

Making an easy pizza crust from scratch is simpler than you might think! I combine 2 cups of flour, 2 ¼ teaspoons of yeast, 1 teaspoon of sugar, and a dash of salt. Then, I mix in warm water and olive oil, kneading until it’s smooth and elastic. After letting it rise for an hour, it’s ready to shape. With endless toppings to choose from, you’ll love creating your perfect pizza masterpiece. Discover fantastic ideas ahead!
History
When I think about the history of pizza crust, it amazes me how this simple dough has traveled through time and cultures, evolving into the beloved staple we enjoy today. The pizza origins can be traced back to ancient civilizations, where flatbreads topped with various ingredients delighted palates. Fast forward to Naples in the 18th century, and you’ll find the first true pizza, a symphony of fresh tomatoes, mozzarella, and basil. However, pizza didn’t stop there. Cultural variations emerged, each region adding its twist—think New York’s thin crust, Chicago’s deep-dish, or even international flavors like Thai or barbecue. This rich tapestry of influences showcases not just a dish, but a story of innovation, creativity, and community.
Recipe
Making your own pizza crust at home can be a fun and rewarding experience. This easy pizza crust recipe is perfect for those who want to skip the store-bought versions and enjoy a fresh, homemade base for their favorite toppings. In just a few simple steps, you will have a delicious crust that can be customized to suit your taste. Whether you prefer a thin, crispy crust or a thicker, chewier base, this recipe will guide you through creating the perfect foundation for your pizza.
Making pizza crust at home is a delightful way to enjoy fresh flavors and customize your favorite toppings.
To get started, gather your ingredients and prepare your workspace. Setting up a clean area will make it easier to mix and knead the dough. The key to a great pizza crust lies in the dough’s texture, which should be smooth and elastic. This recipe guarantees that you achieve that perfect balance, allowing for a delightful crunch when baked. So roll up your sleeves and let’s plunge into making this delicious pizza crust!
Ingredients:
- 2 ¼ teaspoons active dry yeast (1 packet)
- 1 teaspoon sugar
- ¾ cup warm water (about 110°F)
- 2 cups all-purpose flour
- 1 teaspoon salt
- 1 tablespoon olive oil
Instructions:
In a small bowl, combine the warm water, sugar, and yeast; let it sit for about 5 minutes until frothy. In a larger mixing bowl, whisk together the flour and salt. Once the yeast mixture is ready, add it to the flour mixture along with the olive oil. Stir until a dough begins to form, then transfer it to a floured surface and knead for about 5-7 minutes until smooth. Place the dough in a lightly greased bowl, cover it with a damp cloth, and let it rise in a warm place for about 1 hour or until doubled in size.
Extra Tips:
For the best results, be sure to let the dough rise in a warm, draft-free environment. If your kitchen is cold, you can preheat your oven to the lowest setting for a few minutes, then turn it off and place the dough inside to rise. Additionally, when rolling out your dough, use flour to prevent sticking, and don’t be afraid to adjust the thickness according to your personal preference. If you want a crispier crust, bake it for a few extra minutes, and for added flavor, consider brushing the crust with garlic butter or olive oil before adding your toppings. Enjoy your homemade pizza night!
Cooking Steps
Now that we’ve gathered our ingredients, let’s jump into the cooking steps that will bring our pizza crust to life. I’ll guide you through mixing the flour and water, kneading the dough, and letting it rise, all the way to shaping it into perfect rounds. Finally, we’ll top it off with your favorite ingredients, creating a delicious canvas for your culinary creativity!
Step 1. Mix Flour and Water
To create the perfect pizza crust, I start by mixing flour and water in a large bowl. I often experiment with different flour types, like all-purpose or bread flour, to see how each affects my crust’s texture. For the best results, I use warm water, ideally around 110°F, which helps activate the yeast when I add it later. I pour the water slowly into the flour, stirring with a wooden spoon until the mixture begins to come together. The goal is to create a shaggy mass that shows potential for transformation. It’s exciting to feel the blend of ingredients come alive, setting the stage for a delicious crust that’s both crispy and chewy. Now, let’s move on to the next step!
Step 2. Knead the Dough Thoroughly
With the shaggy mass of flour and water ready, it’s time to knead the dough thoroughly. I like to sprinkle a little flour on my countertop to prevent sticking, then I plunge in with my hands. Using various kneading techniques, I push and fold the dough, feeling it transform beneath my palms. It’s all about achieving that perfect dough consistency—smooth, elastic, and just a bit tacky. I keep kneading for about 8 to 10 minutes, letting my excitement build as the dough develops strength. If it feels too sticky, I add a sprinkle of flour; if it’s too dry, a dash of water helps. This step is essential for creating that delightful pizza crust we all crave!
Step 3. Let Dough Rise Briefly
After kneading the dough, I let it rise briefly, which is essential for developing that airy texture in the crust. This step isn’t just a formality; it’s where the magic happens. I cover the dough with a damp cloth and set it in a warm spot, allowing for dough fermentation to kick in. The yeast activation during this time creates carbon dioxide bubbles that give the crust its lift and chewiness. I usually aim for about 30 minutes; it’s just enough time for the dough to puff up without over-proofing. The aroma that fills the kitchen during this stage is simply delightful, hinting at the delicious pizza to come. Trust me, this brief rise makes all the difference!
Step 4. Shape the Dough Into Rounds
Once the dough has risen and puffed up nicely, it’s time to shape it into rounds. I start by gently pressing my fingers into the dough, feeling that perfect dough consistency—soft yet slightly elastic. Using a shaping technique I’ve honed over time, I divide the dough into equal portions. I take each piece and roll it into a ball, tucking the edges under to create a smooth surface. This technique not only gives the dough a lovely round shape but also helps maintain the airiness from the rise. Once I’ve shaped all the portions, I let them rest a bit longer, allowing those lovely gluten strands to relax, ensuring each crust will bake up perfectly golden and delicious.
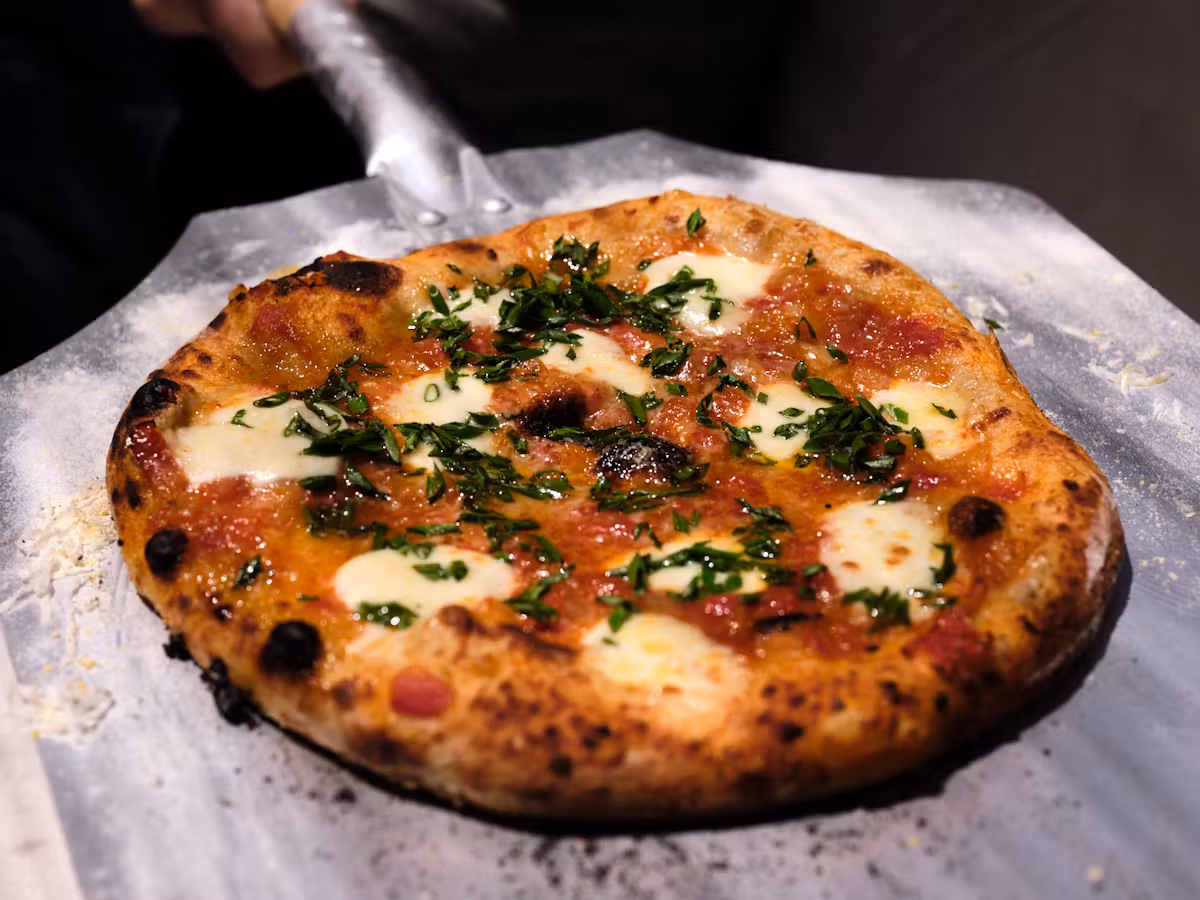
Step 5. Add Toppings of Choice
Now that you’ve got your beautifully shaped rounds, it’s time to release your creativity with toppings! I love experimenting with bold topping combinations that elevate the classic pizza experience. Start with a delicious layer of sauce—tomato or pesto—then layer on your favorite ingredients. Think outside the box—how about roasted vegetables, spicy salami, or even a drizzle of balsamic glaze?
Don’t forget the cheese; a blend of mozzarella and goat cheese creates a delightful creaminess. For an unexpected twist, try adding fresh herbs or arugula after baking. Remember, the magic lies in combining textures and flavors, so let your imagination run wild. Every pizza is a canvas; make yours a masterpiece with the toppings that excite you most!
Nutritional Guide
While crafting the perfect pizza crust, it’s essential to contemplate its nutritional value, especially if you’re aiming for a balanced diet. Understanding the caloric content and ingredient benefits can elevate your pizza experience. Here’s a quick guide to help you make informed choices:
| Ingredient | Caloric Content (per serving) | Benefits |
|---|---|---|
| Whole Wheat | 70 | High in fiber, nutrients |
| Olive Oil | 120 | Heart-healthy fats |
| Yeast | 15 | Rich in B vitamins |
Final Thoughts
Creating the perfect pizza crust is a delightful journey that combines art and science. I’ve found that experimenting with different dough variations can lead to extraordinary results. Whether you prefer a thin, crispy crust or a thick, chewy base, each option opens up exciting possibilities for pizza toppings. I love to get creative, mixing traditional favorites like pepperoni and mushrooms with innovative choices like goat cheese and arugula. The versatility of homemade dough allows you to tailor your crust to match your culinary vision. Remember, the key lies in balance—achieving the right texture while ensuring it complements your toppings. So, roll up your sleeves, embrace the process, and let your creativity shine through every bite of your delicious homemade pizza!
Frequently Asked Questions
Can I Use Gluten-Free Flour for This Pizza Crust?
I often explore gluten-free options and find that using gluten-free flour substitutes works wonders. Just guarantee the blend has xanthan gum for that perfect texture. You’ll love the delicious results!
How Do I Store Leftover Pizza Crust?
Did you know that nearly 40% of pizza goes uneaten? For the best storage, I wrap leftover crust in plastic wrap and place it in an airtight container, ensuring ideal crust preservation for my next meal.
Can I Freeze the Pizza Crust Before Baking?
Absolutely, I can freeze pizza crust before baking! Just wrap it tightly in plastic wrap and foil. For freezing tips, label with the date. When you’re ready, follow my baking advice for the best results!
What Toppings Pair Well With This Crust?
Imagine a vibrant garden; each topping combination brings unique flavors, like sun-ripened tomatoes, aromatic basil, and zesty olives. I love experimenting with unexpected ingredients—try fig and prosciutto or spicy jalapeños for a delicious twist!
How Long Does the Pizza Crust Take to Rise?
When I prepare the dough, the rising time typically takes about an hour. This allows the yeast activation to work its magic, making the crust light and airy—perfect for holding all those delicious toppings!
Conclusion
In summary, making your own pizza crust not only releases your creativity but also connects you to a culinary tradition that dates back thousands of years. Did you know that on average, Americans consume about 23 pounds of pizza each year? That’s a lot of slices! By mastering this easy pizza crust recipe, you’re not just enjoying a delicious meal; you’re also joining a vibrant food culture. So roll up your sleeves and savor the joy of homemade pizza!
Easy Pizza Crust Recipe
Ingredients
Equipment
Method
- In a bowl, dissolve sugar in warm water. Sprinkle yeast over the water, stir gently, and let sit for 5-10 minutes until frothy.
- Add flour, olive oil, and salt to the yeast mixture. Stir until a shaggy dough forms.
- Turn dough onto a floured surface and knead for 5 minutes until smooth and elastic. Add flour as needed to prevent sticking.
- Place dough in a greased bowl, cover with a towel, and let rise for 30 minutes (for a fluffier crust). Skip for a thin crust.
- Preheat oven to 475°F (245°C). Roll or stretch dough into two 12-inch circles on a floured surface or parchment paper.
- Transfer crust to a baking sheet. Pre-bake for 5 minutes, add toppings, then bake for 10-12 minutes until edges are golden.
Notes
- For Crispier Crust: Bake directly on a pizza stone or preheated sheet.
- Gluten-Free Option: Substitute with 1:1 gluten-free flour blend.
- Storage: Freeze unbaked dough for up to 3 months. Thaw before using.