

I’ve discovered that making gluten-free pizza dough can be both simple and delightful! You’ll need just a blend of gluten-free flour, yeast, olive oil, and a few other ingredients. After mixing and letting it rise, roll it out and bake at high temperatures for a crispy crust. It’s perfect for adding all your favorite toppings. If you’re curious about cooking techniques and tasty topping ideas, there’s so much more to explore!
History
When I immerse myself in the history of gluten-free pizza dough, I can’t help but marvel at how this beloved dish evolved to accommodate those with gluten sensitivities. The origins of pizza trace back to ancient civilizations, where flatbreads made from various grains fed communities. As we explored alternatives, ancient grains like quinoa, millet, and buckwheat emerged, transforming traditional recipes into innovative gluten-free options. These grains not only honor pizza’s rich history but also add unique flavors and textures, catering to modern dietary needs. It’s fascinating to see how culinary creativity has embraced these ancient ingredients, ensuring that everyone can enjoy a slice of pizza, regardless of gluten sensitivities. This journey shows how food can adapt and thrive through time.
Recipe
Making gluten-free pizza dough at home is a fantastic way to enjoy a delicious pizza night without worrying about gluten. This recipe is simple and requires minimal ingredients, making it perfect for a quick meal. By using gluten-free flour blends, you can create a dough that is not only tasty but also has a great texture, allowing you to enjoy your favorite toppings without the gluten.
In this recipe, we’ll be using a combination of gluten-free flour, yeast, and essential seasonings to create a dough that rises beautifully and is easy to work with. Whether you’re a seasoned chef or a beginner in the kitchen, this gluten-free pizza dough will elevate your pizza game. Let’s get started!
Ingredients
- 2 cups gluten-free all-purpose flour
- 1 teaspoon instant yeast
- 1 teaspoon salt
- 1 tablespoon olive oil
- 1 teaspoon sugar
- 3/4 cup warm water (110°F)
- 1 teaspoon apple cider vinegar
Cooking Instructions
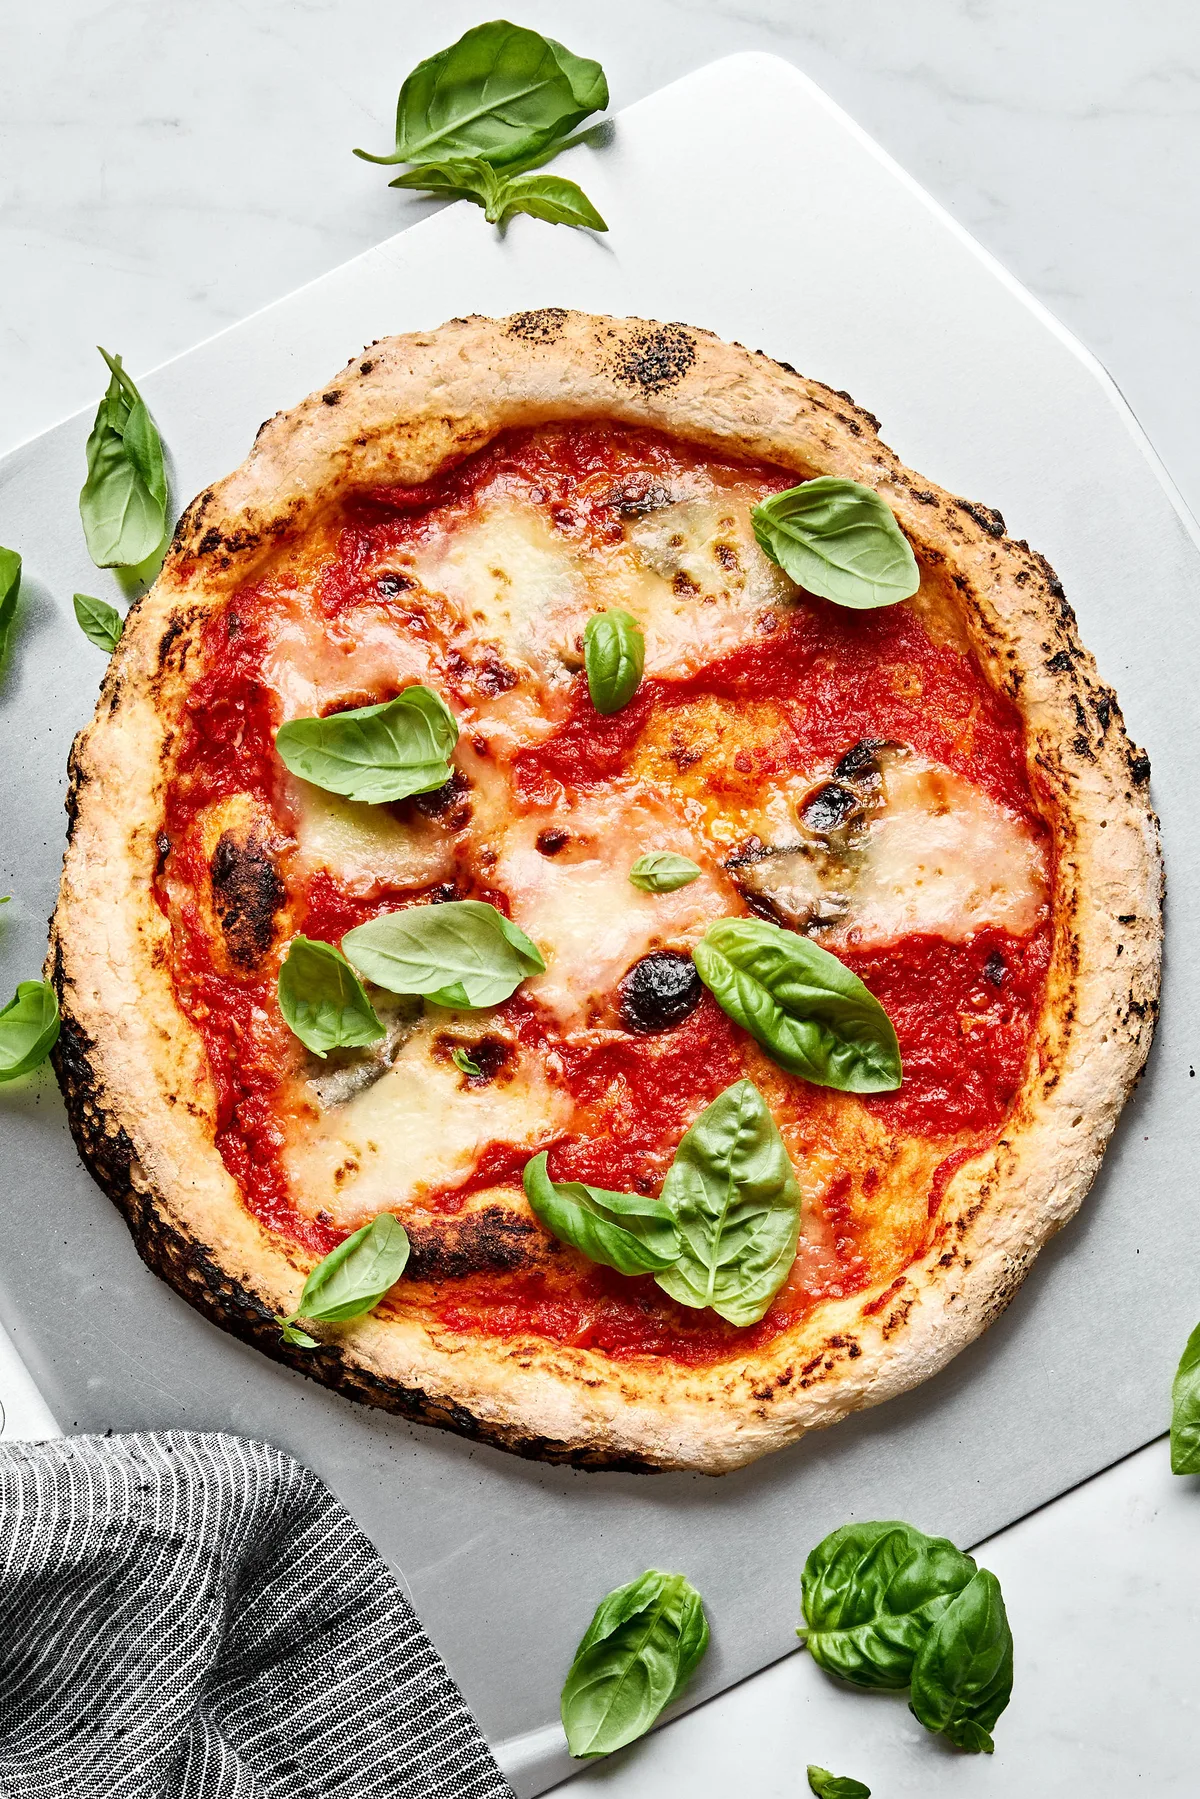
In a large mixing bowl, combine the gluten-free flour, instant yeast, and salt. In a separate bowl, whisk together the warm water, olive oil, sugar, and apple cider vinegar until fully mixed. Gradually add the wet ingredients to the dry ingredients, stirring until a dough forms. Once the dough is well combined, knead it gently on a floured surface for about 2-3 minutes until smooth. Place the dough in a greased bowl, cover it with a clean kitchen towel, and let it rise in a warm place for 30-45 minutes, or until it has doubled in size. After rising, roll out the dough on parchment paper to your desired thickness, add your favorite toppings, and bake in a preheated oven at 475°F for 12-15 minutes or until golden and crispy.
Extra Tips
For the best results, make sure your ingredients are at room temperature before starting, as this helps the yeast activate better. Additionally, using a gluten-free flour blend that includes xanthan gum can improve the texture of your dough. If you prefer a crispy crust, pre-bake the rolled-out dough for 5 minutes before adding toppings. Finally, experiment with different herbs and seasonings in the dough to enhance the flavor; oregano or garlic powder can be excellent additions!
Cooking Steps
Now that we have our ingredients ready, it’s time to bring this gluten-free pizza dough to life. I’ll guide you through each step, from mixing the dry ingredients to shaping the perfect crust. Let’s get started on creating a delicious base for your pizza!
Step 1. Prepare Dry Ingredients Mixture
As I gather my ingredients, I find that preparing the dry ingredients mixture is crucial to achieving the perfect gluten-free pizza dough. First, I choose a blend of flour types, using almond flour for its nutty flavor and tapioca flour for that delightful chewiness. I add a generous pinch of salt to enhance the overall taste. Next, I incorporate gluten substitutes, like xanthan gum, which acts as a binding agent, mimicking the elasticity of traditional dough. To elevate the flavor, I sometimes sprinkle in a bit of garlic powder or Italian herbs. Mixing these ingredients thoroughly guarantees a uniform texture, setting the foundation for my innovative pizza creation. The right combination here truly makes all the difference!
Step 2. Add Wet Ingredients Gradually
Once I’ve got my dry ingredients perfectly blended, I enthusiastically turn my attention to the wet ingredients, knowing that this step is where the magic truly happens. I start by measuring out the liquids with precision, keeping the ingredient ratios in mind. Gradually, I add each wet ingredient to the dry mix, allowing the batter to come together smoothly. This gradual incorporation is essential for achieving the right consistency; too much liquid at once can lead to a sticky mess. I mix carefully, observing how the dough transforms, until I reach that perfect, pliable texture. This meticulous approach not only enhances flavor but also guarantees my gluten-free pizza dough is both innovative and delicious.
Step 3. Knead Dough Until Smooth
With my dough finally coming together, I plunge into the kneading process, which is vital for developing a smooth and elastic texture. I dust my countertop with a hint of gluten-free flour and place the dough in the center. Using my palms, I press down and push the dough away, folding it over itself with each turn. It’s all about mastering those kneading techniques—maintaining a firm but gentle pressure. I can feel the dough texture transforming; it becomes less sticky and more cohesive with each fold. After about 5 to 7 minutes, I can see that beautiful, silky surface forming. This step is essential, as it sets the foundation for a pizza crust that’s both delicious and innovative.
Step 4. Let Dough Rest Briefly
After kneading the dough to perfection, I let it rest for about 10 to 15 minutes. This brief pause is essential for allowing the dough’s texture to relax, making it easier to work with later. During this time, the gluten alternatives in my mix—like almond flour and tapioca starch—have a chance to hydrate fully, creating a more cohesive and supple dough. I often use this moment to gather my toppings, envisioning the mouthwatering pizza to come. Resting also helps develop flavors, enhancing the overall experience. So, don’t rush this important step; it’s all about achieving that ideal balance of elasticity and tenderness, setting the stage for a delightful gluten-free pizza crust.
Step 5. Shape Dough Into Crust
Now that the dough has rested and is ready to go, it’s time to shape it into the perfect crust. This is where you can get creative with various dough shaping techniques that suit your style. Here are three crust thickness options to contemplate:
- Thin Crust: Roll the dough out to about ¼ inch for a crispy finish.
- Regular Crust: Aim for ½ inch; it’s a classic choice that balances chewiness and crispness.
- Thick Crust: For a hearty option, keep the dough at around ¾ inch.
I love experimenting with these thicknesses, as each one brings a different texture and flavor to the pizza. Get ready to create something delicious!
Nutritional Guide
When I whip up gluten-free pizza dough, I always keep in mind the nutritional aspects that make it a satisfying choice. Using alternative flours not only enhances flavor but also boosts nutritional benefits. For instance, almond flour is rich in healthy fats, while chickpea flour adds protein.
Here’s a quick guide to my favorite ingredient substitutions:
| Ingredient | Nutritional Benefits | Substitution Idea |
|---|---|---|
| Almond Flour | High in healthy fats | Coconut Flour |
| Chickpea Flour | Packed with protein | Quinoa Flour |
| Brown Rice Flour | Good source of fiber | Oat Flour |
These choices keep my pizza delicious and nourishing, allowing me to enjoy my favorite dish without compromising on health!
Final Thoughts
Creating gluten-free pizza dough isn’t just about following a recipe; it’s about enjoying a delicious meal that caters to my dietary needs without sacrificing flavor. I love how versatile this dough can be, and with the right approach, it’s easy to elevate my pizza experience. Here are some final thoughts to keep in mind:
- Dough Storage: Store any leftover dough in an airtight container in the fridge for up to 3 days or freeze for later use.
- Topping Suggestions: Experiment with fresh veggies, gourmet cheeses, or even a drizzle of balsamic glaze for a gourmet touch.
- Cooking Techniques: Baking on a preheated stone or skillet gives a delightful crispiness.
With these tips, I’m always ready to create a fantastic gluten-free pizza!
Frequently Asked Questions
Can I Use Almond Flour Instead of Gluten-Free Flour?
Absolutely, I’ve used almond flour as a gluten-free alternative before. Its benefits include healthy fats and a delightful nutty flavor, making it an innovative choice that elevates my dishes while catering to dietary needs.
How Do I Store Leftover Gluten-Free Pizza Dough?
When you’ve got extra dough, treat it like a treasure! For ideal storing, wrap it tightly in plastic, then stash it in the fridge. This way, you guarantee dough longevity for your next culinary adventure.
Is Gluten-Free Pizza Dough Suitable for Freezing?
I love using freezing techniques for dough preservation. Just portion and wrap tightly, then freeze. It’s a fantastic way to guarantee fresh, gluten-free pizza dough is always ready for my next culinary adventure!
What Toppings Pair Best With Gluten-Free Pizza Dough?
You wouldn’t believe how well sweet peppers and goat cheese harmonize! For innovative pizza topping combinations, I love using popular gluten-free ingredients like arugula, balsamic glaze, and roasted garlic to create mouthwatering flavor explosions.
Can I Make Gluten-Free Dough Without Yeast?
I’ve experimented with gluten-free alternatives and discovered yeast-free options like almond flour and baking powder create a delightful texture. It’s exciting to innovate and craft delicious dough that everyone can enjoy, regardless of dietary restrictions!
Conclusion
In the world of gluten-free cooking, this pizza dough recipe truly hits the nail on the head. With its chewy texture and delightful flavor, it’ll make you forget you’re missing out on traditional pizza. So, roll up your sleeves and give it a whirl! Whether it’s a cozy family dinner or a fun gathering with friends, this dough is sure to impress. Trust me, once you try it, you’ll be singing its praises for years to come!
Gluten Free Pizza Dough Recipe
Ingredients
Equipment
Method
- In a small bowl, mix warm water, sugar, and yeast. Let sit for 5-10 minutes until frothy.
- In a large bowl, whisk together gluten-free flour, psyllium husk, and salt.
- Pour the yeast mixture, olive oil, and apple cider vinegar (if using) into the dry ingredients.
- Stir until a sticky dough forms.
- Cover the bowl with a damp towel and let it rest for 30 minutes (this helps the dough thicken).
- Preheat oven to 475°F (245°C) with a pizza stone or baking sheet inside.
- Place the dough on parchment paper and use wet hands or a rolling pin to shape into a 10-12 inch circle.
- Transfer parchment paper with dough onto the hot pizza stone.
- Pre-bake for 5 minutes (to avoid a soggy crust).
- Remove from oven, add sauce and toppings, then bake for 7-10 minutes until crispy.