

I’ve perfected a Pizza Hut-style dough recipe that captures that soft, chewy, and buttery crust we all love. Start by activating active dry yeast in warm water mixed with sugar. Knead the dough until it’s smooth and elastic, then let it rise until doubled in size. Preheat your oven to 475°F, and bake your pizza until golden. Customize your toppings for a personal touch—there’s so much more to explore in the dough-making process!
History
When I think about the history of Pizza Hut, I can’t help but marvel at how a simple idea blossomed into a global phenomenon. The pizza origins trace back to ancient times, but it was in the 1950s that two brothers turned a modest concept into a thriving business. They began experimenting with dough evolution, refining it to achieve that perfect balance between chewiness and crispness. Each iteration aimed to enhance flavor, leading to the iconic pan pizza we recognize today. As they embraced innovation, they introduced a range of toppings that transformed the dining experience. Today, Pizza Hut stands as a symbol of creativity, where each slice tells a story of culinary progress that continues to inspire food lovers worldwide.
Recipe
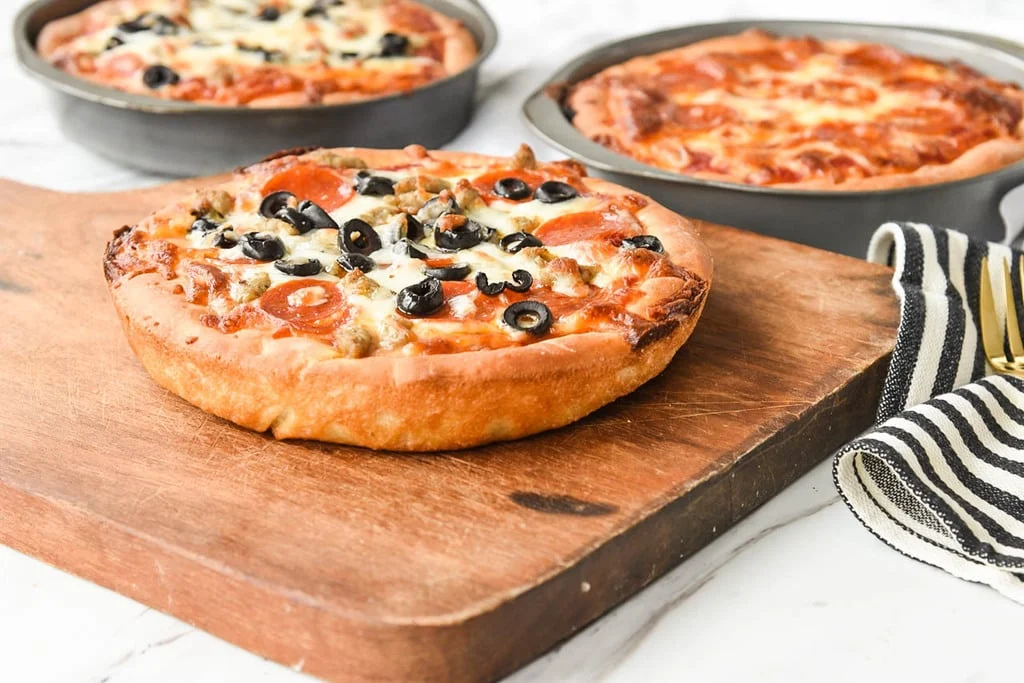
Making Pizza Hut’s iconic dough at home is a delightful way to bring the taste of your favorite pizza restaurant into your kitchen. This recipe will guide you through creating a soft and chewy crust that perfectly holds up under your favorite toppings. With just a few simple ingredients, you can replicate that classic pizza experience to share with family and friends.
Bring the beloved taste of Pizza Hut home with this easy dough recipe for a soft, chewy crust perfect for any toppings.
Before getting started, verify that you have all the necessary ingredients on hand. The process is straightforward, but it does require some patience as the dough needs time to rise. Once you’ve mastered this dough recipe, you’ll find endless possibilities for creating delicious pizzas to suit any occasion.
Ingredients:
- 2 1/4 teaspoons active dry yeast
- 1 1/2 cups warm water (110°F)
- 1 tablespoon sugar
- 3 tablespoons olive oil
- 4 cups all-purpose flour
- 1 teaspoon salt
Instructions:
In a mixing bowl, combine the warm water, sugar, and active dry yeast. Let it sit for about 5-10 minutes until it becomes frothy. Add in the olive oil, salt, and gradually incorporate the flour, mixing until a dough forms. Knead the dough on a floured surface for about 5-7 minutes until it is smooth and elastic. Place the dough in a lightly greased bowl, cover it with a damp cloth, and let it rise in a warm area for about 1 hour, or until it has doubled in size. Once risen, punch down the dough and roll it out to your desired thickness for your pizza.
Extra Tips:
To achieve a crispy crust, consider preheating your oven with a pizza stone inside, which helps to evenly distribute heat. For added flavor, you can brush the rolled-out dough with a little olive oil before adding sauce and toppings. If you’re not using the dough immediately, it can be stored in the refrigerator for up to 2 days or frozen for longer storage—just remember to let it thaw and rise again before using. Enjoy experimenting with different toppings and sauces to create your perfect pizza!
Cooking Steps
To create that perfect Pizza Hut dough, I’ll first activate the yeast mixture, which brings the dough to life. Next, I’ll knead the dough thoroughly to develop its texture, ensuring it’s soft and pliable. After that, I’ll let the dough rise properly, allowing those flavors to deepen before shaping it into balls.
Step 1. Activate Yeast Mixture
Before diving into the dough-making process, it’s vital to activate the yeast mixture properly, as this step guarantees your pizza crust will rise beautifully and develop that signature flavor. Here’s how I do it:
- Combine ingredients: In a bowl, mix warm water (around 110°F), sugar, and yeast. The sugar feeds the yeast, promoting robust yeast activation.
- Let it rest: Allow the mixture to sit for about 5-10 minutes. You’ll notice a frothy layer forming on top, indicating successful fermentation.
- Incorporate into dough: Once activated, gently stir in the yeast mixture with your dry ingredients. This is important for achieving the best dough fermentation and flavor integration.
Step 2. Knead the Dough Thoroughly
Kneading the dough is where the magic happens, transforming a simple mixture into a stretchy, elastic masterpiece. I start by lightly flouring my countertop to prevent sticking, then I turn out the dough and press it with the palms of my hands. Using a folding and pushing technique, I work the dough for about 8-10 minutes. I’m aiming for a smooth, pliable dough consistency that springs back when poked. If it feels too sticky, I sprinkle in a bit more flour—just don’t overdo it! I also enjoy using a bench scraper to help incorporate any stubborn bits. The right kneading techniques not only develop the gluten but also enhance the flavor, setting the stage for a delicious pizza crust.
Step 3. Let Dough Rise Properly
Once I’ve kneaded the dough to perfection, I move on to letting it rise, an essential step that allows the yeast to work its magic. Proper dough fermentation is vital for achieving that light, airy texture we crave in a pizza crust. Here’s how I let it rise using innovative rising techniques:
- Warm Environment: I place the dough in a warm, draft-free area, ideally around 75°F to 80°F, which encourages yeast activity.
- Cover Tightly: I cover the bowl with a damp cloth or plastic wrap, ensuring moisture retention to prevent a dry crust.
- Patience is Key: I let it rise for about 1 to 2 hours, or until it doubles in size, ensuring full flavor development before shaping.
Step 4. Shape the Dough Into Balls
After letting the dough rise and develop its flavor, it’s time to shape it into balls. First, I lightly flour my work surface to prevent sticking. I gently punch down the risen dough, releasing any trapped air, and observe its smooth, elastic dough texture. Next, I divide the dough into equal portions, usually about 4-6 ounces each, depending on my desired pizza size.
For ball formation, I take one portion and tuck the edges toward the center, rotating it to create a tight, smooth surface. I place the formed ball seam-side down on the floured surface. As I repeat this process, I appreciate the anticipation of the flavorful pizza that awaits. Each ball is a promise of deliciousness ahead!
Step 5. Preheat Oven to 475°F
To achieve that perfect, crispy crust, I always preheat my oven to a sizzling 475°F. This step is essential for ideal temperature control, ensuring my pizza cooks evenly and develops that signature flavor. Here’s how I do it:
- Set the oven: Adjust your oven settings to 475°F. Make sure to choose the bake option, not broil.
- Wait patiently: Allow the oven to preheat fully. I usually give it about 15-20 minutes to reach the desired temperature.
- Check with an oven thermometer: If you have one, double-check that the internal temperature is spot on for precise baking.
Nutritional Guide
While crafting the perfect Pizza Hut-style dough, it’s essential to take into account the nutritional aspects that come with it. Understanding the caloric content and ingredient benefits can enhance your culinary experience while keeping your health in mind.
Here’s a quick breakdown of the nutritional information:
| Ingredient | Caloric Content (per serving) | Ingredient Benefits |
|---|---|---|
| All-purpose flour | 100 | Provides structure and chewiness |
| Yeast | 5 | Aids in rising and fermentation |
| Salt | 0 | Enhances flavor and texture |
| Sugar | 16 | Promotes browning and adds sweetness |
Incorporating these ingredients wisely can lead to a delicious, flavorful pizza dough that aligns with your dietary goals. So let’s innovate while enjoying every bite!
Final Thoughts
Crafting Pizza Hut-style dough isn’t just about following a recipe; it’s about embracing the flavors and textures that make each bite memorable. To elevate your pizza experience and cater to diverse pizza preferences, consider these dough variations:
- Classic Pan Dough: Perfect for that buttery, thick crust.
- Thin Crust Option: For those who enjoy a crispy, lighter bite.
- Whole Wheat Dough: A healthier alternative that doesn’t compromise on flavor.
Experimenting with these variations can transform your homemade pizza into a delightful culinary adventure. Remember, the key lies in precision with ingredients and technique. Enjoy the process, and let your creativity shine as you customize your dough to match your favorite toppings and styles. Happy baking!
Frequently Asked Questions
Can I Use Whole Wheat Flour Instead of All-Purpose Flour?
I’ve tried using whole wheat flour instead of all-purpose, and it adds great flavor and health benefits. Just remember, the texture changes, so you might need to adjust the liquid for the best results.
How Long Does the Dough Need to Rise?
When I watch pizza dough rise, it’s like a balloon slowly inflating. Generally, I let it rise for about one to two hours, until it doubles in size, yielding a deliciously airy crust.
Can I Freeze the Pizza Dough for Later Use?
Absolutely, I freeze my dough for later use! Just wrap it tightly in plastic, label it with the date, and store it in an airtight container. This way, I maintain flavor and texture when I thaw it.
What Substitutes Can I Use for Yeast?
If you’re out of yeast, consider using baking powder alternatives or sourdough starters. They can elevate your dough with unique flavors and textures, creating an innovative twist on traditional recipes that’ll impress your taste buds.
How Can I Make the Dough Gluten-Free?
To make gluten-free dough, I mix almond flour and tapioca starch for the best dough texture. Adding a bit of xanthan gum enhances elasticity, while ensuring the flavor remains rich and satisfying. You’ll love the results!
Conclusion
As I pull the golden, bubbling pizza from the oven, the aroma of fresh dough and melted cheese fills the air, wrapping around me like a warm embrace. Each slice, with its perfectly crispy edges and soft, chewy center, transports me back to cozy family nights. This dough recipe isn’t just about ingredients; it’s a gateway to delicious memories. So, roll up your sleeves, savor the process, and let your kitchen become a haven of flavor and joy.
Pizza Hut Dough Recipe
Ingredients
Equipment
Method
- Dissolve sugar in warm water, sprinkle yeast, and let sit until frothy (~5–10 minutes). Skip if using instant yeast.
- In a mixer bowl, combine flour, salt, yeast (instant), sugar, olive oil, and water. Mix on low until a shaggy dough forms (~2 minutes).
- Increase speed to medium and knead for 5–7 minutes until smooth and elastic. (Or knead by hand for 10 minutes.)
- Place dough in a greased bowl, cover with plastic wrap, and let rise in a warm place until doubled (~1.5–2 hours).
- Punch down dough, divide into 2 balls, and place in greased pizza pans. Press to edges, cover, and rest for 30 minutes.
- Preheat oven to 475°F (245°C). Press dough to edges again, add toppings, and bake for 15–20 minutes until golden.
- Brush crust with melted butter (optional) for authentic Pizza Hut flavor. Slice and serve hot!
Notes
- For Crispy Crust: Preheat pizza pan before adding dough.
- Make Ahead: Refrigerate dough after first rise (up to 24 hours) for deeper flavor.
- Gluten-Free: Substitute with GF flour blend + xanthan gum.