

I’ve created a delicious soup in a jar recipe that’s perfect for sharing with friends or family. Layer dried lentils, dehydrated vegetables like carrots and celery, and your favorite seasonings in a pretty jar. When you’re ready to enjoy it, just add broth and simmer until everything’s tender. It’s a heartwarming gift that combines convenience and nutrition. Stick around, and I’ll share more tips on making this delightful gift even more special!
History
When I think about the history of soup in a jar, I can’t help but marvel at how this simple concept has evolved over time. Ancient soups, often crafted from foraged ingredients, laid the groundwork for our culinary adventures today. These hearty concoctions were pivotal for nourishment, especially when preservation methods like drying and salting became essential for survival. Fast forward to today, and we’ve transformed those age-old practices into something innovative and convenient. Soup in a jar not only pays homage to our ancestors’ resourcefulness but also allows us to embrace modern flavors and creativity. It’s fascinating how a humble jar can encapsulate centuries of tradition while inviting us to experiment with our own recipes.
Recipe
Soup in a Jar is a delightful and convenient way to enjoy homemade soup without the hassle of preparation each time you crave it. This recipe allows you to layer dried ingredients in a jar, creating a beautiful presentation that also serves as a perfect gift or a meal prep solution. Simply add water or broth when you’re ready to eat, and you’ll have a delicious, hearty soup ready in no time. It’s a fantastic way to incorporate your favorite vegetables, grains, and spices, guaranteeing that every spoonful is packed with flavor.
To make this soup versatile, feel free to customize the ingredients based on your personal preferences or dietary needs. You can opt for gluten-free grains, low-sodium broth, or even add in your favorite proteins like beans or lentils. This recipe is not only easy to make but also encourages creativity in the kitchen, allowing you to experiment with different flavors and textures. Gather your ingredients, and let’s get started on creating your very own Soup in a Jar!
Ingredients:
- 1 cup dried lentils or beans
- 1/2 cup diced carrots (dehydrated)
- 1/2 cup diced celery (dehydrated)
- 1/2 cup diced onions (dehydrated)
- 1/4 cup corn kernels (dehydrated)
- 1 teaspoon garlic powder
- 1 teaspoon dried thyme
- 1 teaspoon dried basil
- 1 teaspoon salt (or to taste)
- 1/2 teaspoon black pepper
- 6 cups vegetable or chicken broth (for cooking)
Instructions:
To prepare the Soup in a Jar, start by layering the dried ingredients in a quart-sized jar. Begin with the lentils or beans at the bottom, followed by the dehydrated carrots, celery, and onions. Next, add the corn, and sprinkle the garlic powder, thyme, basil, salt, and pepper on top. Seal the jar tightly and store it in a cool, dry place until you are ready to make your soup. When you’re ready to cook, pour the contents of the jar into a large pot, add 6 cups of broth, and bring it to a boil. Reduce the heat, cover, and simmer for about 30-40 minutes or until the lentils are tender. Serve hot and enjoy!
Extra Tips:
When preparing Soup in a Jar, confirm that all dried ingredients are completely dehydrated to prevent spoilage. You can also experiment with different spice combinations or add a bay leaf for added flavor. If you prefer a creamier soup, consider adding a splash of heavy cream or coconut milk during the final few minutes of cooking. For those looking to make a quicker version, you can use canned beans instead of dried, reducing the cooking time considerably. Remember to adjust the liquid and seasoning accordingly to maintain a balanced flavor!
Cooking Steps
As I prepare to make my soup in a jar, I focus on measuring the dry ingredients carefully to guarantee every bite is flavorful. I love adding my seasoning blends at this stage, as it allows the spices to mingle perfectly with the other ingredients. Once everything’s combined thoroughly, I layer it neatly in the jar and seal it tightly, ready for a cozy meal later on.
Step 1. Measure Dry Ingredients Carefully
To create a flavorful soup in a jar, measuring dry ingredients carefully is essential. I’ve discovered that ingredient accuracy can make or break your soup. Here’s how I guarantee precision in my measurements:
- Use the right measuring tools: Opt for dry measuring cups and spoons for accurate quantities.
- Level off ingredients: After filling your measuring cup, use a straight edge to level off the top, making sure you don’t pack in extra.
- Weigh ingredients when possible: Using a kitchen scale can provide even greater accuracy, especially for bulk items.
- Double-check your measurements: It doesn’t hurt to verify, as a small mistake can lead to an unbalanced flavor profile.
Step 2. Add Seasoning Blends Now
With your dry ingredients measured and ready, it’s time to elevate your soup with the right seasoning blends. I love exploring various seasoning options that can transform a simple mix into a culinary masterpiece. Think about the flavor profiles you want to create—perhaps a robust Italian blend with oregano and basil, or a spicy kick with chili flakes and cumin. Don’t shy away from experimenting; a pinch of smoked paprika can add depth, while a sprinkle of thyme brings warmth. Remember, the key is balance—selecting the right combinations can highlight the natural flavors of your ingredients. By thoughtfully adding these seasoning blends, I guarantee my soup in a jar becomes a delightful gift, bursting with personality and taste.
Step 3. Combine Ingredients Thoroughly
Once you’ve chosen your seasoning blends, it’s time to combine the ingredients thoroughly for a harmonious mix. This step is essential, as the right mixing techniques can elevate your soup’s flavor profile. I recommend following these easy steps:
- Gather your dry ingredients – Verify you have everything measured accurately based on your ingredient ratios.
- Use a large bowl – This provides ample space for mixing without spilling.
- Blend gently – Incorporate the ingredients using a whisk or spatula to avoid breaking down any delicate components.
- Taste as you go – Adjust seasoning if needed; trust your palate to guide you.
Step 4. Layer in Jar Neatly
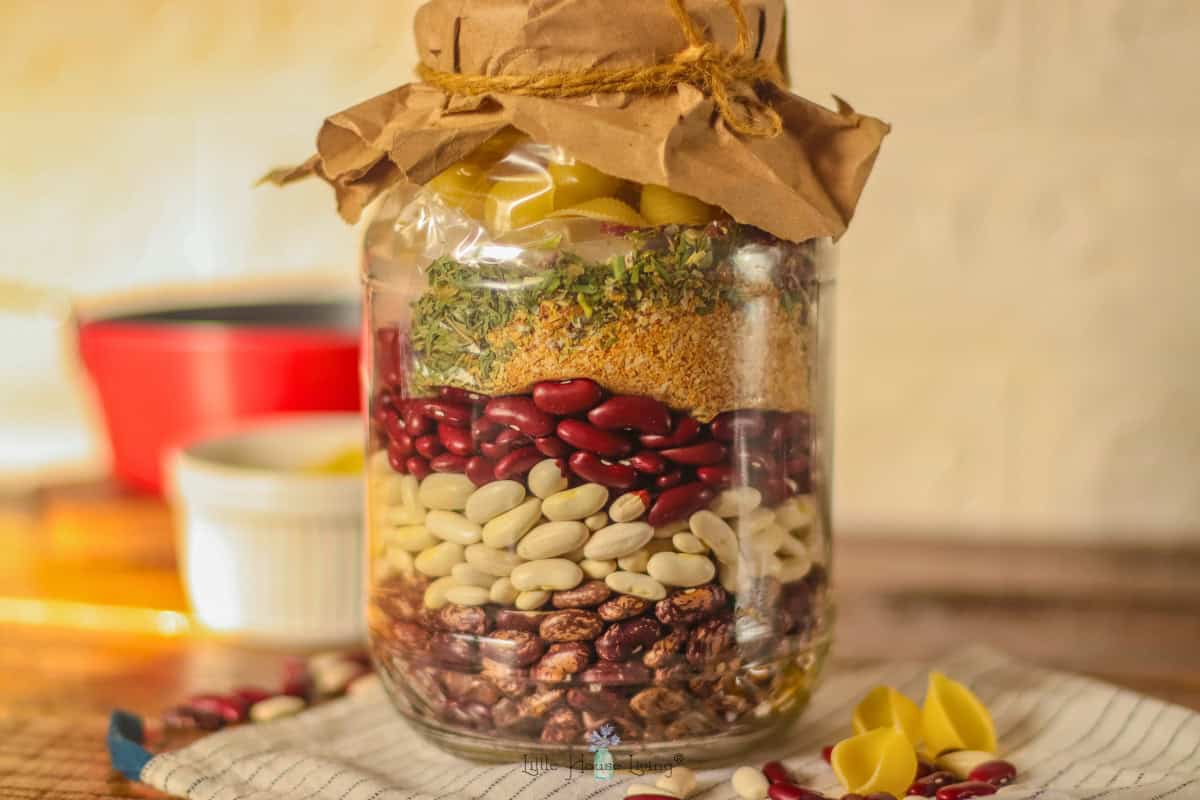
As I carefully layer the ingredients into the jar, I make certain each component is visible and well-distributed for an appealing presentation. The vibrant ingredient colors create a stunning visual effect, transforming the jar into a work of art. I start with hearty beans at the bottom, followed by bright yellow corn, and then sprinkle in rich green herbs. Each layer adds depth, enhancing the jar aesthetics that catch the eye. I also use contrasting textures, like crunchy noodles and silky spices, to make it even more inviting. By taking my time to layer neatly, I make certain that when opened, the mix looks as good as it tastes—an innovative gift that’s both beautiful and delicious!
Step 5. Seal Jar Tightly
After layering the ingredients, I quickly grab the lid to seal the jar tightly, ensuring everything stays fresh and flavorful. This step is essential for effective jar preservation, as it prevents moisture and air from compromising my mix. Here’s how I achieve airtight sealing:
- Choose the Right Lid: Make sure it fits snugly and is free of any damage.
- Check the Seal: Press down in the center of the lid; it should pop back up slightly.
- Store Properly: Keep the jar in a cool, dark place to enhance longevity.
- Label Clearly: Write the date and contents on a label for easy reference.
Nutritional Guide
When I think of a comforting bowl of soup, I can’t help but appreciate the nutritional benefits packed into each jar. Each ingredient is selected not just for taste but for its unique contribution to our health. The caloric content varies, but the benefits are undeniable.
Here’s a quick look at some key ingredients and their benefits:
| Ingredient | Benefits |
|---|---|
| Lentils | High in protein and fiber |
| Carrots | Rich in vitamins and antioxidants |
| Onions | Supports heart health |
| Spinach | Packed with iron and calcium |
Final Thoughts
While preparing soup in a jar might seem simple, the experience can be incredibly rewarding. Not only do you create a delicious meal, but you also craft a thoughtful gift that delights the recipient. To elevate your gift presentation, consider these four tips:
- Select a Theme: Choose a flavor profile that reflects the season or the recipient’s preferences.
- Layer Thoughtfully: Arrange ingredients in a visually appealing way, showcasing vibrant colors and textures.
- Personalize the Jar: Use jar decoration like ribbons or custom labels to add a personal touch.
- Include Instructions: Attach a beautifully designed card with preparation instructions, enhancing the gift’s value.
With these ideas, your soup in a jar will not only nourish but also impress!
Frequently Asked Questions
What Types of Jars Are Best for Soup Mixes?
When I choose jars for soup mixes, I love using mason jars or other glass containers. They’re not only stylish but also preserve freshness, making my mixes look inviting and taste delicious when prepared.
How Long Do Dry Soup Mixes Last?
I’ve found that dry soup mixes typically last about one to two years when stored properly. For ideal shelf life, keep them in a cool, dark place and use airtight containers to maintain freshness.
Can I Customize the Recipes for Dietary Restrictions?
I love customizing recipes to suit dietary restrictions. For vegan options, I swap out dairy and use plant-based ingredients. For gluten-free alternatives, I choose certified gluten-free grains and legumes for delicious, inclusive flavors.
What Are Some Creative Ways to Decorate the Jars?
I love getting creative with jar embellishments! You can use twine, fabric, or washi tape for a rustic touch. For label designs, consider vibrant colors or hand-lettered fonts to make each jar truly unique and eye-catching.
How Should the Soup Mixes Be Stored?
Ever wondered how to keep your creations fresh? I prioritize soup preservation techniques and use airtight jar sealing methods, ensuring my mixes stay flavorful and vibrant, ready to delight anyone who opens them.
Conclusion
As I wrap up this journey into the world of soup in a jar, I can’t help but think of each jar as a little treasure chest, waiting to be opened and savored. Whether you’re gifting it or keeping it for yourself, these dry mixes offer warmth and comfort, like a cozy blanket on a chilly day. So go ahead, share the love of homemade soup; it’s a simple yet heartfelt way to nourish both body and soul.
Soup in a Jar Recipe Dry Mixes Gift
Ingredients
Equipment
Method
- Layer Ingredients: In a clean 1-quart jar, add ingredients in the order listed, packing each layer tightly.
- Seal & Decorate: Secure the lid, attach a gift tag with cooking instructions (below), and decorate with twine or fabric.
- Empty jar into a pot with 6 cups water or broth.
- Bring to a boil, then simmer 20-25 mins until lentils/rice are tender.
- Stir in 1 tbsp olive oil and fresh herbs (optional). Serve hot!
Notes
- Customize: Swap rice for quinoa or add dried mushrooms for umami.
- Storage: Keeps 6+ months in a cool, dark place.
- Allergy-Friendly: Use gluten-free bouillon if needed.