

If you’re looking for Christmas dinner recipes that even picky eaters will love, I’ve got a great list for you! Fun dishes like Cheesy Christmas Tree Pizza and Festive Chicken Tenders make mealtime enjoyable. Don’t forget Holiday Mac and Cheese and Sweet Potato Casserole for a creamy twist. Mini Meatloaf Muffins and Garlic Butter Pasta are also big hits. Try Potato Wedges with holiday spices for a side, and end with Chocolate Peppermint Brownies for dessert. Stick around to discover more tasty options!
Cheesy Christmas Tree Pizza

Get ready to celebrate the holiday season with a fun and festive twist on a classic favorite! This Cheesy Christmas Tree Pizza is not only a delicious meal but also a creative activity for kids to get involved in the kitchen. Shaped like a Christmas tree, this pizza is perfect for holiday gatherings or a cozy family dinner. With gooey cheese, vibrant toppings, and a sprinkle of holiday spirit, this dish will surely bring smiles and joy to your table.
Making this pizza is a great way to encourage children to explore their culinary skills while also enjoying the delicious results. You can involve them in every step, from rolling out the dough to decorating the pizza with their favorite toppings. Plus, this recipe is versatile! Feel free to customize it with different sauces, cheeses, and toppings according to your family’s preferences. Let’s get started on creating this festive masterpiece!
Get your kids involved in the kitchen with this fun and customizable Cheesy Christmas Tree Pizza recipe!
Ingredients:
- 1 pre-made pizza dough
- 1 cup pizza sauce
- 2 cups shredded mozzarella cheese
- 1/2 cup sliced bell peppers (red and green)
- 1/2 cup sliced black olives
- 1/4 cup grated Parmesan cheese
- Olive oil (for brushing)
- Italian seasoning (optional)
- Fresh basil or spinach (for garnish)
Cooking Instructions:
Preheat your oven to 450°F (230°C). Roll out the pizza dough on a floured surface into a triangle shape to resemble a Christmas tree. Transfer the dough to a baking sheet lined with parchment paper. Spread a layer of pizza sauce over the dough, leaving a small border around the edges. Sprinkle the shredded mozzarella cheese generously on top, and then arrange the sliced bell peppers and olives to create ornaments and garlands on the tree. Finally, sprinkle grated Parmesan cheese over the entire pizza, brush the edges with olive oil, and add Italian seasoning for extra flavor. Bake in the preheated oven for 12-15 minutes, or until the cheese is bubbly and the crust is golden brown.
Extra Tips:
When making Cheesy Christmas Tree Pizza, let your kids get creative with the toppings! You can use different shapes of vegetables or even cut out toppings using cookie cutters for added fun. If you’re short on time, premade pizza dough and sauce work perfectly. Additionally, consider using a baking stone for a crispier crust. For a healthier version, try using whole wheat dough and adding more veggies. And don’t forget to let the pizza cool slightly before slicing to avoid burning little hands! Enjoy this delightful dish as a festive treat this holiday season!
Festive Chicken Tenders

Christmas dinner doesn’t have to be all about heavy dishes and complicated recipes, especially when cooking for kids. These festive chicken tenders are not only fun to make but also delicious and appealing to even the pickiest eaters. With a crispy coating and a hint of festive spices, these tenders are perfect for little hands and will brighten up your holiday table. Plus, they can be easily paired with a variety of dipping sauces, making them a versatile dish that kids will love.
Making chicken tenders is a great way to involve your little chefs in the kitchen. They can help with the breading process, and you can even let them choose their favorite seasonings to add a personal touch. This recipe is simple enough for children to participate in, and it’s a fantastic way to create lasting memories while preparing for the holiday feast. Serve these tasty tenders with some holiday-themed sides, and you’ll have a meal that’s sure to please the entire family.
Ingredients:
- 1 pound of chicken breast tenders
- 1 cup of all-purpose flour
- 2 eggs, beaten
- 1 cup of breadcrumbs (Panko or regular)
- 1 teaspoon paprika
- 1 teaspoon garlic powder
- 1 teaspoon onion powder
- 1 teaspoon dried parsley
- Salt and pepper to taste
- Cooking oil (for frying or baking)
Cooking Instructions:
Start by prepping your chicken tenders by patting them dry with paper towels. In one bowl, mix the flour with salt, pepper, paprika, garlic powder, onion powder, and parsley. In a second bowl, beat the eggs. In a third bowl, place the breadcrumbs. Dip each chicken tender first into the flour mixture, then into the beaten eggs, and finally coat with breadcrumbs. For a healthier option, you can place the coated tenders on a baking sheet and spray lightly with cooking oil before baking at 400°F for 20–25 minutes, or until golden brown. If frying, heat oil in a pan over medium heat and cook the tenders for about 5-7 minutes on each side, until they are crispy and cooked through.
Extra Tips:
When preparing festive chicken tenders, feel free to experiment with different seasonings or even add some grated Parmesan cheese to the breadcrumb mixture for an extra flavor boost. If you’re making a large batch, consider freezing a portion of the uncooked, breaded tenders for a quick meal later. Just remember to adjust the cooking time if they are frozen; they may need a few extra minutes. Also, serve with a variety of dipping sauces like honey mustard, barbecue, or ranch to make the meal even more fun and interactive for the kids!
Holiday Mac and Cheese
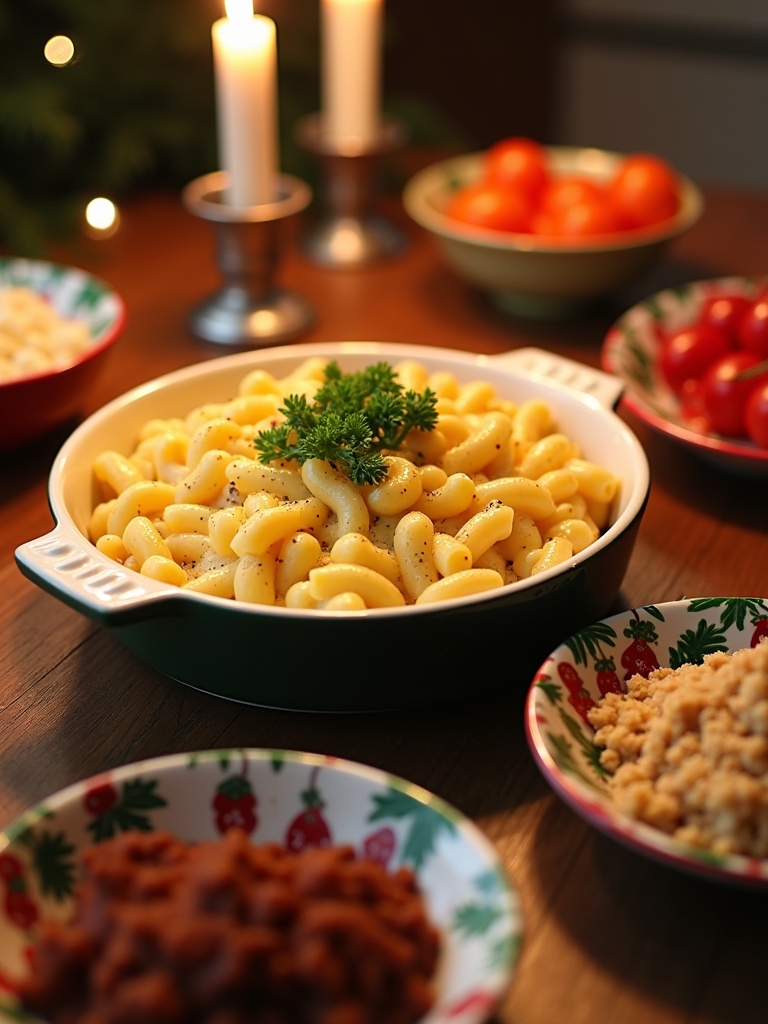
Holiday Mac and Cheese is a festive twist on a classic favorite that kids will adore! This creamy, cheesy dish is perfect for holiday gatherings and can be customized with seasonal ingredients to make it extra special. With the addition of colorful veggies and a sprinkle of breadcrumbs on top, this mac and cheese not only tastes great but also looks delightful on the dinner table, making it a hit with both kids and adults alike.
Making Holiday Mac and Cheese is a fun and straightforward process, perfect for young chefs looking to pitch in during holiday preparations. It’s a chance to get creative in the kitchen, allowing kids to help with mixing, measuring, and even choosing their favorite add-ins. Serve it alongside the traditional turkey or ham, or enjoy it as a hearty main dish—this mac and cheese will warm everyone’s hearts and bellies this holiday season!
Ingredients:
- 1 lb elbow macaroni
- 4 cups shredded sharp cheddar cheese
- 2 cups milk
- 1/4 cup unsalted butter
- 1/4 cup all-purpose flour
- 1 tsp garlic powder
- 1 tsp onion powder
- 1/2 tsp salt
- 1/4 tsp black pepper
- 1/2 cup breadcrumbs
- 1/2 cup frozen peas (optional)
- 1/2 cup cooked and crumbled bacon (optional)
- 1/2 cup diced red bell pepper (optional)
In a large pot, cook the elbow macaroni according to package instructions until al dente, then drain and set aside. In the same pot, melt the butter over medium heat, then whisk in the flour to make a roux. Gradually add in the milk, stirring continuously until the mixture thickens. Lower the heat and stir in the shredded cheese, garlic powder, onion powder, salt, and pepper until the cheese is fully melted and smooth. Fold in the cooked macaroni and any optional ingredients like peas, bacon, or bell pepper. Transfer the mixture to a greased baking dish and top with breadcrumbs. Bake at 350°F for about 20 minutes, or until the top is golden and bubbly.
For an even creamier mac and cheese, consider adding a splash of cream cheese or sour cream to the cheese sauce. You can also experiment with different types of cheese, such as mozzarella or gouda, for a unique flavor. To make it more festive, try incorporating seasonal ingredients like sautéed broccoli or roasted butternut squash. Finally, if your kids enjoy a bit of crunch, feel free to mix in some crushed potato chips or panko breadcrumbs before baking for an added texture. Enjoy your festive cooking!
Sweet Potato Casserole

Sweet Potato Casserole is a delightful dish that can add a touch of warmth and sweetness to your Christmas dinner table. This recipe is perfect for kids, as it combines the natural sweetness of sweet potatoes with a crunchy topping that makes it fun and appealing. Not only is it a tasty side dish, but it also provides a great opportunity to involve your little ones in the kitchen, letting them mash the sweet potatoes and sprinkle the topping.
Preparing Sweet Potato Casserole is a great way to introduce children to cooking. The vibrant orange color of the sweet potatoes is sure to catch their eye, and as they help mix the ingredients, they’ll be learning valuable culinary skills. This dish is not only delicious but also packed with nutrients, making it a healthier option compared to other side dishes typically served at holiday dinners.
Preparing Sweet Potato Casserole introduces kids to cooking while teaching them valuable skills with a fun and nutritious dish.
Ingredients:
- 4 cups cooked and mashed sweet potatoes
- 1/2 cup brown sugar
- 1/4 cup milk
- 1/4 cup melted butter
- 1 teaspoon vanilla extract
- 1/2 teaspoon salt
- 1/2 teaspoon cinnamon
- 1/2 cup pecans, chopped
- 1/2 cup mini marshmallows (optional)
Cooking Instructions:
Preheat your oven to 350°F (175°C). In a large mixing bowl, combine the cooked and mashed sweet potatoes, brown sugar, milk, melted butter, vanilla extract, salt, and cinnamon. Mix until the ingredients are well blended and smooth. Transfer the sweet potato mixture into a greased baking dish, spreading it evenly. For the topping, sprinkle the chopped pecans over the sweet potato mixture, and if desired, add mini marshmallows on top. Bake in the preheated oven for about 25-30 minutes, or until the casserole is heated through and the marshmallows are golden brown.
Extra Tips:
When preparing Sweet Potato Casserole, consider using freshly cooked sweet potatoes for the best flavor and texture. You can also make this dish ahead of time and store it in the refrigerator until you’re ready to bake it. Just cover it tightly with foil to avoid drying out. Feel free to customize the topping—if your kids love crunchy textures, you can replace pecans with crushed graham crackers or even oats for a different twist. Finally, don’t hesitate to let your kids experiment with the spices; a pinch of nutmeg or ginger can add a unique flavor profile.
Mini Meatloaf Muffins
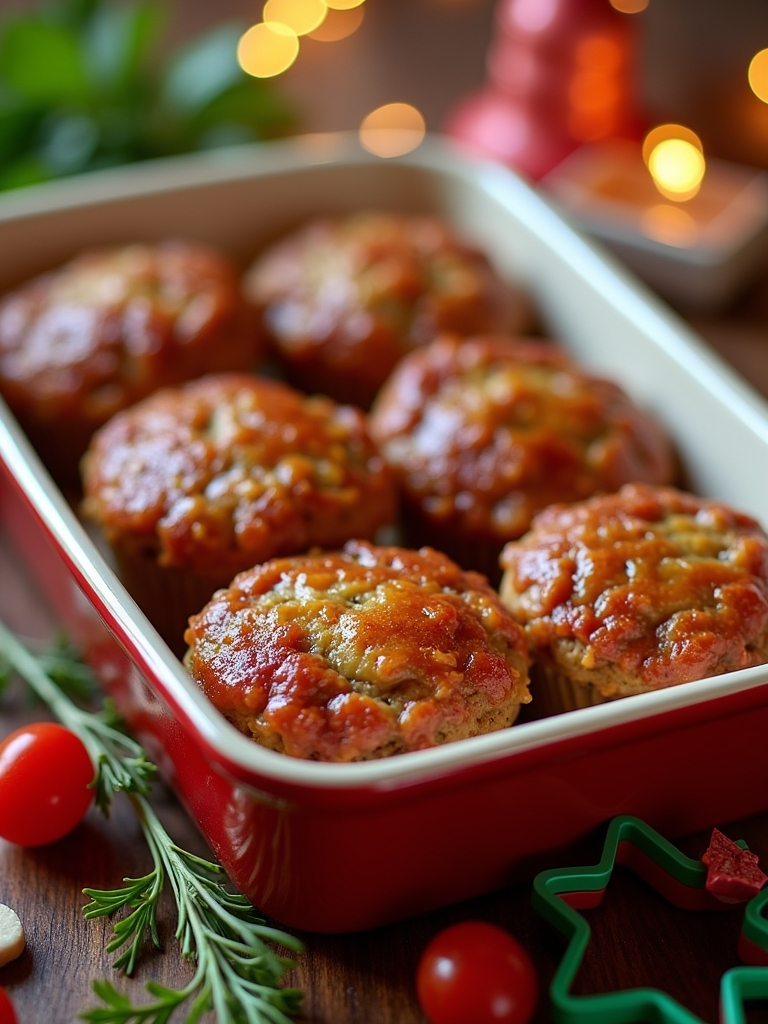
Mini Meatloaf Muffins are a fun and festive twist on the traditional meatloaf, making them perfect for a Christmas dinner that kids will love. These bite-sized delights are not only adorable but also easy for little hands to help prepare. With a mix of ground meat, breadcrumbs, and a variety of tasty seasonings, these muffins are packed with flavor and can be customized to suit your family’s preferences. Plus, they bake up quickly, allowing you to spend more time enjoying the holiday festivities with loved ones.
To make Mini Meatloaf Muffins even more kid-friendly, you can involve your little chefs in the kitchen. They can help mix the ingredients, fill the muffin tins, and even decorate the tops with ketchup or barbecue sauce for an extra touch of fun. These muffins can be served with a side of mashed potatoes or a fresh salad, making for a complete meal that will please both kids and adults alike.
Ingredients:
- 1 pound ground beef or turkey
- 1 cup breadcrumbs
- 1/2 cup grated Parmesan cheese
- 1/2 cup chopped onion
- 1/4 cup chopped bell pepper
- 1/4 cup milk
- 1 large egg
- 2 tablespoons ketchup (plus extra for topping)
- 1 teaspoon garlic powder
- 1 teaspoon salt
- 1/2 teaspoon pepper
- 1/2 teaspoon Italian seasoning
Cooking Instructions:
Preheat your oven to 350°F (175°C) and grease a muffin tin. In a large mixing bowl, combine the ground meat, breadcrumbs, Parmesan cheese, onion, bell pepper, milk, egg, ketchup, garlic powder, salt, pepper, and Italian seasoning. Mix well until all ingredients are fully incorporated. Scoop the mixture into the prepared muffin tin, filling each cup about three-quarters full. Top each muffin with a little extra ketchup if desired. Bake for 20-25 minutes, or until the meat is cooked through and the tops are golden brown.
Extra Tips:
For added flavor and moisture, consider mixing in some finely chopped vegetables like carrots or zucchini, which can be a sneaky way to incorporate more nutrition into the dish. You can also experiment with different types of meat or seasonings to suit your family’s taste. If you have leftovers, these mini meatloaf muffins can easily be stored in the refrigerator and reheated for quick lunches or dinners throughout the week. Enjoy the festive cooking experience with your kids and make lasting holiday memories!
Colorful Veggie Platter With Dip
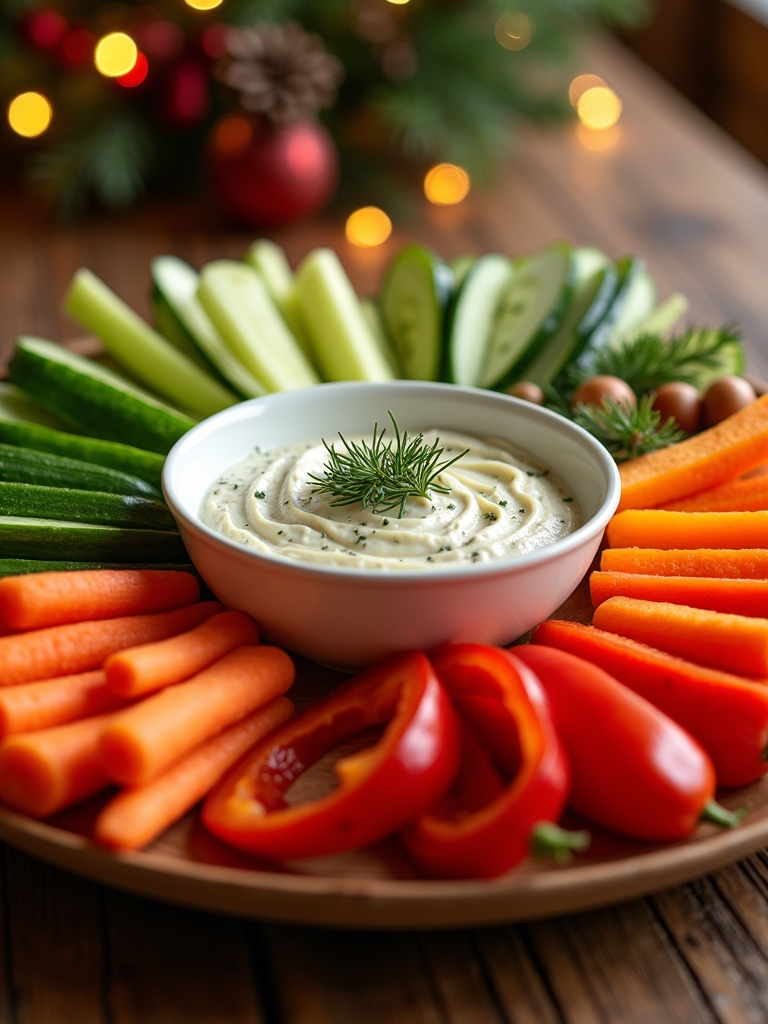
Creating a colorful veggie platter with dip is a delightful way to engage kids in the kitchen while promoting healthy eating habits during the festive season. This dish is not only visually appealing but also offers a variety of crunchy textures and flavors that children will enjoy. Involving kids in the preparation of the veggie platter can spark their creativity as they choose colorful vegetables and arrange them in fun patterns, making it an exciting and interactive experience.
To make the veggie platter even more enticing, pair it with a delicious dip that complements the freshness of the vegetables. A simple yogurt or hummus-based dip can be made in just a few minutes, adding a creamy element that enhances the overall taste. This colorful veggie platter with dip is perfect for holiday gatherings, allowing kids to munch healthily while they enjoy the festivities with family and friends.
Ingredients:
- 1 cup cherry tomatoes
- 1 cup cucumber sticks
- 1 cup bell pepper strips (red, yellow, and green)
- 1 cup baby carrots
- 1 cup celery sticks
- 1 cup broccoli florets
- 1 cup cauliflower florets
- 1 cup ranch dressing or hummus for dipping
Instructions:
Begin by washing all the vegetables thoroughly and drying them with a clean kitchen towel. Next, cut the cucumbers into sticks, slice the bell peppers into strips, and chop the broccoli and cauliflower into bite-sized florets. Arrange the vegetables in a circular or rainbow pattern on a large platter, grouping similar colors together for a vibrant display. Place a small bowl in the center of the platter and fill it with your chosen dip, whether it’s ranch dressing or hummus.
Extra Tips:
When preparing your colorful veggie platter, feel free to get creative with the arrangement to make it more visually appealing. You can even use cookie cutters to create fun shapes with some of the vegetables, like stars or hearts, to further entice young eaters. Additionally, consider involving the kids in choosing the vegetables to include; this can help them develop a personal connection to healthy foods. If you have leftover veggies, they can be stored in airtight containers for snacking later, helping to reduce waste and encourage healthy snacking habits.
Cranberry-Glazed Meatballs
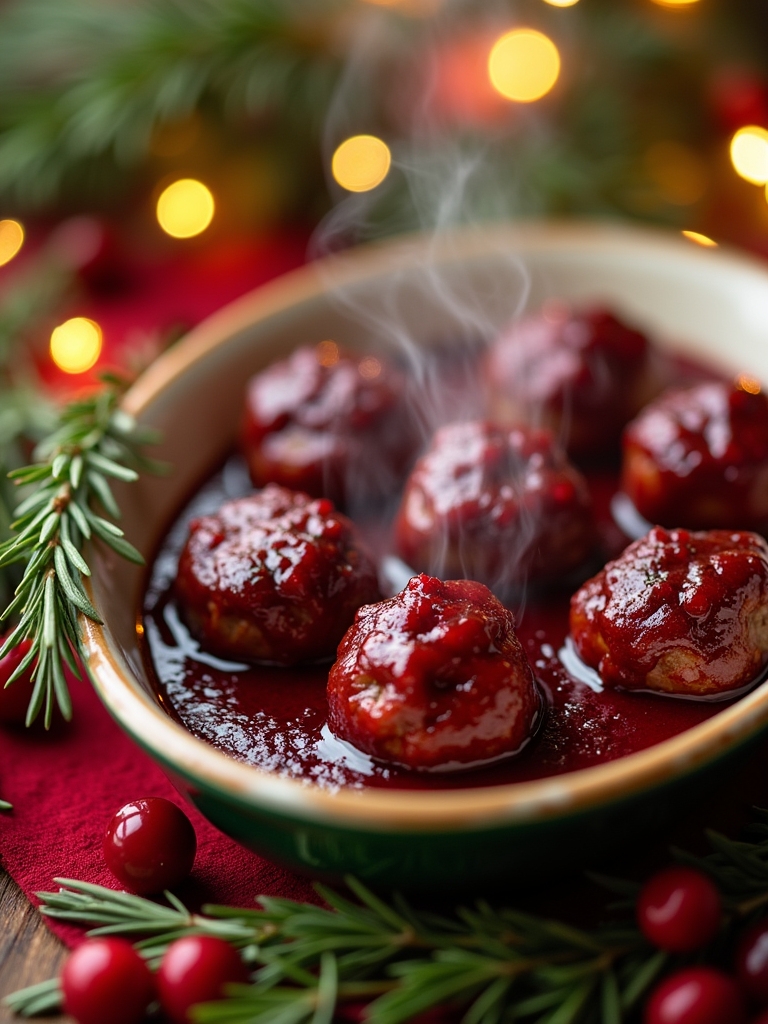
Cranberry-glazed meatballs are a delightful and festive dish that kids will love to help make and eat during the holiday season. This recipe combines the savory flavors of meatballs with a sweet and tangy cranberry sauce, making it a crowd-pleaser at any Christmas dinner. Perfect as an appetizer or a main course, these meatballs are not only delicious but also easy to prepare, allowing little chefs to get involved in the cooking process.
To start, you can choose to make the meatballs from scratch or use pre-made frozen ones for added convenience. The cranberry glaze is the star of the show, featuring fresh cranberries, brown sugar, and a hint of orange zest to brighten up the flavor profile. With just a few simple ingredients and steps, these cranberry-glazed meatballs will surely become a favorite holiday treat for kids and adults alike.
Choose homemade or frozen meatballs, and enjoy a delightful cranberry glaze that will be a hit with everyone this holiday season.
Ingredients:
- 1 pound ground beef (or turkey)
- 1/2 cup breadcrumbs
- 1/4 cup grated Parmesan cheese
- 1/4 cup chopped parsley
- 1 egg
- Salt and pepper to taste
- 1 cup fresh cranberries
- 1/2 cup brown sugar
- 1/4 cup orange juice
- 1 teaspoon orange zest
- 1 tablespoon soy sauce
Cooking Instructions:
Preheat your oven to 400°F (200°C). In a large bowl, combine the ground beef, breadcrumbs, Parmesan cheese, parsley, egg, salt, and pepper, mixing well until fully combined. Shape the mixture into small meatballs and place them on a lined baking sheet. Bake for about 20 minutes or until they are browned and cooked through. In a saucepan, combine the cranberries, brown sugar, orange juice, orange zest, and soy sauce over medium heat. Stir until the mixture simmers and the cranberries start to burst, creating a thick glaze. Once the meatballs are done baking, toss them in the cranberry glaze to coat, and serve warm.
Extra Tips:
For a twist on this recipe, consider adding some finely chopped onions or garlic to the meatball mixture for extra flavor. If you prefer a spicier kick, a dash of red pepper flakes can be added to the glaze. These meatballs can also be made ahead of time and frozen, making them a convenient option for holiday gatherings. Just reheat in the oven and glaze right before serving for a fresh taste. Remember, kids can help with mixing the meatball ingredients and rolling them into shape, making this a fun family activity.
Easy Stuffed Bell Peppers
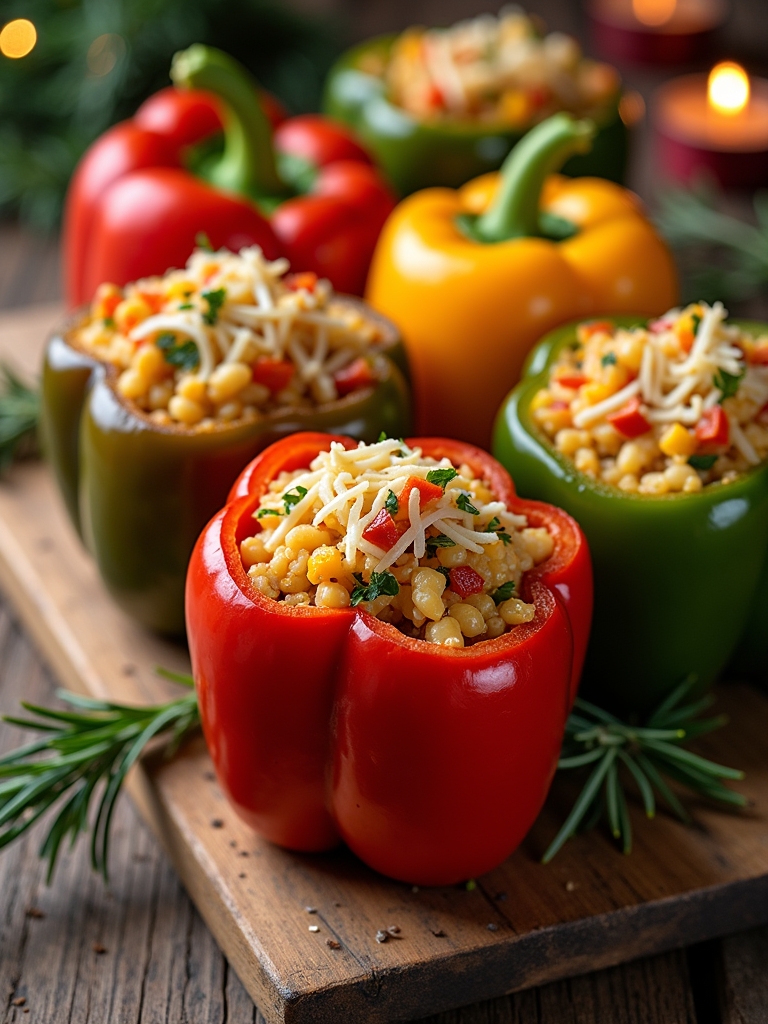
Stuffed bell peppers are a fun and colorful dish that kids will love to help prepare and eat. This recipe is simple enough for younger chefs to get involved, making it a great family activity during the holiday season. The vibrant colors of the bell peppers not only make the dish visually appealing but also add an array of flavors and nutrients. You can customize the filling based on what your kids enjoy, whether that’s a mix of rice, beans, meat, or vegetables.
This dish can be a delightful centerpiece on your Christmas dinner table. It’s versatile, allowing you to switch up the ingredients based on dietary preferences or what you have on hand. Plus, stuffed bell peppers are easy to make ahead of time, so you can enjoy more time with your family and less time in the kitchen on the big day.
Ingredients
- 4 large bell peppers (any color)
- 1 cup cooked rice
- 1 cup cooked ground meat (beef, turkey, or chicken)
- 1 cup black beans (canned, rinsed and drained)
- 1 cup corn (fresh, frozen, or canned)
- 1 cup shredded cheese (cheddar or mozzarella)
- 1 teaspoon cumin
- 1 teaspoon garlic powder
- Salt and pepper to taste
- Fresh cilantro or parsley for garnish (optional)
Instructions
Preheat your oven to 375°F (190°C). Begin by slicing the tops off the bell peppers and removing the seeds and membranes. In a mixing bowl, combine the cooked rice, ground meat, black beans, corn, half of the cheese, cumin, garlic powder, salt, and pepper. Stir until well mixed. Spoon the filling mixture into each bell pepper until they are generously filled. Place the stuffed peppers upright in a baking dish, sprinkle the remaining cheese on top, and cover the dish with aluminum foil. Bake in the preheated oven for about 25-30 minutes, then remove the foil and bake for an additional 10 minutes, or until the cheese is melted and bubbly.
Extra Tips
When choosing bell peppers, look for ones that are firm and have smooth skin, as these will hold up better during cooking. You can also prepare the stuffed peppers a day in advance and refrigerate them until you’re ready to bake, making it a convenient option for busy holiday schedules. If your kids are adventurous, let them choose their own mix of ingredients for the filling, encouraging creativity and making the meal more enjoyable for them!
Christmas Cookie Decorating Station

Setting up a Christmas cookie decorating station is a delightful way to engage kids during the holiday season. It’s a fun, creative activity that not only allows them to express their artistic side but also gets them excited about the festive spirit. The best part is that kids can enjoy both making and decorating the cookies, which makes it a perfect holiday project for the whole family. Whether you’re hosting a holiday party or just looking for a fun afternoon activity, this cookie station is sure to spread joy and cheer.
To get started, you’ll need to bake some delicious cookies as a base for the decorating fun. Classic sugar cookies or gingerbread cookies are excellent choices because they are sturdy enough to hold up to the decorations. Once the cookies are baked and cooled, set up a variety of colorful icing, sprinkles, and edible decorations to inspire the little ones. This interactive station will not only keep kids entertained but will also create sweet memories that last a lifetime.
Ingredients:
- Sugar cookie dough or gingerbread cookie dough
- Royal icing (white, red, green, and other colors)
- Edible glitter
- Sprinkles (various shapes and colors)
- Mini chocolate chips
- Candy canes (broken into pieces)
- Colored sugar
- Marshmallows
- Food coloring (optional for icing)
Instructions:
Begin by preparing your cookie dough according to your chosen recipe, then roll it out and use cookie cutters to create festive shapes like stars, trees, and candy canes. Bake the cookies according to the recipe instructions and allow them to cool completely on a wire rack. While they cool, prepare your royal icing by mixing powdered sugar, egg whites, and a splash of lemon juice until it reaches a smooth consistency. Divide the icing into small bowls and add various food colors for a vibrant selection. Set up the decorating station with all the icing, sprinkles, and edible decorations laid out for easy access.
Extra Tips:
When setting up your decorating station, consider including a few tools like piping bags or plastic squeeze bottles for more precise icing application. You may also want to provide some parchment paper or wax paper for easy cleanup. Encourage kids to mix colors and experiment with different designs, reminding them that there are no rules when it comes to creativity! To preserve their masterpieces, take photos before they plunge into enjoying the cookies, as it’s a great way to capture the festive fun and share memories later on.
Garlic Butter Pasta
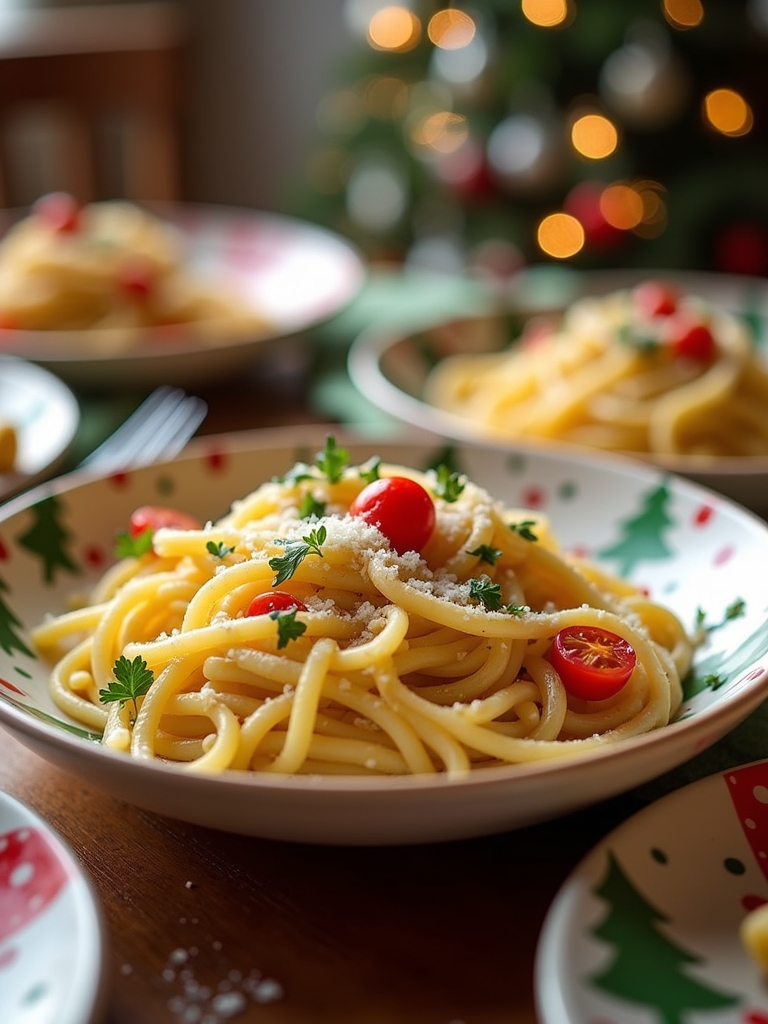
Garlic Butter Pasta is a delightful and simple dish that kids will love to help make during the festive season. This dish combines the creamy richness of butter with the aromatic essence of garlic, creating a comforting pasta that pairs wonderfully with a variety of toppings. It can be a great side dish for your Christmas dinner or even a main course for picky eaters who may not be fond of traditional holiday fare. Plus, it’s quick to prepare, making it ideal for busy holiday schedules.
This recipe is versatile and allows room for creativity. You can easily add vegetables like spinach or broccoli for a pop of color and nutrition or sprinkle some grated cheese on top for an extra layer of flavor. Kids can join in the fun, helping to mix the ingredients and toss the pasta, making it an engaging cooking experience that brings families together during the holiday season.
Ingredients:
- 8 oz pasta (spaghetti or fettuccine works well)
- 4 tablespoons unsalted butter
- 4 cloves garlic, minced
- Salt, to taste
- Black pepper, to taste
- Fresh parsley, chopped (for garnish)
- Grated Parmesan cheese (optional)
Instructions:
Begin by cooking the pasta according to the package instructions until al dente. While the pasta cooks, melt the butter in a large skillet over medium heat. Add the minced garlic and sauté for about 1-2 minutes until fragrant but not browned. Once the pasta is done, reserve a cup of pasta water, then drain the pasta and add it directly to the skillet with the garlic butter. Toss everything together, adding salt and pepper to taste. If the pasta seems dry, gradually add some reserved pasta water until you reach your desired consistency. Serve hot, garnished with fresh parsley and a sprinkle of Parmesan cheese if desired.
Extra Tips:
When cooking the garlic, be careful not to let it burn, as burnt garlic can turn bitter and ruin the dish’s flavor. If you prefer a milder garlic taste, you can sauté it for a shorter time or even add it after the pasta has been combined with the butter. Feel free to experiment with adding in other ingredients like cooked chicken, shrimp, or seasonal veggies to make the dish more festive and filling. Enjoy making this dish together, and don’t forget to have fun with it!
Simple Roast Chicken
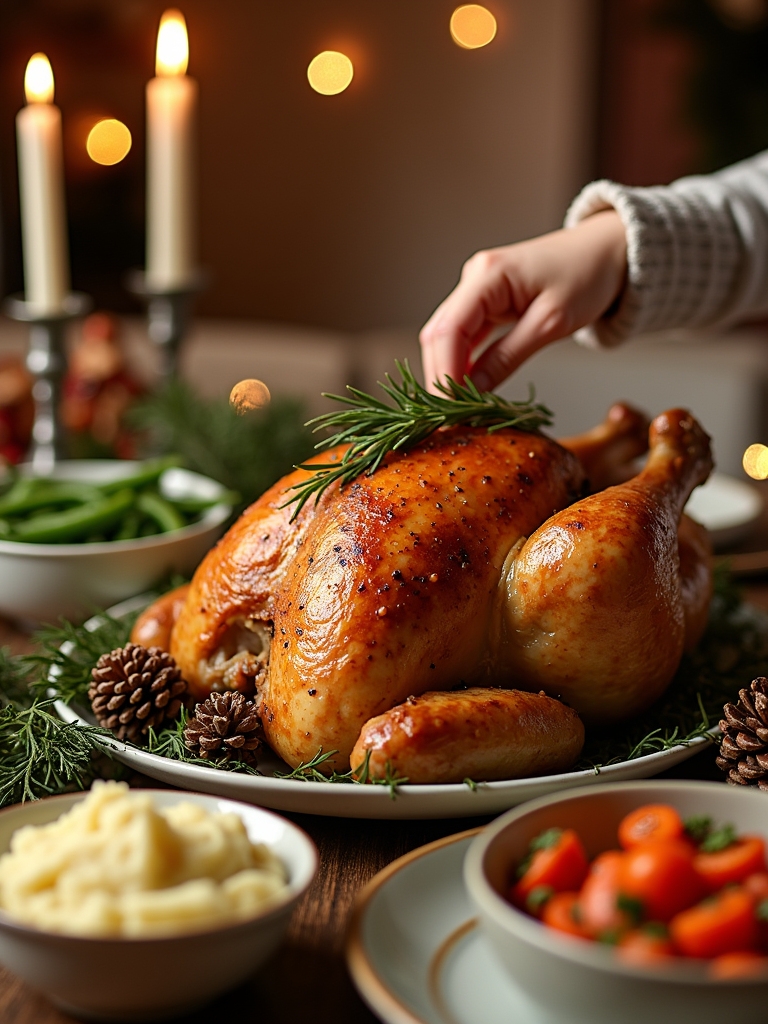
Roast chicken is a classic dish that can be a delightful centerpiece for any Christmas dinner, and it’s surprisingly easy for kids to help prepare. With a little guidance, they can learn the basics of seasoning, marinating, and cooking meat while enjoying the festive spirit. This simple roast chicken recipe is perfect for young chefs, as it requires minimal ingredients and straightforward steps that will keep them engaged and excited about cooking.
The beauty of roast chicken lies in its versatility; you can customize the flavors to suit your family’s taste. This recipe focuses on a simple blend of herbs and spices, making it a great choice for kids to experiment with. Whether you’re serving it with traditional sides like mashed potatoes and green beans or a fresh salad, this roast chicken will surely impress your holiday guests.
Ingredients:
- 1 whole chicken (about 4-5 pounds)
- 2 tablespoons olive oil
- 1 teaspoon salt
- 1 teaspoon black pepper
- 1 teaspoon garlic powder
- 1 teaspoon onion powder
- 1 teaspoon dried thyme
- 1 lemon, cut into wedges
- Fresh herbs (like rosemary or parsley) for garnish
Cooking Instructions:
Preheat your oven to 375°F (190°C). Pat the chicken dry with paper towels, then place it in a roasting pan. Rub the olive oil all over the chicken, making sure to coat it evenly. Sprinkle salt, pepper, garlic powder, onion powder, and thyme over the chicken, rubbing the spices into the skin to guarantee flavor permeates the meat. Stuff the cavity with lemon wedges and any leftover herbs. Roast the chicken in the preheated oven for about 1.5 hours, or until the internal temperature reaches 165°F (75°C) and the juices run clear when pierced. Let it rest for 10-15 minutes before carving.
Extra Tips:
When cooking roast chicken, always verify it is thoroughly cooked to avoid any food safety issues. Kids can help by using a meat thermometer to check the temperature. For extra crispy skin, try increasing the oven temperature to 400°F (200°C) during the final 20 minutes of cooking. Additionally, encourage kids to be creative with the seasoning; they can add their favorite spices or even a splash of their favorite sauce for a unique twist. Finally, don’t forget to save the leftovers for delicious sandwiches or salads the next day!
Potato Wedges With Holiday Spices
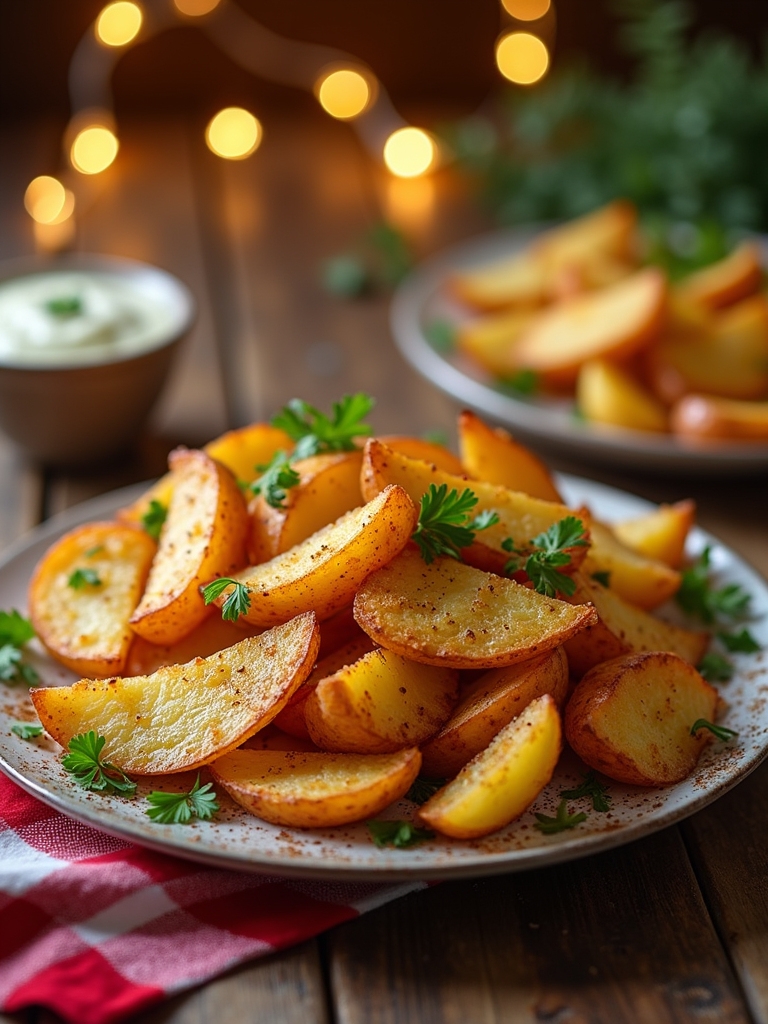
Potato wedges are a fun and delicious side dish that kids will love, especially when infused with holiday spices! These crispy, golden wedges are not only easy to make but also a fantastic way to introduce children to the joys of cooking. The combination of warm spices like cinnamon, nutmeg, and paprika gives these wedges a festive twist, making them perfect for your Christmas dinner table. Plus, they are a great way to get kids involved in the kitchen as they can help wash, peel, and season the potatoes.
To make these potato wedges extra special, you can let your little chefs pick their favorite spices to customize the flavor. The process is simple and engaging, allowing kids to learn about measuring and mixing while they create a tasty dish that pairs well with a variety of holiday meals. These wedges can be served as a side or enjoyed on their own with a dipping sauce, making them a versatile addition to any festive gathering.
Ingredients:
- 4 medium-sized potatoes
- 2 tablespoons olive oil
- 1 teaspoon paprika
- 1/2 teaspoon garlic powder
- 1/2 teaspoon onion powder
- 1/4 teaspoon cinnamon
- 1/4 teaspoon nutmeg
- Salt and pepper to taste
- Fresh parsley (optional, for garnish)
Instructions:
Preheat your oven to 425°F (220°C). Begin by washing and cutting the potatoes into wedges, leaving the skin on for added texture and nutrition. In a large bowl, toss the potato wedges with olive oil, paprika, garlic powder, onion powder, cinnamon, nutmeg, salt, and pepper until they are evenly coated. Spread the wedges in a single layer on a baking sheet lined with parchment paper and bake for 25-30 minutes, flipping halfway through, until they are crispy and golden brown.
Extra Tips:
For extra crispiness, make certain not to overcrowd the baking sheet; if necessary, use two sheets to guarantee even cooking. Feel free to experiment with different spices and herbs based on your family’s preferences, and add a sprinkle of grated Parmesan cheese before baking for an extra flavor boost. Finally, serve the potato wedges with a variety of dipping sauces like ketchup, ranch, or a yogurt-based dip to make them even more appealing to kids!
Chocolate Peppermint Brownies

Christmas is the perfect time to indulge in sweet treats, and these chocolate peppermint brownies are sure to be a hit with kids and adults alike. Rich, fudgy, and topped with a delightful peppermint twist, they are easy to make and even easier to eat. Baking together can be a fun holiday activity, allowing kids to participate in the kitchen while creating delicious memories.
These brownies are not only delightful but also versatile. You can decorate them with crushed candy canes for a festive touch or serve them plain for a classic chocolate experience. Either way, they are a perfect addition to your holiday dessert table, providing that chocolatey goodness everyone loves with a seasonal flair.
These brownies offer delightful versatility, perfect for a festive touch with crushed candy canes or a classic chocolate experience.
Ingredients:
- 1 cup unsalted butter
- 2 cups granulated sugar
- 4 large eggs
- 1 teaspoon vanilla extract
- 1 cup all-purpose flour
- 1 cup unsweetened cocoa powder
- 1/2 teaspoon salt
- 1/2 teaspoon baking powder
- 1 cup chocolate chips (optional)
- 1/2 cup crushed peppermint candies (for topping)
Cooking Instructions:
Preheat the oven to 350°F (175°C) and grease a 9×13 inch baking pan. In a large saucepan, melt the butter over low heat. Once melted, remove from heat and stir in the sugar, eggs, and vanilla until well combined. In a separate bowl, whisk together the flour, cocoa powder, salt, and baking powder. Gradually add the dry ingredients to the wet mixture, stirring until just combined. If using, fold in the chocolate chips. Pour the batter into the prepared baking pan and spread evenly. Bake for 25-30 minutes or until a toothpick inserted in the center comes out with a few moist crumbs. Allow to cool in the pan before cutting into squares and topping with crushed peppermint candies.
Extra Tips:
When making these brownies, be sure not to overmix the batter once you add the dry ingredients, as this can lead to a tougher texture. For an extra festive touch, you can drizzle melted white chocolate over the top before sprinkling on the crushed peppermint. If you’re looking for an alternative twist, consider adding a few drops of peppermint extract to the batter for an even stronger peppermint flavor. Enjoy your holiday baking!
Frequently Asked Questions
What Are Some Alternatives to Cheese for Picky Eaters?
I love using nutritional yeast as a cheesy flavor substitute for picky eaters. You can also try dairy-free alternatives like cashew cheese or almond-based spreads. They’re innovative and delicious options that kids might surprisingly enjoy!
How Can I Make These Recipes Healthier?
I love swapping out heavy ingredients for healthy substitutes, like Greek yogurt instead of sour cream. Plus, practicing portion control makes meals lighter and more satisfying, encouraging kids to embrace new flavors without feeling overwhelmed.
Can I Prepare These Dishes in Advance?
Absolutely, I prepare these dishes in advance! With effective dinner prep and advance planning, I can streamline my cooking process, ensuring everything’s fresh and delightful, even for those picky eaters who might surprise us.
What Kitchen Tools Do I Need for These Recipes?
I’ve found that 70% of home cooks swear by essential utensils like measuring cups and spatulas, plus innovative kitchen gadgets like immersion blenders and food processors, which make preparing these dishes so much easier and enjoyable.
How Do I Involve Kids in the Cooking Process?
I involve kids by assigning cooking roles like measuring ingredients or stirring. They love taste testing, which makes them feel important and engaged. It’s a fun way to spark their interest in cooking and creativity!
Conclusion
As we wrap up our holiday cooking adventure, remember that the best meals are those shared with loved ones, even if they’re a bit picky! These 13 festive dishes are like a warm hug on a chilly winter’s night, sure to bring smiles to everyone’s faces. So, gather your family, roll up your sleeves, and get cooking! With these recipes, you’ll create tasty memories that’ll last far beyond the holiday season. Happy cooking and merry feasting!