

I absolutely love making dirt cake—it’s a nostalgic treat that’s perfect for gatherings! This fun dessert layers chocolate pudding, cream cheese, and crushed Oreos, creating a delightful mix of flavors and textures. It’s super easy to whip up, requires no baking, and you can customize it with playful toppings like gummy worms. The process of making it is just as enjoyable as eating it, so join me to discover how to bring this deliciousness to your table!
History
When I think about the origins of dirt cake, I’m reminded of the playful spirit that often accompanies childhood desserts. This whimsical treat, with its layers of chocolate pudding and crushed cookies, has roots in the culinary origins of the 1980s. It emerged during a time when desserts began evolving to include more interactive elements, sparking creativity in kitchens everywhere. Families delighted in its unique presentation, often garnished with gummy worms or edible flowers, transforming a simple dessert into an adventure. As dirt cake captures the essence of childhood nostalgia, it also reflects a broader trend in dessert evolution, where fun and flavor intertwine, inviting us to challenge traditional approaches and embrace culinary innovation.
Recipe
Dirt cake is a delightful and playful dessert that brings out the child in everyone. With its rich layers of chocolate pudding, cream cheese, and crushed cookies, it’s not only visually appealing but also incredibly delicious. This dessert is perfect for parties, picnics, or simply to enjoy with family at home. The combination of flavors and textures makes it a favorite among both kids and adults alike.
Making dirt cake is a fun and simple process that requires no baking, making it an ideal choice for those who want a quick and easy treat. You can customize this recipe by adding gummy worms or other fun toppings to enhance the “dirt” theme. Gather your ingredients, and let’s plunge into creating this delectable dessert that’s sure to be a hit!
Ingredients:
- 1 package (8 oz) cream cheese
- 1 cup powdered sugar
- 1 container (12 oz) cool whip
- 2 packages (3.9 oz each) instant chocolate pudding mix
- 4 cups milk
- 1 package (15.25 oz) Oreo cookies
- Gummy worms (optional for decoration)
Cooking Instructions:
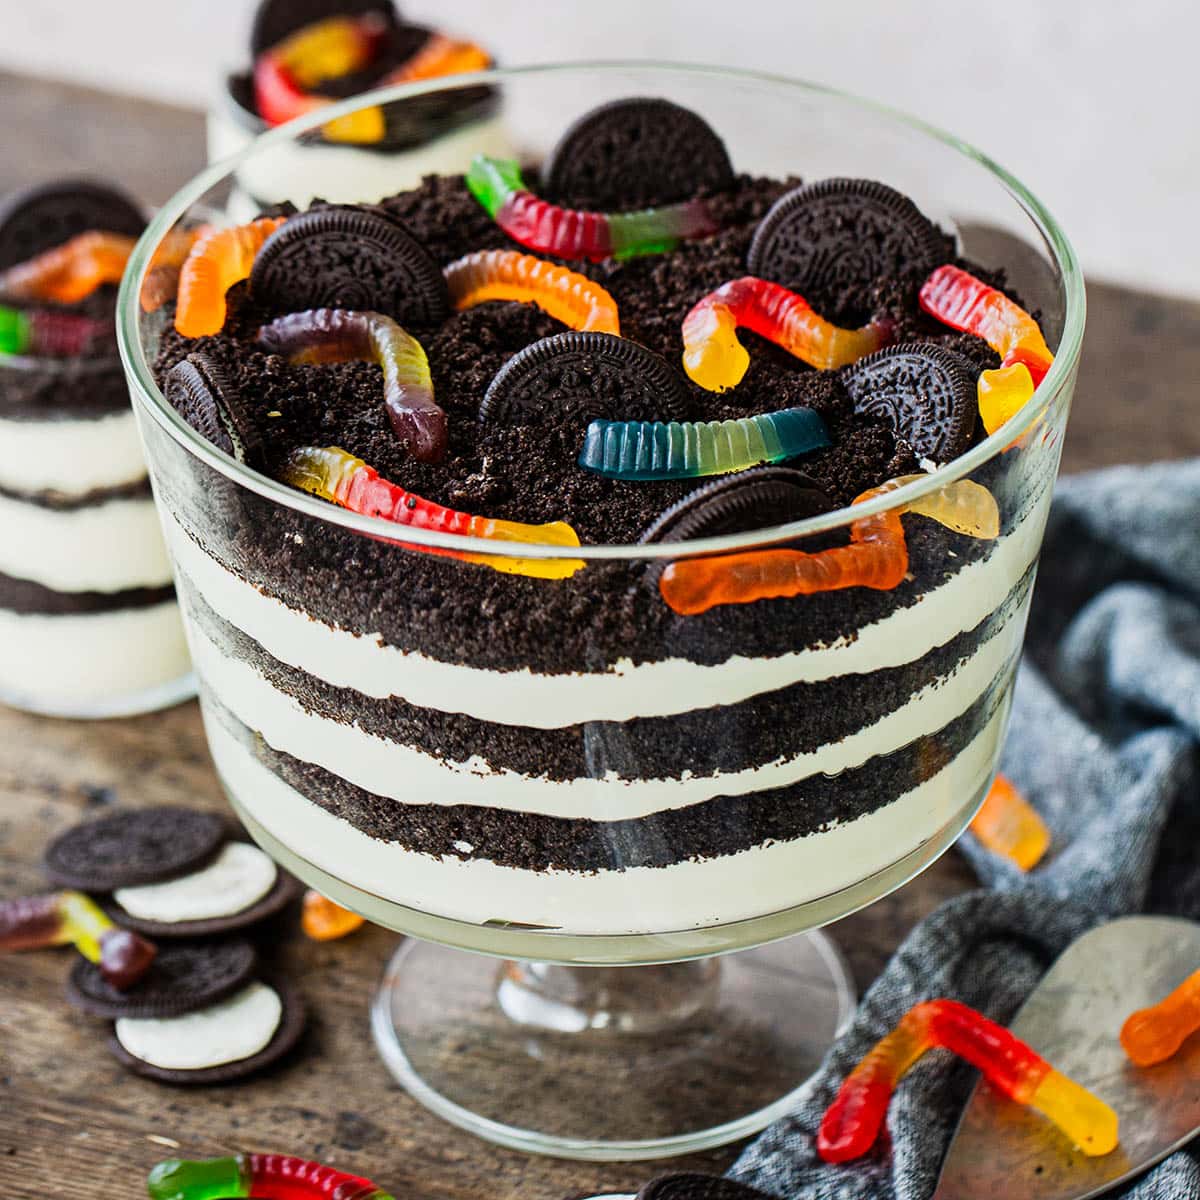
In a large mixing bowl, beat the cream cheese and powdered sugar together until smooth and well combined. Gently fold in the cool whip until the mixture is light and fluffy. In another bowl, prepare the instant chocolate pudding by whisking it with the milk for about 2 minutes until it thickens. Once the pudding is ready, layer the dessert in a large trifle dish or individual cups by alternating between the cream cheese mixture, chocolate pudding, and crushed Oreo cookies. Repeat the layers until all ingredients are used, finishing with a layer of crushed Oreos on top. If desired, add gummy worms for a playful touch before serving.
Extra Tips:
When preparing dirt cake, you can make it a day in advance to allow the flavors to meld together, which enhances the taste. Be sure to crush the Oreo cookies just before layering to keep them crunchy. If you want a more intense chocolate flavor, consider adding a layer of chocolate shavings on top. To make serving easier, use a spatula or large spoon to scoop out portions, and don’t hesitate to get creative with your toppings!
Cooking Steps
Now that we’ve gathered our ingredients, it’s time to bring this delightful dirt cake to life! I love crushing the chocolate sandwich cookies to create that authentic “dirt” texture, and mixing the cream cheese with sugar adds a creamy richness. Layering it all together with the pudding and finishing off with gummy worms makes for a fun and tasty treat that everyone will enjoy!
Step 1. Crush Chocolate Sandwich Cookies
To create the perfect base for your dirt cake, I recommend starting with about 20 chocolate sandwich cookies. The key is to achieve that ideal cookie texture—crunchy yet fine enough to blend seamlessly into the cake. I like to place the cookies in a sturdy zip-top bag and use a rolling pin to crush them into a crumbly mixture. This method keeps things tidy while ensuring each piece maintains its rich, chocolatey flavor profiles. You’ll want to aim for a consistency that resembles moist sand. As I crush, I can already imagine how these crumbs will form the foundation of a deliciously layered dessert, offering a delightful contrast to the creamy elements that follow. It’s all about balance!
Step 2. Mix Cream Cheese and Sugar
With the cookie crumbs ready to go, it’s time to tackle the creamy filling that will elevate our dirt cake. First, I grab my favorite cream cheese varieties—sometimes I mix regular with a tangy whipped cream cheese for a unique texture. In a large mixing bowl, I blend the cream cheese with my choice of sugar substitutes, like agave or stevia, to keep things on the lighter side. Using an electric mixer, I whip it all together until it’s smooth and creamy, ensuring there are no lumps. The aroma is delightful, hinting at the indulgence to come! This mixture not only adds a rich flavor but also creates a luxurious base for the layers ahead. Let’s keep this momentum going!
Step 3. Layer With Pudding Mixture
As I carefully fold the luscious pudding mixture into the creamy filling, the excitement builds for the next layer of our dirt cake. I gently scoop the mixture and spread it evenly over the cream cheese layer, using layering techniques that create a visually appealing contrast. Each spoonful glides effortlessly, ensuring every corner gets the velvety goodness. I can already envision the stunning dessert presentation, with the rich colors blending together. To elevate this innovative treat, I’ll alternate layers of the pudding and the crushed cookies, creating a delightful texture and flavor harmony. This step is essential, as it sets the foundation for the whimsical garnishes we’ll add later. I can’t wait to see how it all comes together!
Step 4. Add Gummy Worms Topping
The final touch of whimsy is about to transform my dirt cake into a playful masterpiece. I carefully reach for a handful of gummy worms, those squishy, vibrant creatures that add a burst of color and fun. With a gentle sprinkle, I nestle them into the rich chocolatey soil—my crushed cookies—making it look as if they’ve just crawled out of the earth. I love how these gummy worms not only serve as delightful dessert toppings but also evoke childhood nostalgia. Their chewy texture contrasts beautifully with the creamy layers below. Each worm peeking out invites curiosity and excitement, making this dessert irresistibly appealing to both kids and adults alike. Trust me, this final flourish is what elevates my dirt cake to the next level!
Step 5. Chill Before Serving
After assembling my dirt cake, I always make sure to chill it for at least two hours before serving. This chilling period is essential, as it enhances the flavors and allows the layers to meld beautifully. The chilling benefits are twofold: the cake firms up, making it easier to slice, and it reaches the perfect serving temperature, ensuring that every bite is creamy and delicious. I love how that coolness contrasts with the rich chocolate and cream, creating a delightful experience for my guests. Plus, the longer it chills, the more the flavors develop, inviting everyone to engage. Trust me, patience pays off—your dirt cake will be the star of any gathering!
Nutritional Guide
While indulging in a delicious dirt cake, it’s easy to overlook the nutritional components that come with this delightful dessert. But understanding the caloric content and ingredient benefits makes our experience even richer. Here’s a quick guide to help you appreciate what’s in your slice of dirt cake:
| Ingredient | Calories per Serving | Benefits |
|---|---|---|
| Cream Cheese | 100 | Source of calcium and protein |
| Pudding Mix | 60 | Convenient flavor enhancer |
| Oreos | 53 | Crunchy texture and nostalgia |
| Whipped Topping | 30 | Lightens the dessert’s richness |
Final Thoughts
As we savor each delightful bite of dirt cake, it’s clear that this dessert is more than just a sweet treat; it’s a nostalgic journey that brings back fond memories of childhood gatherings and playful celebrations. Its charm lies not only in its taste but also in its fun presentations that can spark creativity in any kitchen. Here are a few reasons why dirt cake stands out as one of those memorable desserts:
- Versatile Ingredients: You can customize it with different cookies and toppings.
- Creative Themes: Perfect for themed parties or seasonal events.
- Interactive Experience: Involving kids in the layering process makes it even more special.
Frequently Asked Questions
Can I Use Gluten-Free Cookies in This Dirt Cake Recipe?
I love using gluten-free options for that extra creativity. You can easily substitute regular cookies with gluten-free varieties, ensuring everyone enjoys a delicious treat without compromising flavor or texture. It’s a win-win!
How Long Does Dirt Cake Last in the Refrigerator?
Ah, the nostalgia of sweet treats! In the fridge, dirt cake lasts about 3 to 5 days. For ideal freshness, I recommend using airtight containers and following proper storage tips to maximize its shelf life. Enjoy!
Can I Freeze Leftover Dirt Cake?
Yes, you can freeze leftovers! Just remember, freezing can change the texture. I recommend using airtight containers and separating layers with parchment paper for best results. Follow these freezing tips, and you’ll enjoy it later!
What Variations Can I Try With This Recipe?
Did you know 90% of kids love chocolate pudding? I’ve tried adding crushed cookies or even fruit to my dirt cake. Swapping gummy worms for chocolate candies creates a fun twist that kids adore!
Is Dirt Cake Suitable for Vegetarians?
Yes, dirt cake can be suitable for vegetarians! I’ve found plenty of vegetarian ingredients and plant-based options to create a delicious, innovative dessert that everyone will love, while keeping it entirely meat-free and delightful.
Conclusion
As I savor the last bite of this delectable dirt cake, I can’t help but feel a warm nostalgia wrap around me like a cozy blanket. This whimsical dessert not only tantalizes the taste buds but also brings back cherished memories of childhood. With each spoonful, I’m reminded that simple pleasures, like a scoop of chocolate pudding and crushed cookies, can turn any gathering into a celebration. So, let’s dig in and relish the sweet joy of this delightful treat together!
Dirt Cake Recipe
Ingredients
Equipment
Method
- Use a food processor or zip-top bag + rolling pin to crush cookies into fine crumbs (reserve 2–3 tbsp for topping).
- Whisk chocolate pudding mix with cold milk in a bowl until thickened (about 2 minutes). Set aside.
- In a separate bowl, beat cream cheese, butter, and powdered sugar until smooth. Fold in Cool Whip.
- In a 9×13-inch dish (or individual pots), layer:Half the Oreo crumbs (like "dirt").All of the cream cheese mixture.All of the chocolate pudding.Remaining Oreo crumbs.
- Press gummy worms into the top layer. Chill for at least 2 hours before serving.
Notes
- Make Ahead: Assemble up to 1 day in advance (add gummy worms just before serving).
- Variations: Use vanilla pudding + crushed golden Oreos for a “sandbox cake.”
- Vegan Option: Substitute with dairy-free pudding, cream cheese, and whipped topping.