

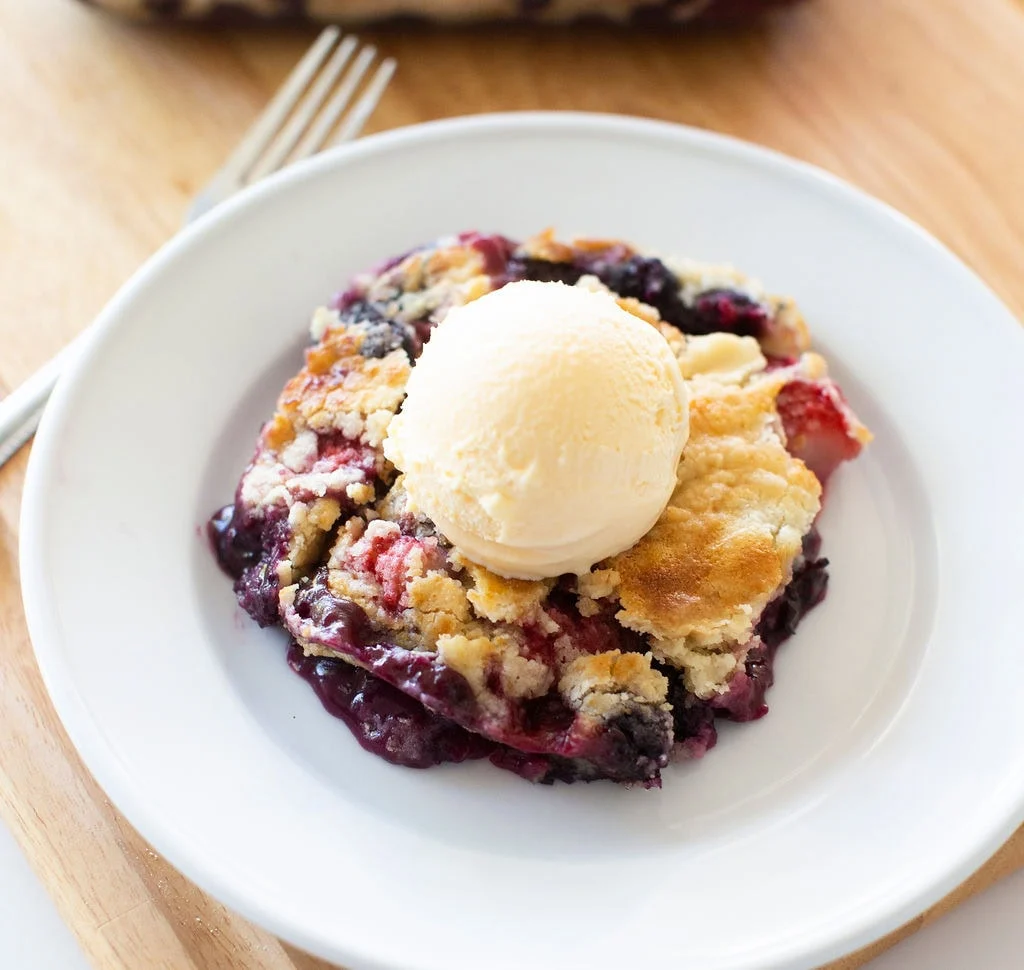
If you’re looking for an easy dessert that impresses, I’ve got the perfect dump cake recipe for you! Just combine your favorite fruit with a cake mix, sprinkle on some butter, and pop it in the oven. It’s that simple! The result is a warm, comforting treat with a crispy topping and soft fruit underneath. I love serving it with a scoop of vanilla ice cream. Want to learn about variations and serving tips that can elevate your dessert?
History
When I think about the history of dump cake, it’s fascinating to see how this simple dessert has evolved over the years. Its origins trace back to the mid-20th century, where busy home cooks needed a quick, no-fuss recipe that didn’t compromise on flavor. The concept was revolutionary—just dump ingredients into a baking dish without the fuss of mixing. Over time, this dessert transformed, incorporating various flavors and textures, adapting to our ever-changing culinary preferences. From classic fruit combinations to innovative twists like chocolate and nut variations, dump cake’s dessert evolution reflects a blend of nostalgia and creativity. It’s more than just a dish; it’s a reflection of our desire for simplicity without sacrificing taste.
Recipe
Dump cake is a wonderfully simple dessert that is perfect for anyone who loves the taste of cake without the fuss of traditional baking. The beauty of a dump cake lies in its name—you literally “dump” all the ingredients into a baking dish and let the oven do the work for you. This recipe is versatile, allowing for various fruit fillings and cake mixes, so you can easily tailor it to your taste. Whether you’re serving it at a family gathering, a potluck, or just enjoying a cozy night in, this easy dump cake will surely be a hit.
Dump cake is an easy, fuss-free dessert that allows you to mix and match flavors for any occasion.
To get started, you’ll want to gather your ingredients and preheat your oven. The combination of fruit, cake mix, and a buttery topping creates a deliciously sweet and slightly crispy texture that contrasts beautifully with the soft fruit underneath. This dessert is best served warm with a scoop of vanilla ice cream or a dollop of whipped cream, making it a delightful treat any time of the year.
Ingredients:
- 1 can (21 oz) fruit pie filling (e.g., cherry, peach, or apple)
- 1 box (15.25 oz) cake mix (yellow or white)
- 1/2 cup (1 stick) unsalted butter, melted
- 1/2 cup chopped nuts (optional)
- 1 teaspoon cinnamon (optional)
Instructions:
Preheat your oven to 350°F (175°C). In a 9×13 inch baking dish, spread the fruit pie filling evenly across the bottom. Next, sprinkle the dry cake mix evenly over the fruit filling, making sure to cover it completely. Drizzle the melted butter over the top of the cake mix, allowing it to soak in. If desired, sprinkle chopped nuts and cinnamon on top for added flavor and texture. Bake in the preheated oven for 30-35 minutes or until the top is golden and bubbly.
Extra Tips:
For the best results, make sure to use high-quality fruit filling to enhance the overall flavor of your dump cake. You can also experiment with different cake mixes, such as chocolate or spice, to create unique flavor combinations. If you prefer a fruitier dessert, consider adding fresh fruit or additional pie filling. Allow the dump cake to cool for a few minutes before serving, as this will help the flavors meld together and make it easier to scoop. Enjoy your delicious creation!
Cooking Steps
Let’s get started on making this delicious dump cake! First, I’ll preheat my oven to 350°F, setting the stage for that perfect bake. Then, I’ll mix the cake ingredients thoroughly and layer the fruit evenly, ensuring every bite is bursting with flavor.
Step 1. Preheat Oven to 350°F
Before diving into the delightful process of making your easy dump cake, I always make certain to preheat the oven to 350°F. This oven temperature is vital for achieving that perfect, golden-brown crust while keeping the inside moist and tender. It’s one of those essential baking tips that can transform your dessert from ordinary to extraordinary. I love the anticipation that builds as the oven warms up, filling my kitchen with a cozy vibe. Plus, preheating guarantees even baking, so you won’t end up with a cake that’s overcooked on the edges and undercooked in the center. Trust me, taking this simple step makes all the difference in your baking adventure! Let’s get those delicious flavors ready to shine!
Step 2. Mix Cake Ingredients Thoroughly
Mixing the cake ingredients thoroughly is essential for achieving that delightful texture and balanced flavor. I start by measuring out my ingredient ratios precisely; too much or too little can really affect the outcome. Using a whisk or electric mixer, I employ effective mixing techniques to guarantee everything’s well combined. I blend the dry ingredients first, then gradually incorporate the wet ones, avoiding any lumps. It’s important to mix until the batter is smooth, yet I’m careful not to overmix, as this can lead to a dense cake. The goal is a light, airy mixture that’ll rise beautifully in the oven. Once I’m satisfied with the batter’s consistency, I know I’m one step closer to a delicious dump cake!
Step 3. Add Fruit Layer Evenly
Now that I’ve prepared a smooth batter, it’s time to add the fruit layer evenly. This step is essential for a balanced flavor, and I love experimenting with different fruit combinations. Here’s how I do it using some effective layering techniques:
- Choose your fruits: Fresh, frozen, or canned—pick what you love.
- Drain excess liquid: If using canned fruits, make sure you drain them well to avoid sogginess.
- Spread evenly: Gently spoon the fruits over the batter, making sure of even coverage for best flavor distribution.
- Consider textures: Mix soft fruits with firmer ones for a delightful bite contrast.
This layering technique not only enhances the taste but also creates a visually appealing dessert. Enjoy the creative process!
Step 4. Sprinkle Topping Evenly
Once the fruit layer is set, it’s time to sprinkle the topping evenly for that perfect finish. I like to use a combination of cake mix, butter, and my favorite spices for an exciting twist. As I gently disperse the dry mix over the fruit, I make certain every inch is covered; this is a key baking technique that guarantees a delightful crunch. Don’t be afraid to experiment with topping variations—try adding nuts, chocolate chips, or even shredded coconut for an innovative flair. The layering of textures not only enhances flavor but also elevates the visual appeal of the dump cake. With this step, I’ve transformed a simple dessert into something truly special that’ll impress everyone!
Step 5. Bake for 45 Minutes
As the oven preheats, I carefully place the cake in to bake for 45 minutes, knowing this is the magic moment when everything comes together. During this baking time, the aromas fill the kitchen as the ingredients meld into a delicious symphony. I always keep an eye on the clock, enthusiastically anticipating that perfect texture.
Here’s what to focus on while it bakes:
- Watch for bubbling: The fruit should start to bubble around the edges.
- Check the color: A golden brown topping indicates it’s nearly ready.
- Test the texture: A toothpick should come out clean from the center.
- Let it cool: Allow it to rest for a few minutes before serving.
This is where the magic happens!
Nutritional Guide
When it comes to enjoying a delicious dump cake, understanding its nutritional profile can help you make informed choices. The calorie count can vary based on the ingredients you use, but generally, a slice of dump cake is around 250-300 calories. Let me break down the benefits of key ingredients:
| Ingredient | Benefits |
|---|---|
| Cake Mix | Quick energy source, easy to use |
| Fruit | Rich in vitamins, natural sweetness |
| Butter | Adds flavor, source of healthy fats |
| Eggs | High in protein, promotes fullness |
Final Thoughts
While I often find myself drawn to the simplicity and comfort of a dump cake, it’s the versatility of this dessert that truly captivates me. You can create endless cake variations, ensuring it never gets boring. Here are a few serving suggestions that elevate your experience:
- Pair with whipped cream for a light, fluffy contrast.
- Serve warm with a scoop of vanilla ice cream for that delightful temperature play.
- Drizzle caramel or chocolate sauce to add a decadent touch.
- Top with fresh berries for a revitalizing burst of flavor.
These ideas turn a humble dump cake into a showstopper, perfect for any occasion. So, don’t hesitate to experiment and make this dessert your own!
Frequently Asked Questions
Can I Make Dump Cake in a Slow Cooker?
Absolutely, I’ve made dump cake in my slow cooker! For great results, I use some slow cooker tips like layering ingredients and exploring cake mix alternatives. It’s a delicious, innovative twist on a classic dessert!
How Can I Substitute for Cake Mix?
Think of cake mix as a blank canvas; I often use flour, sugar, and baking powder for homemade cake. You can also explore almond flour or coconut flour for delicious cake mix alternatives. Let creativity flow!
Are There Gluten-Free Options for Dump Cake?
Absolutely, I’ve experimented with gluten-free flours like almond and coconut, and they work wonders! Plus, I love adding dairy-free options like coconut milk or almond yogurt for a rich, delicious twist that everyone enjoys.
Can I Freeze Leftovers of Dump Cake?
Absolutely, I can freeze leftovers of dump cake! For best results, I recommend wrapping it tightly in plastic wrap and using a freezer-safe container. These freezing tips help preserve flavor and texture during leftover storage.
How Long Does Dump Cake Last in the Fridge?
I’ve found that dump cake freshness lasts about three to four days in the fridge. For ideal dump cake storage, cover it tightly to keep those delicious flavors intact and avoid drying out. Enjoy every bite!
Conclusion
In the end, making a dump cake is like painting with flavors; each ingredient blends together to create a delicious masterpiece. It’s an effortless way to bring warmth and sweetness to your gatherings, leaving everyone craving more. So, don’t hesitate to plunge into this simple recipe—let the aromas fill your kitchen and the smiles fill your home. Remember, the joy of baking isn’t just in the end result, but in the delightful moments shared along the way.
Easy Dump Cake Recipe
Ingredients
Equipment
Method
- Preheat oven to 350°F (175°C). Grease a 9×13-inch baking dish.
- Layer fruit: Spread cherry pie filling evenly on the bottom, followed by crushed pineapple (with juice).
- Add cake mix: Sprinkle dry cake mix evenly over the fruit (do not stir).
- Drizzle butter: Pour melted butter over the cake mix, covering as much as possible.
- Optional: Top with chopped nuts for crunch.
- Bake for 40–45 minutes until golden brown and bubbly.
- Cool slightly before serving. Best enjoyed warm with vanilla ice cream!
Notes
- Variations: Use apple pie filling or blueberry pie filling instead of cherry.
- Gluten-free: Substitute with gluten-free cake mix.
- Storage: Cover and refrigerate leftovers for up to 3 days. Reheat before serving.
- Pro Tip: For extra richness, add 1 tsp vanilla extract to the melted butter.