

I can’t wait to share my Milk Cake recipe with you! This traditional treat combines rich, full-fat milk and a touch of lemon juice to create a sweet, crumbly delight. Simply boil the milk, add sugar and spices, then chill until firm. With just a few ingredients, you can create a festive dessert that brings warmth and nostalgia. Trust me, it’s a crowd-pleaser! Stick around to discover fun variations and presentation ideas that will elevate your baking.
History
When I think about the history of milk cake, I can’t help but be fascinated by its rich cultural roots. This delightful treat boasts an origin story that stretches back centuries, with its beginnings in the Indian subcontinent. Traditionally made from fresh milk and sugar, the recipe evolved over time, becoming a symbol of celebration and hospitality. I’ve learned that its cultural significance transcends mere dessert; it’s often prepared during festivals and special occasions, binding families and communities together. The aroma of milk cake wafting through the air evokes nostalgia and warmth, reminding me of my own cherished memories. Exploring its history reveals not just a sweet indulgence, but a deep connection to heritage and tradition that continues to inspire culinary innovation today.
Recipe
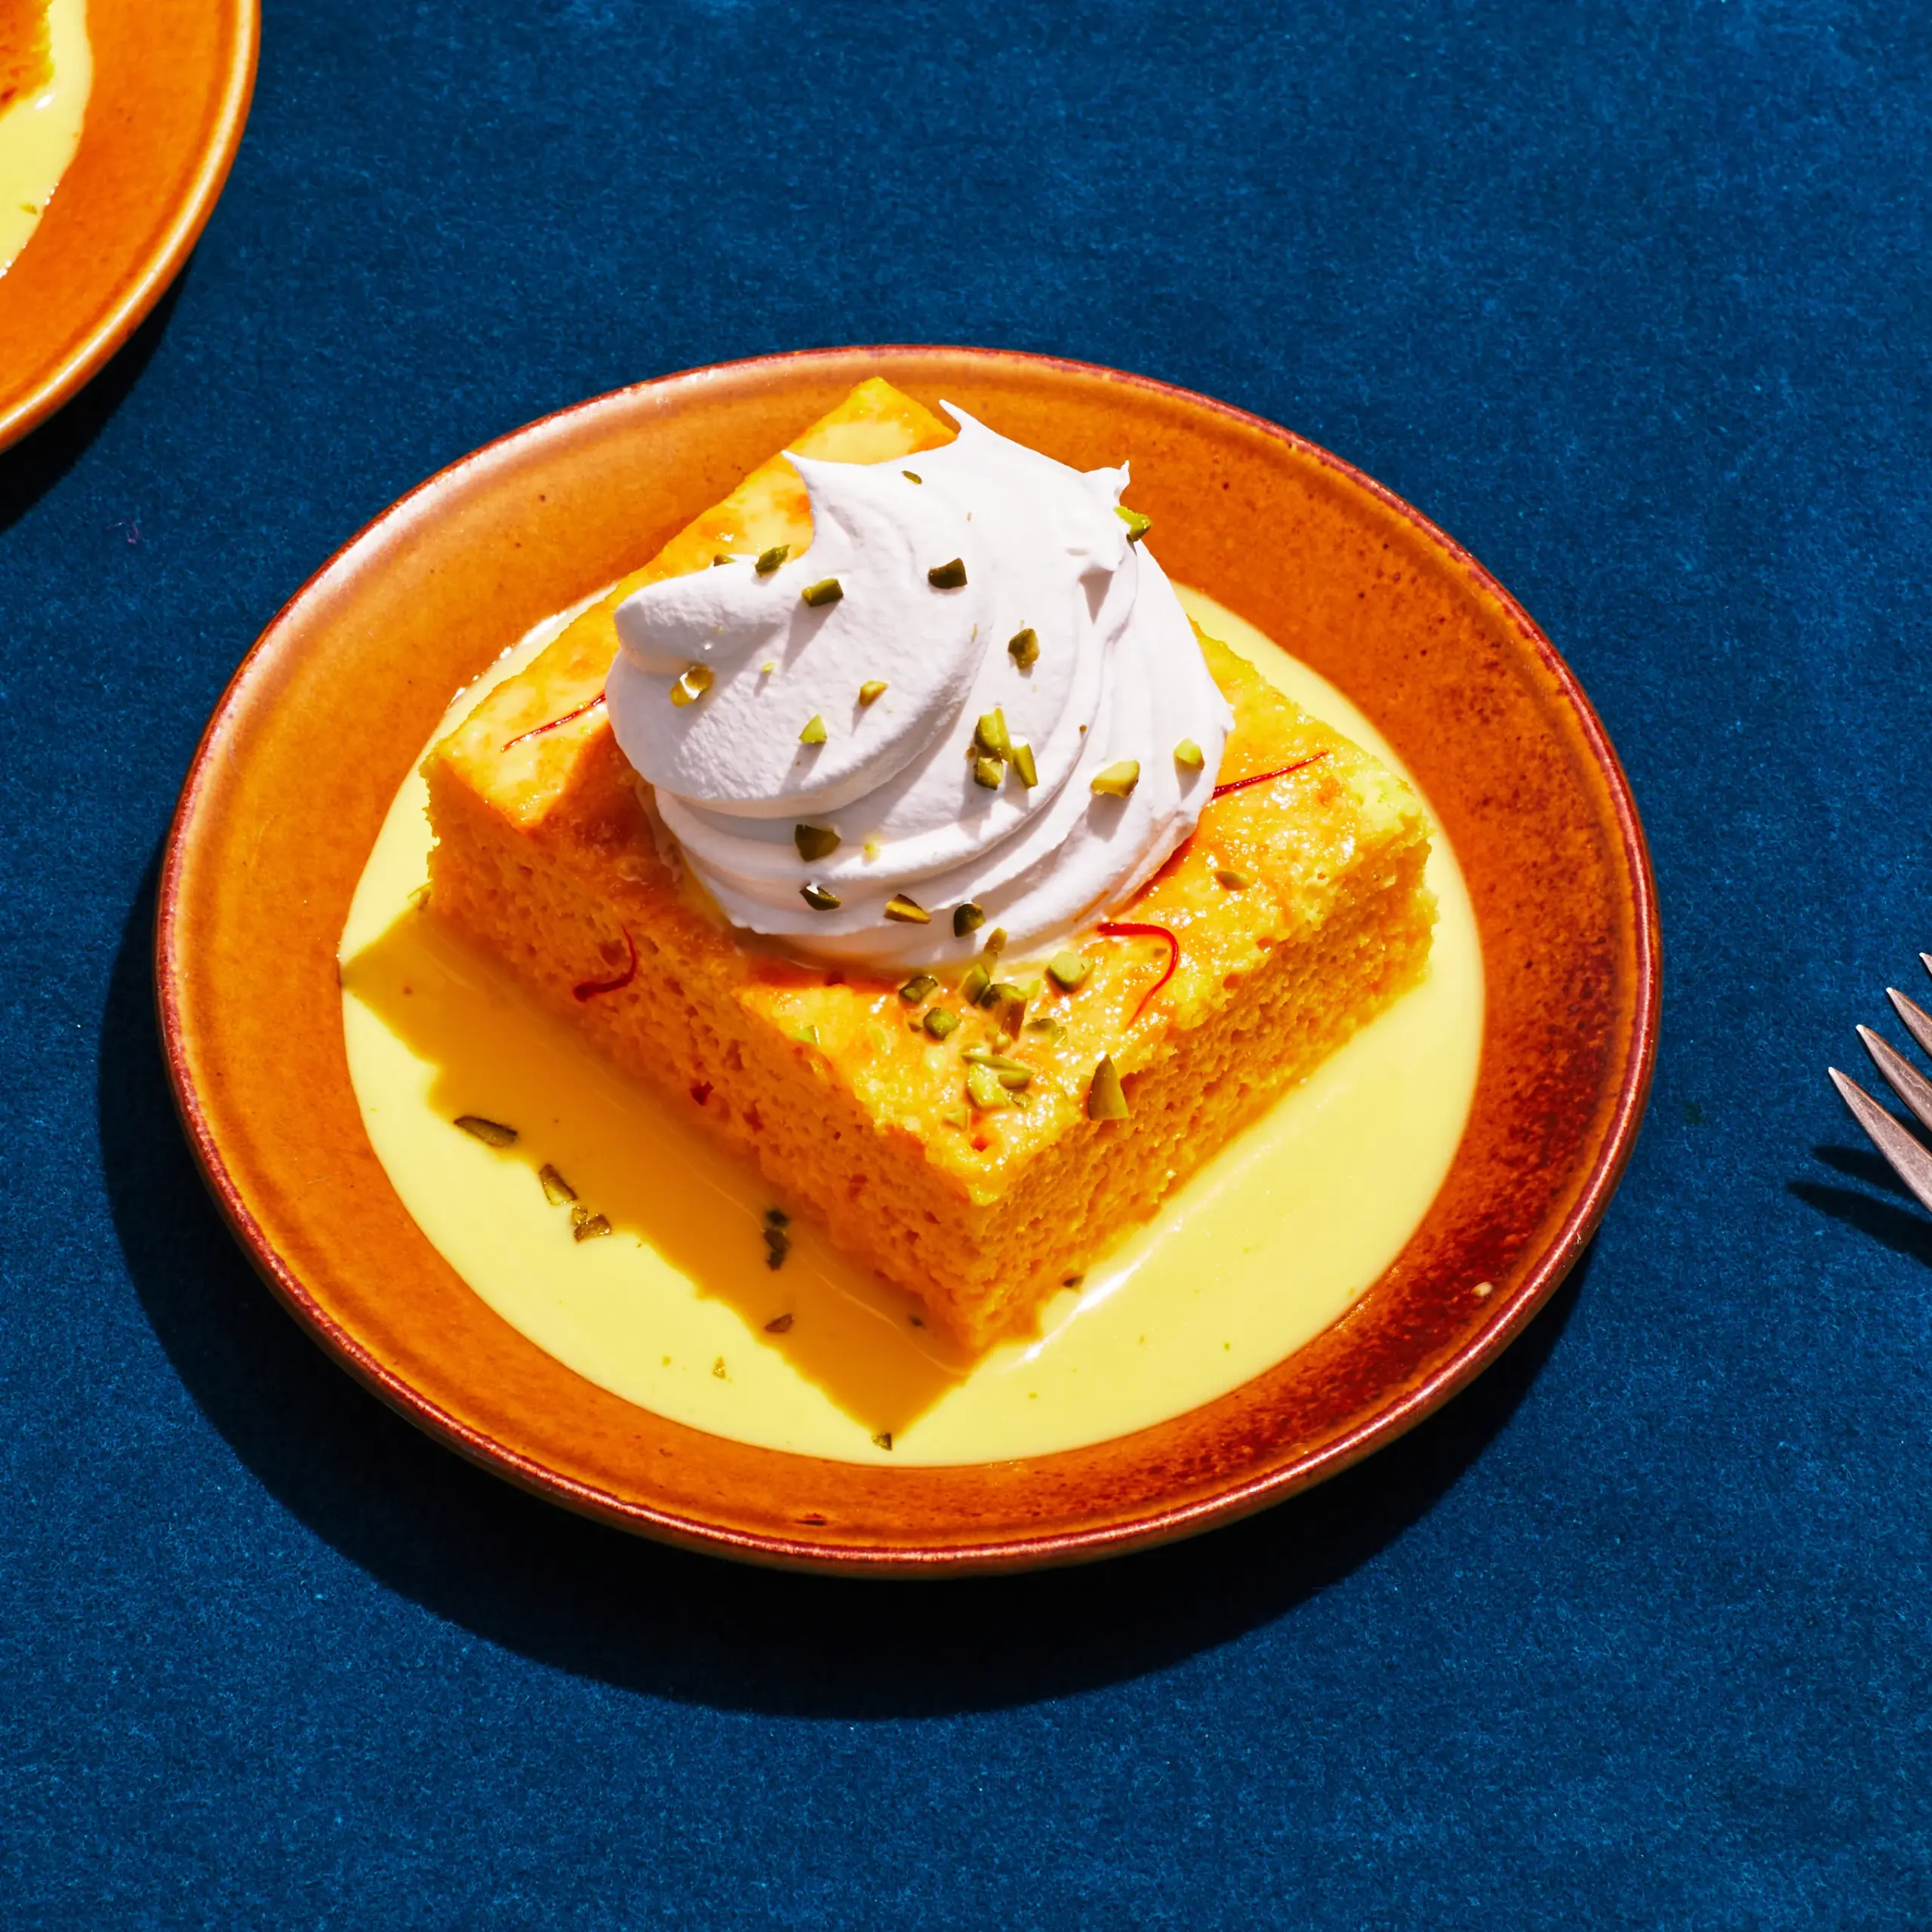
Milk Cake, also known as Kalakand, is a delightful Indian sweet made from fresh milk. This traditional treat is characterized by its soft, crumbly texture and rich flavor, making it a favorite during festivals and special occasions. The primary ingredients are milk and sugar, but the magic lies in the technique of curdling the milk and cooking it to perfection. The end result is a luscious dessert that melts in your mouth, offering a sweet, milky taste that is simply irresistible.
Making Milk Cake at home might seem intimidating, but with the right steps, anyone can achieve this delicious confection. The process involves preparing chenna (fresh cheese) from milk, which is then sweetened and flavored. This recipe is not only easy to follow but also allows you to customize the sweetness and flavor according to your preference. Serve it chilled or at room temperature, and watch it disappear from the plate in no time!
Ingredients:
- 1 liter full-fat milk
- 2-3 tablespoons lemon juice or vinegar
- 1 cup sugar
- 1/4 teaspoon cardamom powder
- 2 tablespoons ghee (clarified butter)
- Chopped nuts (almonds, pistachios) for garnishing
- A pinch of saffron strands (optional)
Instructions:
Start by boiling the milk in a heavy-bottomed pan. Once it comes to a boil, add the lemon juice or vinegar gradually while stirring gently until the milk curdles and the whey separates. Remove it from the heat and pour the curdled milk into a muslin cloth or fine sieve to drain the whey. Rinse the chenna under cold water to remove any sourness, then squeeze out excess water. In another pan, heat ghee, then add the chenna, sugar, and cardamom powder. Cook on low flame, stirring continuously until the mixture thickens and starts to leave the sides of the pan. Transfer the mixture to a greased plate, flatten it, and allow it to cool. Once set, cut into squares and garnish with chopped nuts and saffron strands.
Extra Tips:
When preparing Milk Cake, make sure the milk is fresh and full-fat for the best texture and flavor. For a creamier consistency, you can add a tablespoon of milk powder while cooking the chenna mixture. Be sure to stir continuously to prevent burning and guarantee even cooking. If you prefer a more intense flavor, consider adding a few drops of rose or kewra water. Finally, let the Milk Cake cool completely before cutting it into pieces to achieve clean edges and a beautiful presentation. Enjoy your homemade treat!
Cooking Steps
To make the perfect milk cake, I start by gathering all the ingredients I need. Once I have everything ready, I prepare the milk mixture, ensuring it’s just right. After that, I pour it into a tray and let it chill until it’s firm and ready to be cut into delicious serving pieces.
Step 1. Gather All Ingredients Needed
As I prepare to make a delicious milk cake, I like to guarantee I have all the necessary ingredients within arm’s reach. First, I gather full-fat milk, sugar, lemon juice, and a pinch of cardamom for that aromatic touch. I also set aside some unsalted butter and all-purpose flour. If I’m feeling adventurous, I explore ingredient substitutions, like using coconut milk for a tropical twist or almond flour for a gluten-free option. Sourcing ingredients from local markets often leads to fresher flavors, which I always appreciate. I check my pantry for any additional touches, such as chopped nuts or dried fruits. With everything organized, I’m ready to plunge into the next steps of creating this delightful treat!
Step 2. Prepare the Milk Mixture
Once I’ve gathered my ingredients, I start by pouring the full-fat milk into a heavy-bottomed saucepan. I love using full-fat milk for its rich flavor and creamy texture, which add depth to my milk cake. As the milk heats, I’m reminded of the numerous milk benefits, like its calcium and protein content, which make this dessert not just delicious but nourishing too. While waiting for it to simmer, I often ponder the different milk types; sometimes I’ll experiment with almond or coconut milk for a unique twist. Once it’s steaming, I carefully stir in sugar and a hint of cardamom, letting the aroma fill my kitchen. This is where the magic begins, setting the stage for a delightful treat!
Step 3. Pour Mixture Into Tray
After the milk mixture has simmered to perfection, I gently pour it into a greased tray, ensuring a smooth and even distribution. Mastering the pouring techniques can elevate your milk cake, so here’s how I do it:
- Choose the Right Tray: I opt for a shallow tray for quicker cooling.
- Grease Generously: I use ghee or butter to prevent sticking.
- Angle the Tray: I tilt the tray slightly, allowing the mixture to flow evenly across its surface.
- Pour Slowly: I take my time, ensuring there are no air bubbles, which could ruin the texture.
This careful tray preparation not only enhances the presentation but also sets the stage for a delightful milk cake. Enjoy the process!
Step 4. Chill Until Firm
To achieve the perfect texture for your milk cake, I let the mixture chill until it’s firm, which usually takes about 2 to 3 hours in the refrigerator. During this time, I often explore various chilling techniques, like using an ice bath to speed things up if I’m in a hurry. Ensuring the cake sets properly is essential for a delightful dessert presentation. A well-chilled milk cake not only holds its shape beautifully but also enhances the flavors, making each bite a creamy delight. When I finally remove it from the fridge, the anticipation builds as I envision the elegant slices I’ll serve. Remember, patience is key; the result is worth the wait!
Step 5. Cut Into Serving Pieces
With the milk cake now chilled and firm, it’s time to cut it into serving pieces. This is where your creativity can shine through with innovative serving techniques. Here’s how I do it:
- Choose Your Knife: Use a sharp, clean knife to guarantee smooth cuts.
- Determine Portion Sizes: Decide on portion sizes based on your guests—smaller pieces for a larger crowd or generous slices for a small gathering.
- Cut with Precision: Make straight cuts, ensuring each piece has an even texture and thickness.
- Garnish: If you’d like, add a sprinkle of nuts or a drizzle of syrup for a touch of flair.
Now, you’ve got perfectly cut milk cake pieces ready to impress everyone at the table! Enjoy!
Nutritional Guide
While indulging in a delicious slice of milk cake, I often find myself curious about its nutritional benefits. This delightful dessert not only satisfies my sweet tooth but also offers some surprising health advantages. Let’s explore the caloric content and health benefits that make milk cake a worthy treat.
| Nutrient | Amount per Slice |
|---|---|
| Calories | 200 |
| Protein | 5g |
| Sugars | 10g |
Milk cake contains essential proteins and can provide a quick energy boost, thanks to its moderate sugar content. By enjoying it in moderation, I can savor the flavors while also appreciating the added nutrients. So, treat yourself to a slice and enjoy its delightful balance!
Final Thoughts
As I reflect on the delightful experience of enjoying milk cake, I’m reminded of how this sweet treat can bring joy to any occasion. The beauty of milk cake lies not only in its taste but also in its versatility. Here are a few milk cake variations to inspire your creativity:
- Coconut Milk Cake – Infuse a tropical twist with coconut milk.
- Chocolate Milk Cake – Add cocoa for a rich, indulgent flavor.
- Fruit-Infused Milk Cake – Experiment with seasonal fruits for freshness.
- Spiced Milk Cake – Incorporate cardamom or cinnamon for warmth.
Each variation offers unique dessert presentation opportunities, turning a simple cake into a stunning centerpiece. So, go ahead and innovate—your guests will be delighted!
Frequently Asked Questions
Can I Substitute Milk With Non-Dairy Alternatives?
Absolutely, I’ve substituted milk with non-dairy alternatives before. While I appreciate the nutritional benefits, I’ve noticed some taste differences. Experimenting with options like almond or oat milk can lead to delightful surprises in flavor!
How Long Does Milk Cake Last at Room Temperature?
I’ve found that milk cake storage at room temperature is safe for about two to three days. After that, it’s best to refrigerate it to maintain freshness and prevent spoilage. Enjoy it while it’s delicious!
Is Milk Cake Suitable for Vegetarians?
Absolutely, I’ve enjoyed milk cake made with vegetarian ingredients! It’s a delightful treat that offers numerous benefits, like being rich in flavor and texture while catering to those who prefer plant-based options. You’ll love it!
Can I Freeze Milk Cake for Later Use?
Absolutely, I’ve found that proper freezing techniques can preserve the delightful texture of desserts. Just wrap it tightly and follow some storage tips, and you’ll have a sweet treat ready for another day’s indulgence!
What Variations Can I Try With Milk Cake?
I love experimenting with variations! Try adding spice variations like cardamom or cinnamon for warmth, or top it with fresh fruit like strawberries or mangoes for a vibrant twist. Each choice transforms the experience deliciously!
Conclusion
In the end, making milk cake is like crafting a sweet memory that lingers on your palate. With each bite, you’ll taste the love and tradition woven into this delightful treat. I hope you enjoy baking it as much as I do, transforming simple ingredients into something truly special. So, gather your loved ones, share a slice, and let the magic of milk cake bring a little sweetness to your day! Happy baking!
Milk Cake Recipe
Ingredients
Equipment
Method
- In a heavy-bottomed pan, boil 1 liter of milk on medium heat. Stir occasionally to prevent burning.
- Once boiling, add lemon juice gradually to curdle the milk. Stir until the whey separates.
- Strain the curdled milk through a muslin cloth. Rinse with cold water to remove lemon flavor.
- Press out excess water and crumble the chenna (milk solids).
- Heat ghee in the same pan, add crumbled chenna, and cook on low heat for 5 minutes.
- Add sugar and cardamom powder. Keep stirring until the mixture thickens (10–12 minutes).
- Transfer the mixture to a greased tray, flatten the top, and garnish with nuts.
- Let it cool for 2 hours, then cut into squares.
Notes
- Use full-fat milk for best texture.
- Adjust sugar as per taste.
- Store in the fridge for up to 3 days.