

I love making a homemade Oreo cake! It combines rich chocolate with creamy Oreo frosting for a delightful treat. Start by mixing a chocolate cake mix with eggs and crushed Oreos, then bake until perfectly fluffy. I usually let it cool completely before frosting to keep it from melting. You can even get creative with fillings and toppings! If you’re interested in more tips and variations, I’ve got plenty to share!
History
When I think about the Oreo, I can’t help but marvel at its rich history that dates back to 1912. The Oreo’s origins began in a small bakery in New York City, where it quickly captured hearts as a delightful chocolate wafer filled with a sweet cream. Over the years, I’ve watched its evolution unfold, turning this simple treat into a cultural icon. From the classic twist and dunk to innovative flavors like birthday cake and red velvet, the Oreo has continually reinvented itself. It’s fascinating to see how this cookie adapts, embracing trends while maintaining its classic charm. Each bite tells a story, connecting generations through shared experiences and creativity, all stemming from that original recipe.
Recipe
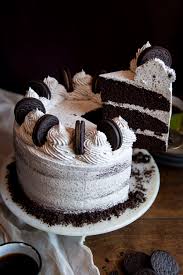
If you’re a fan of the classic Oreo cookie, then this Oreo cake recipe is sure to delight your taste buds. This decadent dessert combines the rich flavors of chocolate and cream, creating a moist cake that’s perfect for any celebration or just a sweet treat at home. The layers of cake are complemented by a creamy Oreo frosting, making it a favorite for both kids and adults alike.
Baking an Oreo cake is not only simple but also incredibly rewarding. With just a few ingredients, you can whip up a stunning dessert that will impress your family and friends. Whether you’re celebrating a birthday, hosting a dinner party, or simply satisfying your sweet tooth, this Oreo cake is sure to be a hit. Grab your apron, and let’s get started!
Ingredients:
- 1 box chocolate cake mix
- 3 large eggs
- 1 cup water
- 1/2 cup vegetable oil
- 1 cup crushed Oreos (about 10 cookies)
- 1 cup heavy cream
- 1 cup powdered sugar
- 1 teaspoon vanilla extract
- 12 Oreos for decoration
Cooking Instructions:
Preheat your oven to 350°F (175°C) and grease two 9-inch round cake pans. In a large mixing bowl, combine the chocolate cake mix, eggs, water, and vegetable oil, and mix until well blended. Gently fold in the crushed Oreos. Divide the batter evenly between the prepared cake pans and bake for 25-30 minutes, or until a toothpick inserted in the center comes out clean. Allow the cakes to cool in the pans for 10 minutes before transferring them to a wire rack to cool completely. While the cakes cool, make the frosting by whipping the heavy cream, powdered sugar, and vanilla extract until stiff peaks form. Once the cakes are cool, spread a layer of frosting between the two cake layers and cover the top and sides with the remaining frosting. Finally, decorate the cake with whole Oreos on top.
Extra Tips:
To elevate your Oreo cake, consider adding a layer of chocolate ganache between the cake layers for an even richer flavor. If you prefer a more intense Oreo flavor, you can also add more crushed cookies to the frosting. Make sure to store any leftovers in an airtight container in the refrigerator to keep it fresh. For an added touch, serve each slice with a drizzle of chocolate syrup or a scoop of vanilla ice cream for a delightful dessert experience!
Cooking Steps
Now that we have our ingredients ready, let’s jump into the cooking steps that will bring this Oreo cake to life. First, I’ll preheat the oven to 350°F to guarantee it’s nice and hot for baking. Then, I’ll mix the dry ingredients thoroughly before combining the wet ones, setting us up for a deliciously fluffy cake!
Step 1. Preheat Oven to 350°F
Before diving into mixing the ingredients, it’s essential to preheat your oven to 350°F. This step might seem simple, but it’s vital for achieving that perfect Oreo cake. While the oven warms up, I take a moment to guarantee I’m practicing oven safety—keeping oven mitts handy and making sure nothing flammable is nearby. A properly preheated oven allows for even baking, which is one of my top baking tips. I love how the heat begins to circulate, creating that cozy atmosphere in my kitchen, making the anticipation even sweeter. By the time I’m ready to pour in my batter, the oven is just right, assuring my cake rises beautifully and bakes to perfection.
Step 2. Mix Dry Ingredients Thoroughly
With the oven warmed to a perfect 350°F, it’s time to focus on mixing the dry ingredients thoroughly. I grab my mixing bowl and sift together flour, cocoa powder, baking soda, and a pinch of salt. Using a whisk, I employ gentle mixing techniques to guarantee everything’s well combined—this step is essential! Each ingredient plays an important role in the cake’s texture and flavor, so I take my time to blend them perfectly. The cocoa adds richness, while the baking soda guarantees a light, airy cake. I can already envision the delightful layers of flavor coming together. Once I’m satisfied with the mix, I’m ready to move on to the next exciting step in creating this Oreo masterpiece!
Step 3. Combine Wet Ingredients Well
As I gather my ingredients, the aroma of vanilla and the richness of melted butter fill the air, signaling that it’s time to combine the wet ingredients well. I reach for my mixing bowl and grab my whisk, ready to utilize some effective whisk techniques that will create a smooth and luscious mixture. Here’s what I do:
- Melted Butter: I pour in the warm melted butter, letting it dance with the sugar, creating a silky base.
- Eggs and Vanilla: Next, I crack in the eggs and add vanilla, whisking vigorously to achieve a creamy texture.
- Milk: Finally, I drizzle in the milk, adjusting the ingredient ratios for that perfect consistency.
With each stroke, I feel the anticipation build for the delicious cake to come!
Step 4. Fold in Crushed Oreos
Gently folding in the crushed Oreos transforms my batter, infusing it with that iconic cookie flavor. I love to experiment with different Oreo flavors—think mint or peanut butter—to elevate my cake to a whole new level. Using a spatula, I carefully incorporate the crushed cookies, ensuring they’re evenly distributed, which creates delightful pockets of creamy filling and crunchy bits. It’s essential not to overmix; I want those Oreo pieces to maintain their texture. A great baking tip is to reserve a handful of crushed Oreos to sprinkle on top before baking, adding an eye-catching finish. This simple step not only enhances the presentation but also keeps that delicious Oreo crunch in every bite.
Step 5. Bake for 25-30 Minutes
It’s important to set your oven to 350°F (175°C) before sliding in the cake. This step is vital for achieving that perfect, gooey texture we all crave. As I place the cake in the oven, I can’t help but feel the excitement build. Here are some baking tips to keep in mind:
- Set a timer for 25-30 minutes; this helps with time management.
- Check for doneness by inserting a toothpick—if it comes out clean, you’re golden.
- Let the cake cool in the pan for a few minutes before transferring it to a wire rack.
Each moment feels like a countdown to bliss, and trust me, the aroma that fills your kitchen will be worth the wait!
Nutritional Guide
When whipping up an Oreo cake, it’s essential to keep nutritional considerations in mind. Balancing indulgence with health can elevate your baking game. Here’s a quick guide on caloric content and ingredient benefits:
| Ingredient | Benefits |
|---|---|
| Oreos | Great for a quick energy boost |
| Cream Cheese | Provides calcium and healthy fats |
| Eggs | Packed with protein and essential nutrients |
| Cocoa Powder | Rich in antioxidants, good for heart health |
Final Thoughts
Baking an Oreo cake is not just about satisfying a sweet tooth; it’s about creating a delightful experience that balances flavor and nutrition. As I reflect on this journey, I encourage you to explore the joy of baking with these tips:
Baking an Oreo cake is a joyful experience that harmonizes flavor with creativity—embrace the journey and savor every moment!
- Experiment with cake variations—try adding different fillings or toppings like caramel or mint.
- Use quality ingredients; they make a world of difference in taste and texture.
- Don’t rush the process; let the cake cool completely for a perfect slice.
With these baking tips in mind, you can craft a masterpiece that not only pleases the palate but also sparks creativity. So, roll up your sleeves and let your imagination run wild. Happy baking!
Frequently Asked Questions
Can I Use Gluten-Free Oreos for This Recipe?
I love exploring gluten-free options, and using gluten-free Oreos as an Oreo alternative works perfectly. They maintain that delicious flavor while accommodating dietary needs, making my baking adventures even more inclusive and creative. Enjoy!
How Can I Store Leftover Oreo Cake?
So, you’ve got leftover cake? Oh, the tragedy! Store it in the refrigerator for up to a week, or freeze it for a sweet eternity. Just wrap it well, and it’ll stay deliciously intact!
Can I Substitute Other Cookies for Oreos?
I love experimenting with cookie alternatives for flavor variations. Try using chocolate chip or peanut butter cookies; they add a unique twist. Just remember, the texture might change, but the deliciousness will definitely shine through!
How Long Does the Cake Take to Cool?
Once I pull the cake from the oven, I let it cool for about 30 minutes. This cooling time enhances the cake texture, ensuring it’s perfectly moist and ready for frosting or serving.
What Are Some Decoration Ideas for Oreo Cake?
When I decorate my Oreo cake, I love using Oreo frosting, topping it with cookie crumbles, drizzling chocolate ganache, adding whipped cream, sprinkling edible glitter, and finishing with chocolate shavings for that extra flair.
Conclusion
In wrapping up, I can’t help but share that over 90 million Oreos are consumed every day around the world—now that’s a staggering number! This homemade Oreo cake is not just a treat; it’s a celebration of flavors that brings joy to every bite. Whether you’re making it for a special occasion or a simple dessert, you’ll find that each slice is packed with nostalgia and sweetness. So, grab your ingredients and let’s indulge in this delightful creation!
Oreo Cake Recipe Homemade
Ingredients
Equipment
Method
- Crush 25 Oreos (including cream) into fine crumbs using a food processor.
- Mix crumbs with melted butter until well combined.
- Press firmly into the bottom of an 8-inch springform pan. Chill for 10 mins.
- Beat cream cheese and powdered sugar until smooth.
- Add vanilla extract and mix.
- In another bowl, whip heavy cream to stiff peaks.
- Gently fold whipped cream into the cream cheese mixture.
- Crush the remaining 5-10 Oreos into chunks and fold into the filling.
- Pour filling over the chilled crust and smooth the top.
- Garnish with mini Oreos or extra crumbs.
- Refrigerate for at least 4 hours (or overnight) until set.
Notes
- For a stronger Oreo flavor, add extra crushed cookies to the filling.
- Substitute heavy cream with cool whip for a lighter texture.
- Store in the fridge for up to 3 days.