

If you’re looking to create a cozy, homestyle Christmas dinner, I’ve got some delightful Pioneer Woman recipes for you! Picture perfect roast beef, herb-crusted prime rib, and honey-glazed ham as your main attractions. Pair them with creamy garlic mashed potatoes and classic green bean casserole for a memorable meal. Don’t forget classic pumpkin and pecan pies for dessert! Each dish brings warmth and joy to your table, and there’s plenty more to discover to inspire your holiday feast!
Perfect Roast Beef
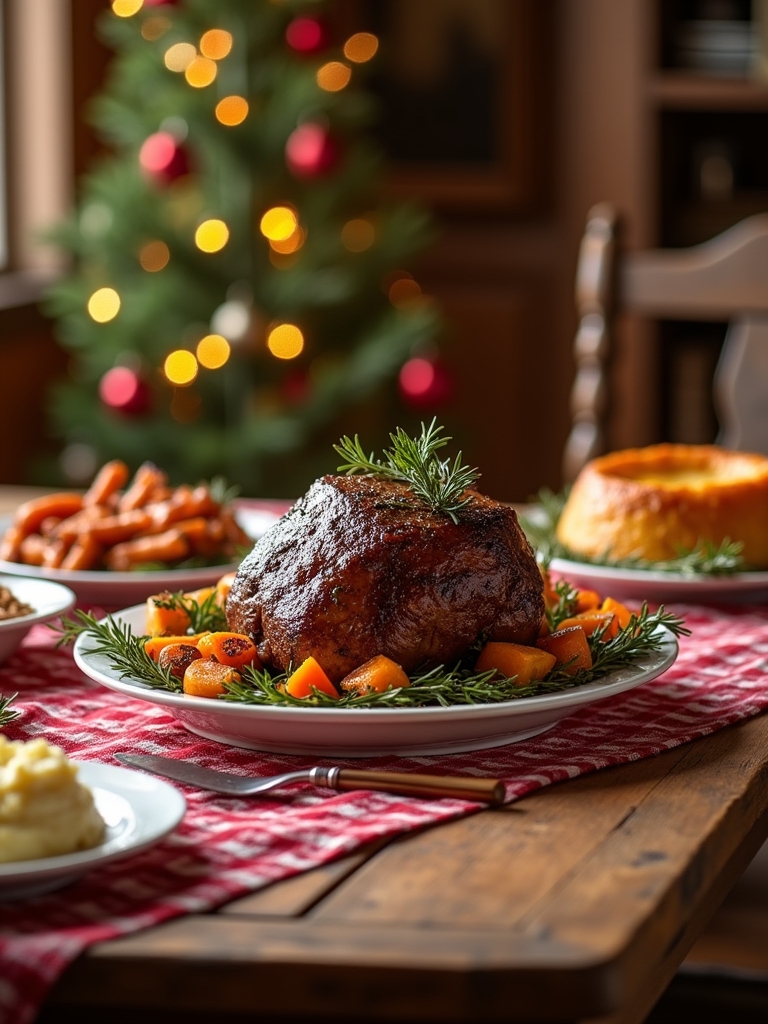
When it comes to holiday feasts, a perfect roast beef can steal the show and become the centerpiece of your Christmas dinner. This dish not only radiates elegance but also fills your home with a warm, mouthwatering aroma that invites everyone to the table. The key to achieving that tender, flavorful roast lies in selecting the right cut of beef, seasoning it properly, and cooking it to just the right temperature. With a few simple ingredients and some care, you can create a succulent roast that will leave your guests raving.
To achieve the perfect roast beef, it’s important to let the meat come to room temperature before cooking. This helps it cook evenly and develop a beautiful crust. Additionally, resting the beef after cooking allows the juices to redistribute, ensuring each slice is moist and flavorful. Pair this roast with your favorite sides, and you’ll have a holiday meal that feels both special and satisfying.
Ingredients:
- 3-4 pounds beef roast (such as ribeye, sirloin, or tenderloin)
- 2 tablespoons olive oil
- 4 cloves garlic, minced
- 2 teaspoons salt
- 1 teaspoon black pepper
- 1 teaspoon dried rosemary
- 1 teaspoon dried thyme
- 1 teaspoon onion powder
- 1 cup beef broth
Instructions:
Preheat your oven to 450°F (232°C). In a small bowl, combine the olive oil, minced garlic, salt, black pepper, rosemary, thyme, and onion powder to create a paste. Rub this mixture all over the beef roast, ensuring it’s evenly coated. Place the roast in a roasting pan and pour the beef broth into the bottom of the pan. Roast in the preheated oven for 15 minutes to sear the outside, then reduce the temperature to 325°F (163°C) and continue cooking until the internal temperature reaches your desired doneness—around 135°F (57°C) for medium-rare. Once done, remove the roast from the oven and let it rest for at least 15-20 minutes before slicing.
Extra Tips:
To elevate your roast beef, consider using a meat thermometer for precise cooking results; this will help you avoid overcooking. Additionally, feel free to experiment with different herbs and spices to match your personal taste preferences. Pair the roast beef with a rich gravy made from the drippings for an even more delicious experience. Finally, remember that resting the meat is essential—don’t skip this step, as it really makes a difference in texture and juiciness. Enjoy your festive meal!
Herb-Crusted Prime Rib
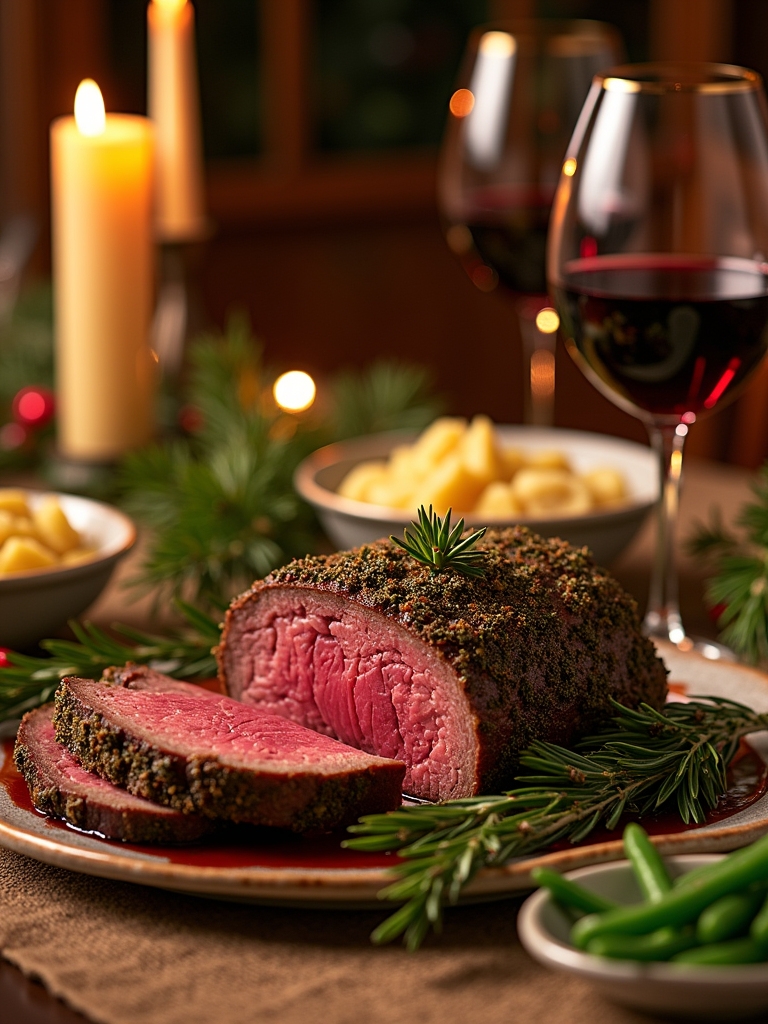
For a truly memorable holiday feast, an herb-crusted prime rib is a show-stopping centerpiece that will impress family and friends alike. The rich flavors of the beef combined with a fragrant herb crust create an indulgent dish perfect for a festive gathering. Cooking prime rib may seem intimidating, but with the right preparation and techniques, you can achieve a tender, juicy roast that is full of flavor.
The key to a successful prime rib lies in seasoning and cooking it to the perfect doneness. The herb crust not only enhances the flavor but also adds a beautiful texture to the exterior. Pair this succulent roast with traditional sides like creamy mashed potatoes, roasted vegetables, or Yorkshire pudding for a complete holiday meal that everyone will love.
Ingredients:
- 1 (4-5 pound) prime rib roast, bone-in
- 3 tablespoons olive oil
- 4 cloves garlic, minced
- 2 tablespoons fresh rosemary, chopped
- 2 tablespoons fresh thyme, chopped
- 2 tablespoons fresh parsley, chopped
- 1 tablespoon salt
- 1 tablespoon black pepper
- 1 teaspoon onion powder
- 1 teaspoon garlic powder
Instructions:
Preheat your oven to 450°F (232°C). In a small bowl, mix together the olive oil, minced garlic, rosemary, thyme, parsley, salt, black pepper, onion powder, and garlic powder to create a herb paste. Rub this mixture all over the prime rib, making sure to cover the entire surface for maximum flavor. Place the seasoned roast on a rack in a roasting pan, bone side down. Roast in the preheated oven for 15 minutes, then reduce the temperature to 325°F (163°C) and continue cooking until the internal temperature reaches 130°F (54°C) for medium-rare, about 1.5 to 2 hours. Let the prime rib rest for at least 20 minutes before slicing to allow the juices to redistribute.
Extra Tips:
When cooking prime rib, using a meat thermometer is vital to guarantee you achieve your desired level of doneness. Remember that the roast will continue to cook slightly after being removed from the oven, so pulling it out at 130°F is ideal for medium-rare. Additionally, letting the roast rest is significant—this step helps keep the meat juicy and tender. For an added touch, consider serving with a horseradish sauce or a red wine reduction to elevate the flavors even further. Enjoy your holiday dinner!
Honey-Glazed Ham
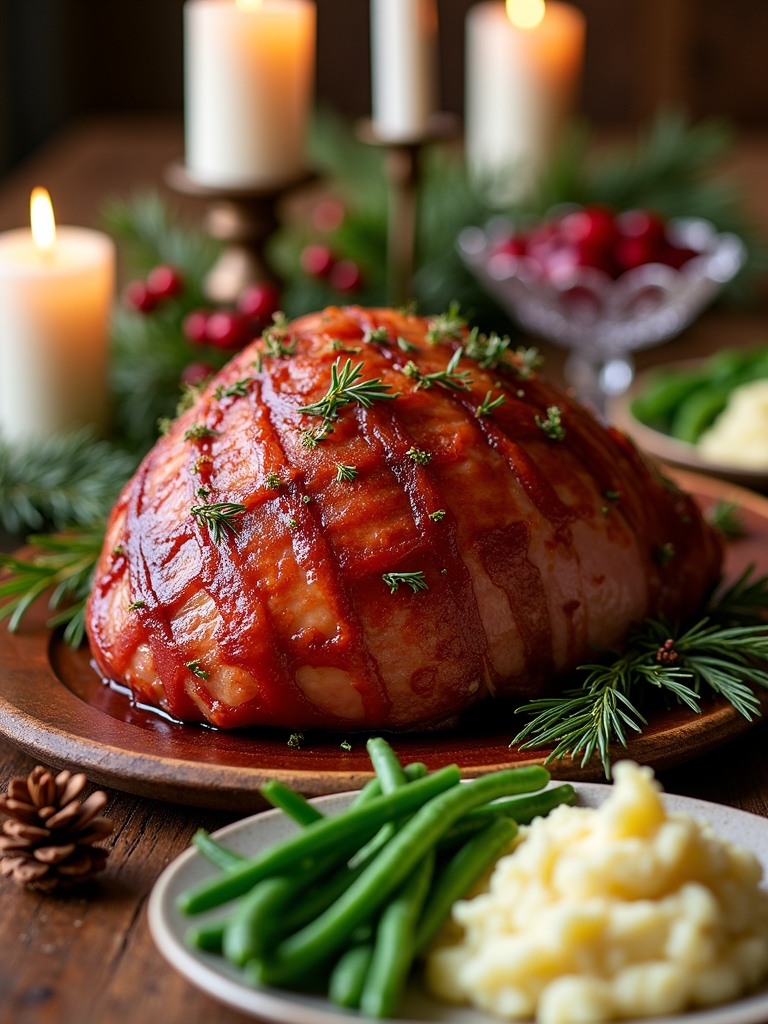
Honey-Glazed Ham is a classic centerpiece for any Christmas dinner, bringing warmth and sweetness to your festive table. This dish is not only visually stunning but also incredibly flavorful, thanks to a rich glaze that caramelizes beautifully during cooking. The combination of honey, brown sugar, and spices creates a delightful coating that pairs perfectly with the savory ham, making it a crowd-pleaser for family and friends alike.
Preparing Honey-Glazed Ham is a straightforward process that requires minimal effort, leaving you with plenty of time to focus on other dishes and holiday preparations. The result is a juicy, tender ham that is infused with a luscious glaze, ready to be carved and served. Whether you’re hosting a large gathering or enjoying an intimate holiday meal, this recipe will surely impress your guests and become a cherished holiday tradition.
Preparing Honey-Glazed Ham is easy and rewarding, creating a tender centerpiece that delights guests at any holiday gathering.
Ingredients:
- 1 fully cooked bone-in ham (6-8 pounds)
- 1 cup honey
- 1 cup brown sugar
- 1/4 cup Dijon mustard
- 1/4 teaspoon ground cloves
- 1/4 teaspoon ground cinnamon
- 1/4 teaspoon ground nutmeg
- 1/2 cup apple juice or cider
- Whole cloves (optional, for decoration)
Cooking Honey-Glazed Ham involves a few simple steps. Preheat your oven to 325°F (160°C). Score the surface of the ham in a diamond pattern and place it in a roasting pan. In a saucepan, combine honey, brown sugar, Dijon mustard, ground cloves, cinnamon, nutmeg, and apple juice. Heat over medium heat until the sugar is dissolved and the mixture is smooth. Brush the glaze generously over the ham, making sure to get it into the scored lines. Cover the ham loosely with foil and bake for about 1.5 to 2 hours, basting every 30 minutes with the remaining glaze, until the ham reaches an internal temperature of 140°F (60°C). Remove the foil for the last 20-30 minutes to allow the glaze to caramelize.
For the best results when cooking Honey-Glazed Ham, make certain you let the ham rest for at least 15 minutes after removing it from the oven before slicing. This helps the juices redistribute throughout the meat, making sure each slice is moist and flavorful. Additionally, if you want a more festive presentation, you can stud the ham with whole cloves before baking or garnish it with fresh herbs and fruit slices. Feel free to adjust the sweetness of the glaze according to your preference by adding more honey or brown sugar, and don’t hesitate to experiment with different spices to make the recipe your own!
Creamy Garlic Mashed Potatoes
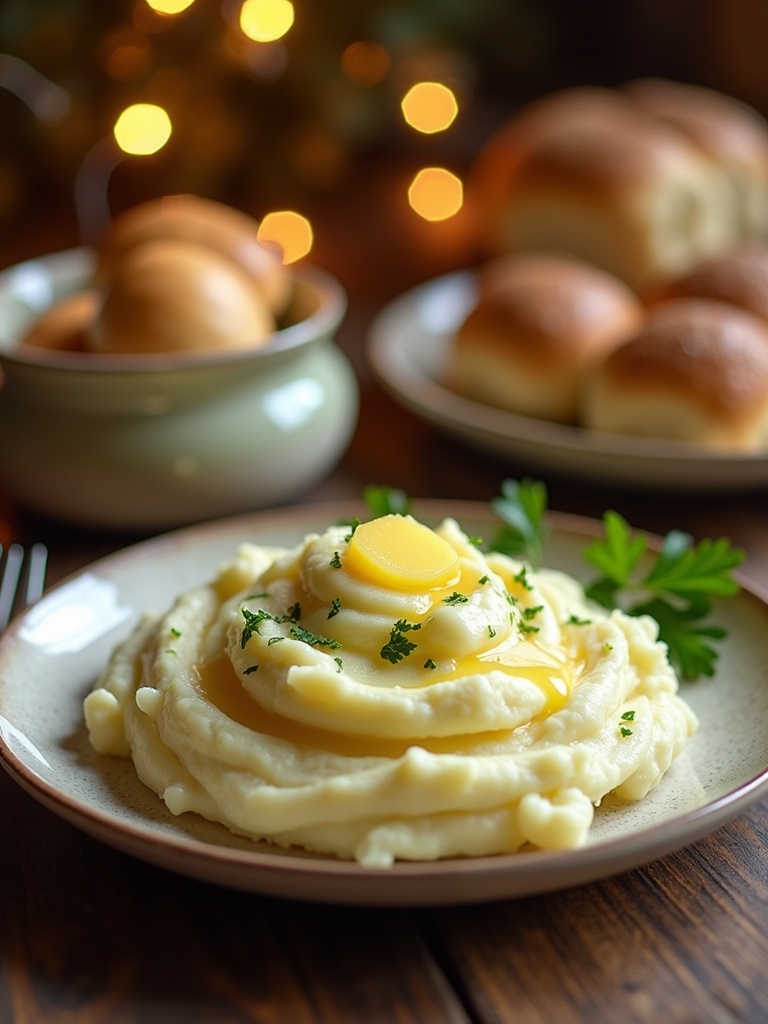
Creamy Garlic Mashed Potatoes are the ultimate comfort food, perfect for any holiday dinner table. The rich, velvety texture combined with the robust flavor of garlic makes these mashed potatoes an irresistible side dish that pairs wonderfully with turkey, ham, or beef. They are not only easy to make but also a delightful way to elevate your festive meal. Whether you’re hosting a large gathering or enjoying a cozy dinner at home, these creamy mashed potatoes will be a hit with everyone.
To achieve the perfect creamy consistency, it’s essential to use the right type of potatoes. Yukon Gold potatoes are an excellent choice for their buttery flavor and creamy texture. The addition of roasted garlic adds depth and a subtle sweetness, transforming traditional mashed potatoes into a gourmet side. With just a few ingredients and simple techniques, you’ll have a delectable dish that everyone will rave about.
Ingredients:
- 3 pounds Yukon Gold potatoes, peeled and cut into chunks
- 1 head of garlic
- 1 cup heavy cream
- 1/2 cup unsalted butter
- Salt, to taste
- Pepper, to taste
- Fresh chives or parsley, for garnish (optional)
Cooking Instructions:
Start by preheating your oven to 400°F (200°C). Wrap the head of garlic in aluminum foil and roast it in the oven for about 30-35 minutes until the cloves are soft and caramelized. While the garlic is roasting, place the peeled and chopped potatoes in a large pot, cover them with cold water, and add a generous pinch of salt. Bring the water to a boil, then reduce the heat and let the potatoes simmer until tender, about 15-20 minutes. Once the garlic is done roasting, squeeze the softened cloves out of their skins into a bowl. Drain the potatoes and return them to the pot. Add the roasted garlic, butter, and heavy cream, and mash everything together until creamy and smooth. Season with salt and pepper to taste, and garnish with fresh chives or parsley if desired.
Extra Tips:
For an even creamier texture, consider using a potato ricer instead of a traditional masher. This will help eliminate lumps and create a silky consistency. If you prefer a stronger garlic flavor, feel free to roast an extra head of garlic, or add some minced raw garlic to the mix for a sharper taste. Additionally, you can prepare the mashed potatoes ahead of time and keep them warm in a slow cooker on low heat, adding a splash of cream if they become too thick before serving. Enjoy your creamy garlic mashed potatoes!
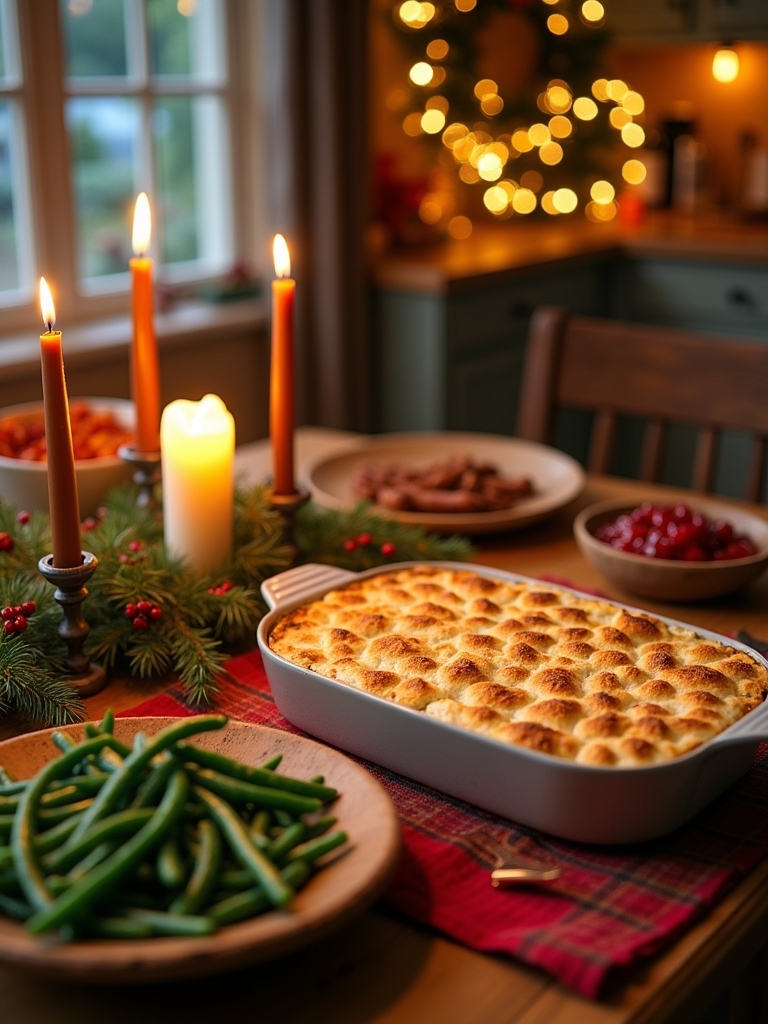
Classic Green Bean Casserole

Classic Green Bean Casserole is a beloved dish that has become a staple at holiday gatherings, particularly during Christmas. This creamy, savory casserole combines tender green beans with a rich mushroom sauce, topped with crispy fried onions for that perfect crunch. Whether it’s served on a festive table or at a cozy family gathering, this dish embodies comfort and nostalgia, making it a must-have for your holiday spread.
Making a Classic Green Bean Casserole is not only simple but also a great way to incorporate veggies into your meal in a way that everyone will enjoy. The blend of flavors and textures makes it a delightful side dish that complements any main course, from roasted turkey to glazed ham. With just a few ingredients and minimal preparation, you can whip up this crowd-pleaser in no time, leaving you free to enjoy the festivities with your loved ones.
Ingredients:
- 1 pound fresh or frozen green beans
- 1 can (10.5 oz) cream of mushroom soup
- ½ cup milk
- 1 teaspoon soy sauce
- 1 cup shredded cheddar cheese
- 1 can (6 oz) French fried onions
- Salt and pepper to taste
Instructions:
Preheat your oven to 350°F (175°C). In a large pot of boiling salted water, blanch the green beans for about 5 minutes until they are bright green and tender-crisp. Drain and rinse under cold water to stop the cooking process. In a mixing bowl, combine the cream of mushroom soup, milk, soy sauce, and half of the French fried onions. Stir in the blanched green beans and half of the shredded cheddar cheese. Season with salt and pepper to taste, then transfer the mixture to a greased baking dish. Bake in the preheated oven for 25 minutes, then remove and sprinkle the remaining cheddar cheese and French fried onions on top. Return to the oven and bake for an additional 10-15 minutes until the cheese is melted and bubbly and the onions are golden brown.
Extra Tips:
For an added depth of flavor, consider sautéing some minced garlic or onions in butter before adding the mushroom soup mixture. You can also customize the dish by adding cooked bacon bits or sautéed mushrooms for extra texture. If you prefer a lighter version, substitute the cream of mushroom soup with a homemade mushroom sauce or a low-fat alternative. Be sure to let the casserole sit for a few minutes before serving; this will allow it to set and make serving easier.
Sweet Potato Casserole With Marshmallows
When it comes to holiday gatherings, sweet potato casserole with marshmallows is a quintessential dish that brings warmth and comfort to the table. This delightful side dish combines the natural sweetness of sweet potatoes with the rich, gooey goodness of marshmallows, creating a perfect balance of flavors. Its creamy texture and crunchy topping make it a favorite among both kids and adults, ensuring that it will be a hit at your Christmas dinner.
Making this sweet potato casserole is a wonderful way to incorporate seasonal ingredients into your holiday feast. The vibrant orange hue of the sweet potatoes is not only visually appealing but also packed with nutrients, making this dish a deliciously wholesome addition to your spread. With a few simple ingredients and steps, you can create a comforting casserole that will surely become a family tradition for years to come.
Ingredients:
- 4 medium sweet potatoes
- 1/2 cup brown sugar
- 1/4 cup milk
- 1/4 cup unsalted butter, melted
- 1 teaspoon vanilla extract
- 1/2 teaspoon cinnamon
- 1/4 teaspoon nutmeg
- 1/4 teaspoon salt
- 2 cups mini marshmallows
Instructions:
Start by preheating your oven to 350°F (175°C). Peel and chop the sweet potatoes into chunks, then boil them in a large pot of water until tender, about 15-20 minutes. Drain the sweet potatoes and transfer them to a mixing bowl. Mash the sweet potatoes until smooth, then stir in the brown sugar, milk, melted butter, vanilla extract, cinnamon, nutmeg, and salt until well combined. Pour the sweet potato mixture into a greased 9×13-inch baking dish and spread it evenly. Top the casserole with mini marshmallows and bake in the preheated oven for 25-30 minutes, or until the marshmallows are golden brown and toasted.
Extra Tips:
For an added layer of flavor, consider incorporating chopped pecans or walnuts into the sweet potato mixture before baking, which will give the dish a delightful crunch. If you prefer a more caramelized topping, broil the marshmallows for a few minutes at the end of baking, but keep a close eye on them to prevent burning. Additionally, this casserole can be prepared ahead of time and stored in the refrigerator before baking; just add a few extra minutes to the baking time if it’s coming straight from the fridge. Enjoy this festive delight as part of your Christmas dinner!
Homemade Cranberry Sauce
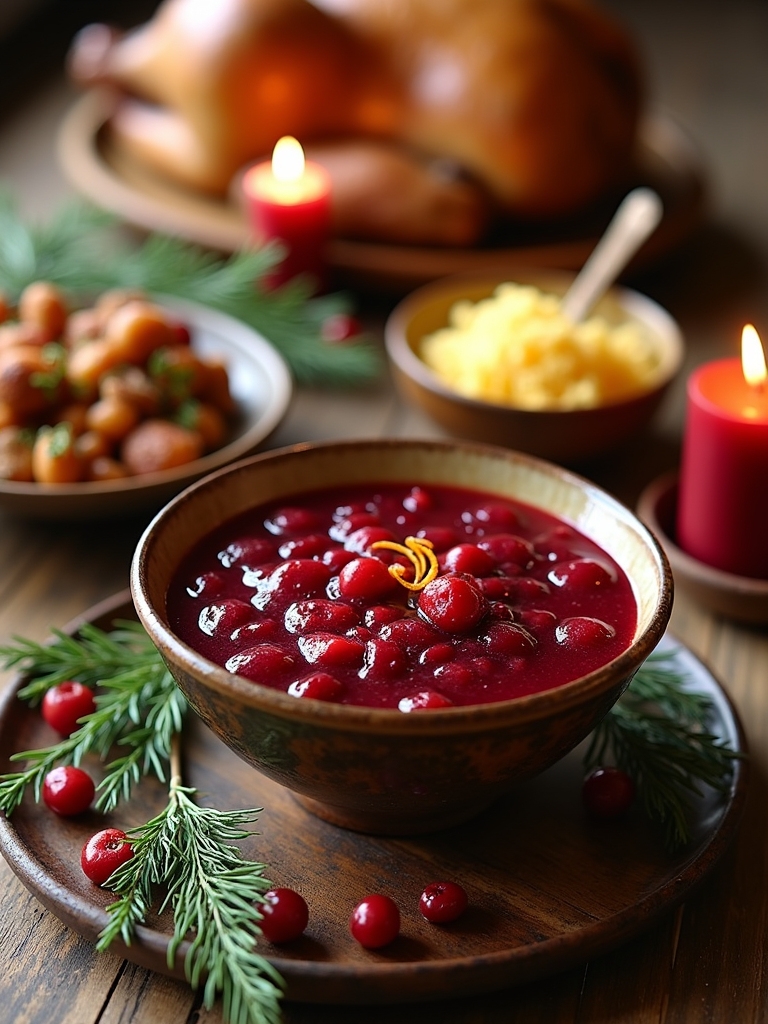
Homemade cranberry sauce is a quintessential part of any holiday feast, and there’s nothing quite like the vibrant, tart flavor of fresh cranberries to complement your Christmas dinner. This simple recipe allows you to create a deliciously tangy sauce that pairs perfectly with turkey, ham, or even as a spread for sandwiches the next day. Making your own cranberry sauce not only guarantees that it’s fresh and flavorful, but it also allows you to adjust the sweetness to your taste, making it a customizable addition to your holiday table.
Preparing homemade cranberry sauce is a straightforward process that requires minimal ingredients and time. The bright color and delightful aroma of simmering cranberries will fill your kitchen, creating a festive atmosphere. Once you’ve mastered this quick and easy recipe, you’ll find yourself wanting to prepare it not just for the holidays, but throughout the year as well.
Preparing homemade cranberry sauce is effortless and brings a festive aroma to your kitchen, making it a dish you’ll crave year-round.
Ingredients:
- 12 ounces fresh cranberries
- 1 cup granulated sugar
- 1 cup water
- 1 orange (zested and juiced)
- 1/2 teaspoon ground cinnamon (optional)
- 1/4 teaspoon salt
Cooking Instructions:
In a medium saucepan, combine the water, sugar, and orange juice over medium heat. Stir until the sugar dissolves, then add the fresh cranberries, orange zest, cinnamon (if using), and salt. Bring the mixture to a boil, then reduce the heat to a simmer. Cook for about 10-15 minutes, or until the cranberries burst and the sauce thickens. Remove from heat and let cool before transferring to a serving dish or storing in the refrigerator.
Extra Tips:
For a twist on the classic flavor, consider adding chopped nuts or dried fruits such as raisins or apricots to your cranberry sauce for added texture and sweetness. If you prefer a smoother sauce, you can blend the mixture using an immersion blender after it has cooled. Additionally, this cranberry sauce can be made a few days in advance and stored in the refrigerator, allowing the flavors to meld beautifully by the time you serve it at your Christmas dinner. Enjoy the burst of freshness with each bite!
Maple-Glazed Brussels Sprouts
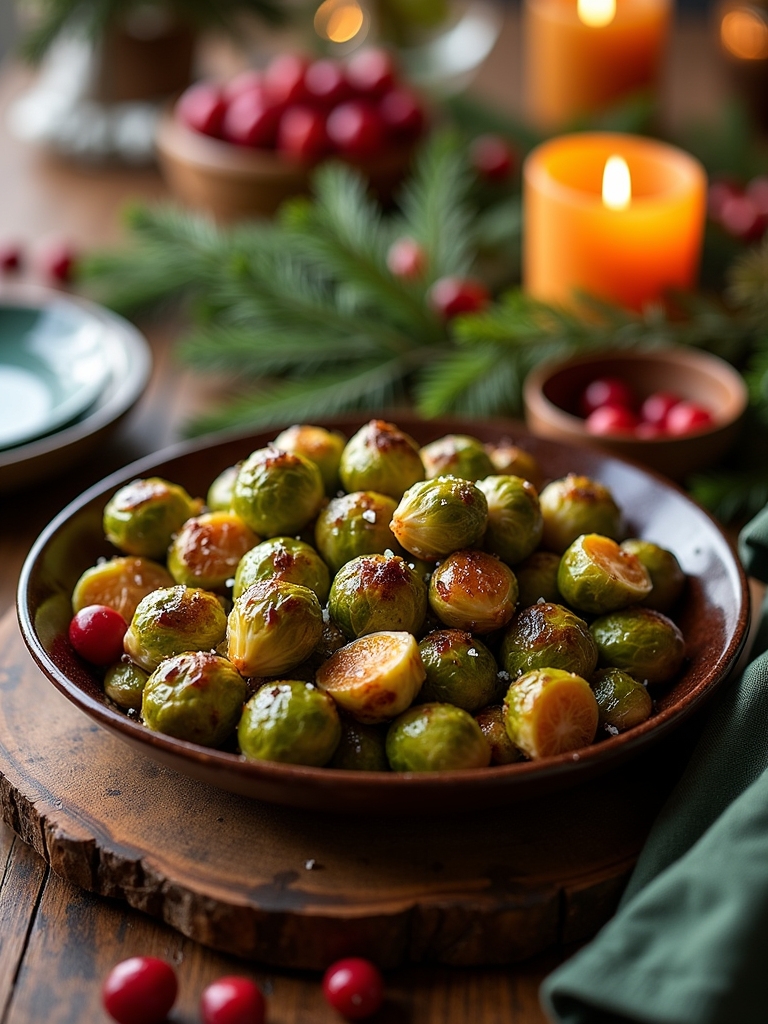
Maple-Glazed Brussels Sprouts are a delightful addition to your holiday table, combining the earthy flavor of Brussels sprouts with a sweet and sticky maple glaze. This dish not only elevates the taste of the Brussels sprouts but also adds a beautiful caramelized exterior that will impress your family and friends. Perfect for Christmas dinner, this recipe is simple enough for a weeknight meal yet elegant enough to grace any festive occasion.
To make the most of this seasonal vegetable, select fresh Brussels sprouts that are firm and vibrant green. The maple glaze adds a touch of sweetness that balances the slight bitterness of the sprouts, making it a dish that even skeptics of Brussels sprouts will enjoy. Serve these alongside your holiday roast, and watch them disappear from the serving dish in no time!
Ingredients:
- 1 ½ pounds Brussels sprouts, trimmed and halved
- 3 tablespoons olive oil
- Salt and pepper to taste
- ¼ cup pure maple syrup
- 2 tablespoons balsamic vinegar
- 1 teaspoon Dijon mustard
- ¼ cup chopped pecans (optional)
To cook Maple-Glazed Brussels Sprouts, preheat your oven to 400°F (200°C). In a large bowl, toss the halved Brussels sprouts with olive oil, salt, and pepper until evenly coated. Spread them in a single layer on a baking sheet and roast for about 20 minutes, or until they are golden brown and tender. Meanwhile, in a small saucepan, combine the maple syrup, balsamic vinegar, and Dijon mustard over medium heat, stirring until the mixture is warmed through and slightly thickened. Once the Brussels sprouts are done roasting, drizzle the maple glaze over them and toss to combine, adding the chopped pecans if desired. Return to the oven for an additional 5 minutes, allowing the glaze to caramelize slightly.
When making Maple-Glazed Brussels Sprouts, be sure not to overcrowd the baking sheet, as this can lead to steaming rather than roasting. If you have a large batch, consider using two sheets. For an added depth of flavor, you can experiment with different types of nuts or even a sprinkle of red pepper flakes for a hint of heat. Additionally, feel free to prepare the glaze ahead of time and store it in the refrigerator, warming it just before serving to save time on a busy holiday cooking day.
Cheesy Scalloped Potatoes
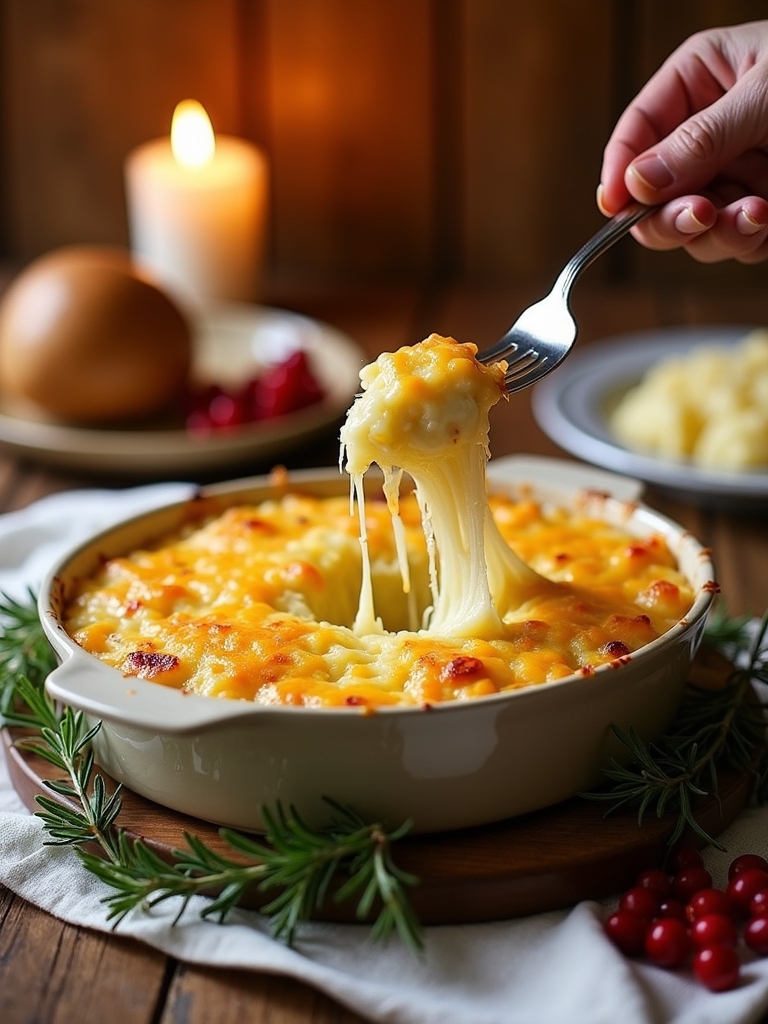
Cheesy scalloped potatoes are the ultimate comfort food that can elevate any holiday dinner, especially during Christmas. This rich and creamy dish features layers of thinly sliced potatoes smothered in a luscious cheese sauce, creating a warm and satisfying side that complements any main course. The irresistible combination of gooey cheese, savory garlic, and buttery potatoes makes it a favorite among family and friends during festive gatherings.
Cheesy scalloped potatoes are the quintessential holiday side dish, blending creamy layers of potatoes with gooey cheese for ultimate comfort.
To make the perfect cheesy scalloped potatoes, it’s important to choose the right type of potatoes. Starchy potatoes, like Russets, work best for achieving that ideal creamy texture, while a blend of cheeses can add depth and flavor to the dish. Whether you’re serving it alongside a roast or a holiday ham, this delightful recipe will surely become a staple at your Christmas dinner table.
Ingredients:
- 4 large Russet potatoes
- 2 cups shredded sharp cheddar cheese
- 1 cup heavy cream
- 1 cup whole milk
- 1 medium onion, finely chopped
- 3 cloves garlic, minced
- 4 tablespoons unsalted butter
- 1 teaspoon salt
- 1/2 teaspoon black pepper
- 1/2 teaspoon paprika
- Fresh parsley, chopped (for garnish)
Instructions:
Preheat your oven to 375°F (190°C). Peel and thinly slice the potatoes using a mandoline or sharp knife. In a large skillet, melt the butter over medium heat and sauté the chopped onion and minced garlic until softened, about 5 minutes. In a mixing bowl, combine the heavy cream, whole milk, salt, black pepper, and paprika. In a greased 9×13-inch baking dish, layer half of the sliced potatoes, followed by half of the sautéed onion and garlic mixture, and half of the cheese. Pour half of the cream mixture over the layers. Repeat the process with the remaining potatoes, onions, and cheese, then pour the rest of the cream mixture on top. Cover the dish with aluminum foil and bake for 45 minutes. Remove the foil and bake for an additional 30 minutes, or until the potatoes are tender and the top is golden and bubbling.
Extra Tips:
For an even more flavorful dish, consider adding cooked bacon or ham between the layers for a smoky twist. You can also experiment with different types of cheese such as Gruyère or Monterey Jack to create a unique flavor profile. If you’re preparing this dish in advance, you can assemble the scalloped potatoes the day before and refrigerate them. Just be sure to increase the baking time slightly if they go into the oven cold. Finally, let the dish sit for about 10 minutes after removing it from the oven to allow the sauce to thicken before serving. Enjoy your delicious cheesy scalloped potatoes!
Fluffy Dinner Rolls
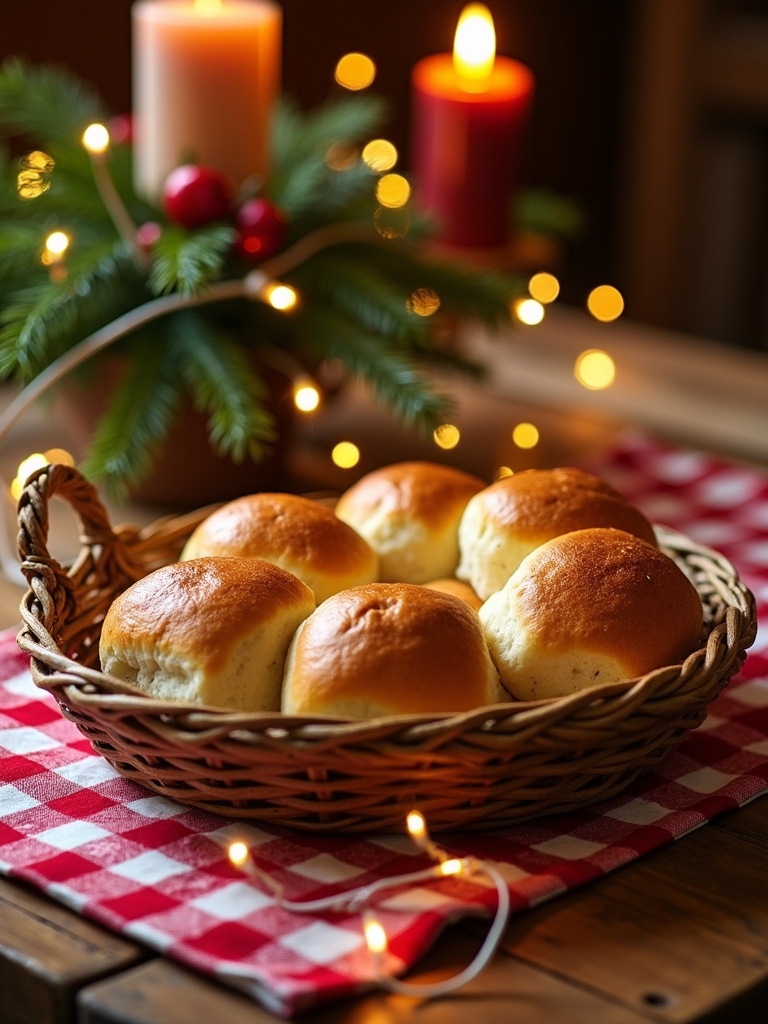
When it comes to holiday gatherings, fluffy dinner rolls can be the star of the show, elevating any meal with their light, airy texture and buttery flavor. These rolls are perfect for sopping up gravies, sauces, or just enjoyed warm with a pat of butter. Making them from scratch might seem intimidating, but with a little patience and practice, you’ll be rewarded with a delightful addition to your Christmas dinner spread.
To achieve the perfect fluffy dinner rolls, it’s vital to use the right ingredients and allow enough time for the dough to rise properly. The key lies in the yeast—using fresh, active yeast guarantees that your rolls will be light and fluffy. Don’t rush the rising process; giving the dough enough time to double in size is essential for achieving that pillowy texture everyone loves.
Ingredients:
- 4 cups all-purpose flour
- 1 packet (2 ¼ teaspoons) active dry yeast
- 1 cup milk (warm)
- 1/4 cup granulated sugar
- 1/4 cup unsalted butter (melted)
- 2 large eggs
- 1 teaspoon salt
To make the fluffy dinner rolls, begin by warming the milk in a small saucepan until it’s just warm to the touch (not boiling). In a large mixing bowl, combine the warm milk, sugar, and yeast, and let it sit for about 5 minutes until it becomes frothy. Next, mix in the melted butter, eggs, and salt. Gradually add the flour, one cup at a time, mixing until a soft dough forms. Knead the dough on a floured surface for about 5-7 minutes until it’s smooth and elastic. Place the dough in a greased bowl, cover it with a kitchen towel, and let it rise in a warm place for about 1 hour or until it has doubled in size. Once risen, punch down the dough, divide it into 12 equal portions, and shape each piece into a ball. Place the rolls in a greased baking dish, cover, and let them rise again for about 30 minutes. Preheat the oven to 375°F (190°C) and bake the rolls for 15-20 minutes or until they are golden brown. Brush with melted butter before serving.
For the best results, make certain your ingredients are at room temperature, especially the eggs and butter. If you live in a cooler climate, you can create a warm environment for rising by turning your oven on for a minute then turning it off, allowing the dough to rise in the warm, turned-off oven. Additionally, for an extra touch of flavor, consider adding herbs or garlic powder to the dough. If you’re preparing ahead of time, these rolls can be shaped and placed in the baking dish, then covered and refrigerated overnight. Just allow them to rise for an hour before baking. Enjoy your fluffy dinner rolls alongside your festive feast!
Cornbread Stuffing With Sausage
Cornbread stuffing with sausage is a delightful addition to your holiday table, bringing warmth and comfort to your Christmas dinner. This dish combines the rich flavors of savory sausage with the sweet, crumbly texture of cornbread, creating a stuffing that is both hearty and satisfying. It pairs wonderfully with roasted turkey or ham, making it a versatile side that will please any crowd.
Preparing cornbread stuffing from scratch is easier than you might think. You’ll start by making a simple cornbread base, which can be baked ahead of time and stored until you’re ready to assemble the stuffing. The key to this recipe is to use high-quality sausage and fresh herbs, which will elevate the dish and fill your kitchen with mouthwatering aromas as it bakes.
Ingredients:
- 4 cups cornbread, crumbled
- 1 pound breakfast sausage
- 1 cup onion, chopped
- 1 cup celery, chopped
- 2 cloves garlic, minced
- 1 teaspoon dried sage
- 1 teaspoon dried thyme
- 1/2 teaspoon black pepper
- 1 cup chicken broth
- 2 large eggs, beaten
- 1/4 cup fresh parsley, chopped
- Salt to taste
Cooking Instructions:
In a large skillet over medium heat, cook the breakfast sausage until browned and fully cooked. Remove the sausage from the skillet and set aside, leaving the drippings in the pan. Add the chopped onion, celery, and minced garlic to the skillet, sautéing until the vegetables are soft and translucent. In a large bowl, combine the crumbled cornbread, cooked sausage, sautéed vegetables, dried herbs, black pepper, and salt. Pour in the chicken broth and beaten eggs, mixing until everything is well combined. Fold in the fresh parsley, and then transfer the stuffing mixture to a greased baking dish. Bake in a preheated oven at 350°F (175°C) for about 30-35 minutes, or until the top is golden and crispy.
Extra Tips:
To enhance the flavor of your cornbread stuffing, consider adding chopped apples or dried cranberries for a hint of sweetness. If you enjoy a little heat, a dash of red pepper flakes can give the dish a nice kick. Make sure to let your cornbread cool before crumbling it, as this will help achieve the perfect texture for the stuffing. Additionally, if you’re preparing this dish ahead of time, you can assemble it the day before and refrigerate it until you’re ready to bake, making your holiday meal prep a breeze!
Pumpkin Pie
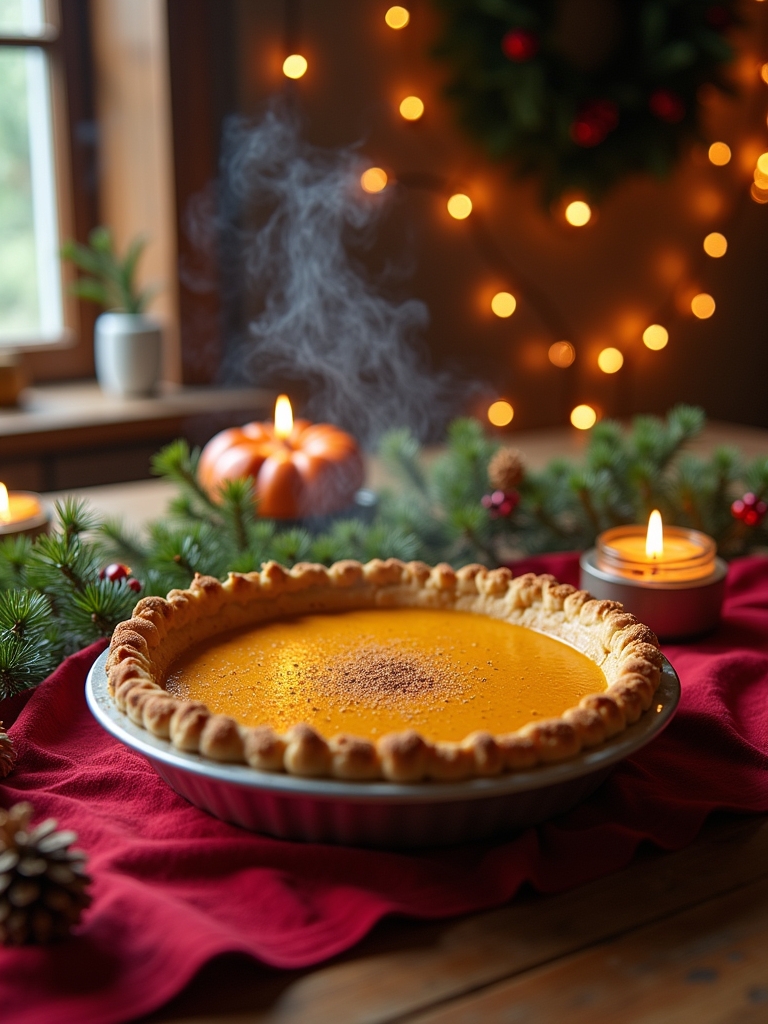
Pumpkin pie is a classic dessert that brings warmth and comfort to any holiday table, particularly at Christmas. Its smooth, spiced filling paired with a flaky crust creates a delightful harmony of flavors that is sure to please your family and friends. This recipe captures the essence of fall with the use of pure pumpkin puree, warming spices, and a hint of sweetness, making it the perfect end to your festive meal.
As you prepare to bake this delicious pumpkin pie, consider the importance of using fresh ingredients. While canned pumpkin can be a convenient option, roasting and pureeing your own pumpkin can elevate the flavor and texture of your pie. Additionally, the spices used can be adjusted to suit your personal preferences, allowing you to create a unique twist on this traditional dessert. Gather your ingredients and get ready to enjoy the wonderful aroma that will fill your kitchen while your pie bakes!
Ingredients:
- 1 unbaked pie crust (store-bought or homemade)
- 1 can (15 ounces) pumpkin puree
- 1 cup heavy cream
- 3/4 cup brown sugar
- 1/2 cup granulated sugar
- 3 large eggs
- 2 teaspoons ground cinnamon
- 1 teaspoon ground ginger
- 1/2 teaspoon ground nutmeg
- 1/4 teaspoon ground cloves
- 1/4 teaspoon salt
- 1 teaspoon vanilla extract
To make the pumpkin pie, preheat your oven to 425°F (220°C). In a large mixing bowl, combine the pumpkin puree, heavy cream, brown sugar, granulated sugar, and eggs. Whisk until the mixture is smooth and well combined. Add the cinnamon, ginger, nutmeg, cloves, salt, and vanilla extract; whisk again until everything is evenly incorporated. Pour the filling into the unbaked pie crust and carefully transfer it to the preheated oven. Bake for 15 minutes, then reduce the temperature to 350°F (175°C) and continue baking for an additional 35-40 minutes, or until the filling is set and a toothpick inserted in the center comes out clean. Allow the pie to cool before serving.
When making pumpkin pie, it’s essential to let it cool completely before slicing, as this will help the filling set properly and prevent it from being too runny. For an extra touch, consider topping each slice with whipped cream or a sprinkle of cinnamon before serving. If you have leftovers, store the pie in the refrigerator, and it will keep well for several days. Enjoy your homemade pumpkin pie as a delicious conclusion to your Christmas dinner!
Pecan Pie
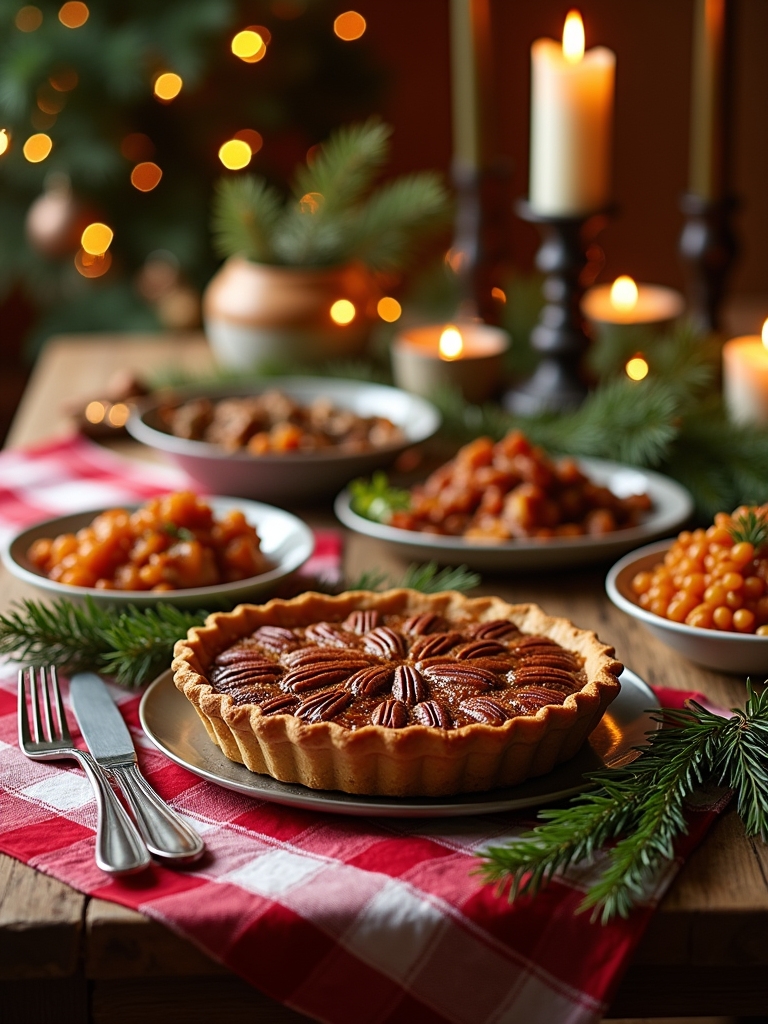
Pecan pie is a beloved classic that graces many holiday tables, especially during Christmas. Its rich, gooey filling and crunchy pecans create a perfect balance of textures and flavors that can satisfy any sweet tooth. This dessert is not only delicious but also straightforward to prepare, making it a favorite for both novice and seasoned bakers alike. Whether served with a dollop of whipped cream or a scoop of vanilla ice cream, pecan pie is sure to be a hit at your festive gathering.
Pecan pie is a holiday favorite, blending rich, gooey filling with crunchy pecans for a delightful treat.
Creating the perfect pecan pie involves a few simple ingredients and steps that yield outstanding results. The combination of dark corn syrup, sugar, and eggs forms the rich filling, while the toasted pecans add that signature crunch and nutty flavor. With an easy-to-make pie crust or a store-bought option, this pie can be assembled in no time, leaving you more moments to enjoy with family and friends during the holiday season.
Ingredients:
- 1 unbaked pie crust
- 1 cup dark corn syrup
- 1 cup granulated sugar
- 4 large eggs
- 1/4 cup unsalted butter, melted
- 1 teaspoon vanilla extract
- 1 1/2 cups pecan halves
- Pinch of salt
Instructions:
Preheat your oven to 350°F (175°C). In a large mixing bowl, combine the dark corn syrup, granulated sugar, and melted butter, whisking until smooth. Add in the eggs one at a time, mixing well after each addition. Stir in the vanilla extract and a pinch of salt. Fold the pecan halves into the mixture, making sure they are evenly distributed. Pour the filling into the unbaked pie crust and bake for 60-70 minutes, or until the filling is set and slightly puffed. Allow the pie to cool completely before slicing.
Extra Tips:
When making pecan pie, make certain to toast your pecans lightly before adding them to the filling; this enhances their flavor considerably. Additionally, if you find the edges of the pie crust browning too quickly, cover them with foil to prevent burning. For a unique twist, consider adding a splash of bourbon or a pinch of cinnamon to the filling for extra depth. Finally, the pie can be made a day in advance; just make sure you store it in the refrigerator and bring it to room temperature before serving for the best texture. Enjoy your festive treat!
Chocolate Sheet Cake
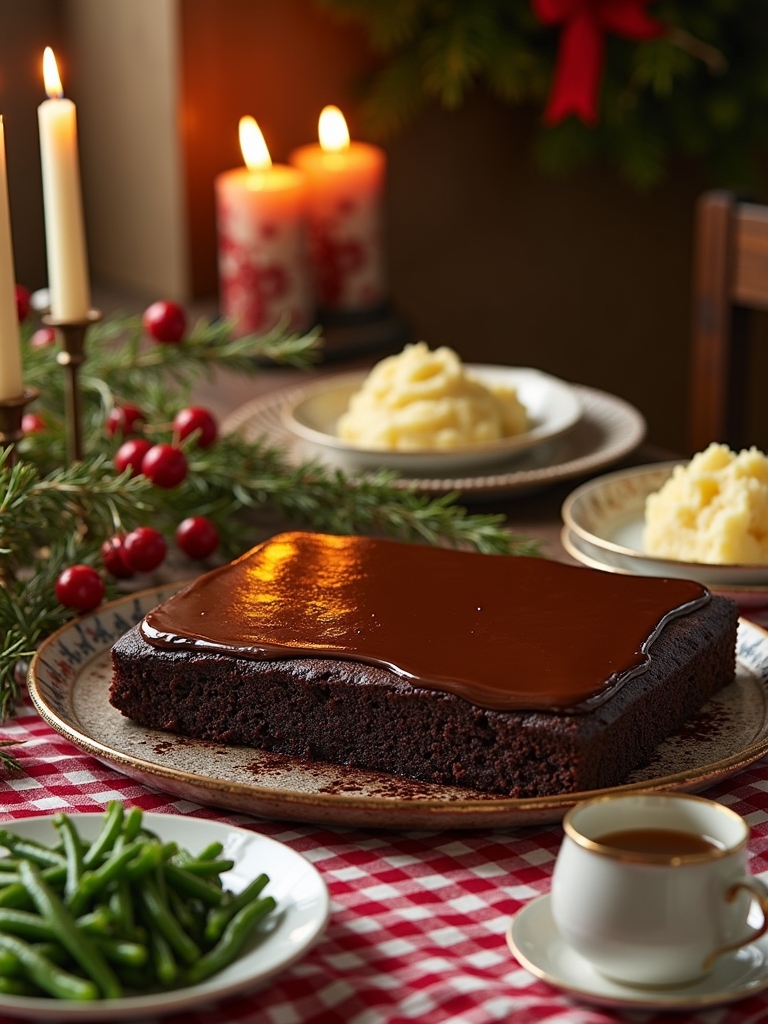
Chocolate Sheet Cake is a delectable dessert that perfectly captures the essence of holiday celebrations. This rich, moist cake is topped with a creamy chocolate frosting that will satisfy any sweet tooth. The simplicity of the recipe makes it an ideal choice for gatherings, allowing you to whip up a crowd-pleaser without spending hours in the kitchen. Whether you’re celebrating Christmas or simply indulging in a cozy winter evening, this cake is sure to impress family and friends alike.
To make the Chocolate Sheet Cake even more special, consider adding festive toppings such as crushed peppermint candies or a sprinkle of powdered sugar for a wintery touch. The cake can be served warm or at room temperature, and its easy-to-slice nature makes it perfect for parties. Pair it with a scoop of vanilla ice cream or a dollop of whipped cream for an extra indulgent treat that everyone will love.
Ingredients:
- 2 cups all-purpose flour
- 2 cups granulated sugar
- 1/2 cup unsweetened cocoa powder
- 1 1/2 teaspoons baking soda
- 1 teaspoon baking powder
- 1 teaspoon salt
- 1 cup buttermilk
- 1 cup vegetable oil
- 2 large eggs
- 2 teaspoons vanilla extract
- 1 cup boiling water
Cooking Instructions:
Preheat your oven to 350°F (175°C) and grease a large sheet pan (approximately 18×13 inches). In a large mixing bowl, combine the flour, sugar, cocoa powder, baking soda, baking powder, and salt. In a separate bowl, whisk together the buttermilk, vegetable oil, eggs, and vanilla extract. Gradually add the wet ingredients to the dry ingredients, mixing until just combined. Ultimately, stir in the boiling water until the batter is smooth. Pour the batter into the prepared sheet pan and bake for 30-35 minutes, or until a toothpick inserted into the center comes out clean. Allow the cake to cool completely before frosting.
Extra Tips:
When making Chocolate Sheet Cake, using room temperature ingredients helps create a smoother batter and guarantees even baking. For an extra touch of flavor, you can add a teaspoon of instant coffee to the boiling water, which enhances the chocolate taste without making the cake taste like coffee. Don’t forget to let the cake cool completely before frosting; this prevents the frosting from melting and sliding off. Finally, if you’re looking to make the cake ahead of time, it stores well in an airtight container for up to three days, making it a convenient option for holiday gatherings.
Eggnog Cookies
Eggnog cookies are a delightful holiday treat that perfectly encapsulates the festive spirit of Christmas. With their rich, creamy flavor and soft, cake-like texture, these cookies evoke the warmth of cozy evenings spent by the fire with loved ones. The addition of nutmeg and vanilla enhances the traditional eggnog flavor, making them a perfect companion to a glass of your favorite holiday beverage. Whether served at a holiday gathering or enjoyed as a sweet snack, these cookies are sure to become a seasonal favorite.
Baking eggnog cookies is a simple and enjoyable process, making them an excellent choice for both novice and experienced bakers. The dough comes together quickly, and the cookies can be decorated with a dusting of powdered sugar or a simple icing glaze for an extra festive touch. Your family and friends will appreciate the unique flavor and the holiday cheer these cookies bring to the table. So, gather your ingredients, roll up your sleeves, and let’s get baking!
Ingredients:
- 2 ½ cups all-purpose flour
- 1 teaspoon baking powder
- ½ teaspoon baking soda
- ½ teaspoon ground nutmeg
- ½ teaspoon ground cinnamon
- 1 cup unsalted butter, softened
- 1 cup granulated sugar
- 1 large egg
- 1 cup eggnog
- 1 teaspoon vanilla extract
- 1 cup powdered sugar (for icing)
- 2 tablespoons milk (for icing)
Instructions:
Preheat your oven to 350°F (175°C) and line two baking sheets with parchment paper. In a medium bowl, whisk together the flour, baking powder, baking soda, nutmeg, and cinnamon. In a large bowl, cream the softened butter and granulated sugar until light and fluffy. Beat in the egg, eggnog, and vanilla extract until well combined. Gradually add the dry ingredients to the wet mixture, mixing until just incorporated. Drop tablespoons of dough onto the prepared baking sheets, spacing them about 2 inches apart. Bake for 12-15 minutes or until the edges are lightly golden. Allow the cookies to cool on the baking sheets for a few minutes before transferring them to wire racks to cool completely.
Extra Tips:
For an added touch of flavor, consider incorporating chocolate chips or crushed nuts into the dough. If you find the dough too sticky, chill it in the refrigerator for about 30 minutes before baking. This will make it easier to handle. When preparing the icing, adjust the milk quantity to achieve your desired consistency—thicker for drizzling or thinner for dipping. Finally, store the cookies in an airtight container at room temperature for up to a week, or freeze them for longer-lasting enjoyment.
Frequently Asked Questions
What Wine Pairs Best With Pioneer Woman’s Christmas Dinner Recipes?
I love choosing a bold Cabernet Sauvignon or a crisp Pinot Grigio for holiday pairings. Both wines elevate the flavors beautifully, making my wine selection feel innovative and special during festive gatherings with family and friends.
How Can I Make These Recipes Vegetarian-Friendly?
I’m excited to make these recipes vegetarian-friendly! I’ll use plant-based options like lentils, mushrooms, and tofu as delicious vegetarian substitutions. They’ll create hearty dishes that everyone will enjoy, proving that veggie meals can be innovative and satisfying!
Can I Prepare These Dishes Ahead of Time?
I love using make ahead options. You can prep many dishes in advance, and freezing tips help maintain freshness. Just guarantee you store them properly, so they taste delicious when you’re ready to serve!
What Alternative Ingredients Can I Use for Allergies?
I often use allergy substitutions like almond milk for dairy or gluten-free flour instead of regular flour. These cooking tips help create delicious meals while accommodating specific dietary needs without sacrificing flavor or creativity.
How Do I Store Leftovers From the Christmas Dinner?
I store leftovers in airtight containers for ideal freshness. Label them with dates for easy meal prep later. I love experimenting with new recipes to transform those leftovers into delicious, innovative dishes that surprise everyone!
Conclusion
As you gather around the table this holiday season, remember that sharing a meal can create lasting memories. Did you know that 83% of families believe that cooking together strengthens their bonds? So, why not whip up one of these delicious Pioneer Woman recipes? Whether it’s the perfect roast beef or a slice of pumpkin pie, these dishes are sure to bring everyone together. Let’s make this Christmas dinner a feast filled with love and laughter!