

I’ve got a simple and nutritious dog cake recipe that’ll have your furry friend wagging its tail with excitement! You’ll use whole wheat flour, peanut butter, and applesauce to create a delightful treat. Just mix the dry and wet ingredients, bake it at 350°F for 25-30 minutes, and let it cool. You can even top it with fresh fruit or peanut butter for an extra special touch. Want to know more about the baking process and nutrition?
History
When I explore the history of dog cakes, I can’t help but smile at how these treats have evolved over time. Initially, dog baking was a simple affair, often involving basic ingredients like oats and meats, meant to satisfy our furry friends’ cravings. As pet nutrition gained importance, recipes transformed, embracing wholesome, nutritious ingredients that cater to dogs’ specific dietary needs. Innovations emerged, with bakers experimenting with flavors and textures, creating delightful options that not only look appealing but also promote health. Today, the dog cake is a symbol of celebration, reflecting the bond we share with our pets. It’s fascinating to see how these once-simple creations have turned into bespoke, gourmet delights that prioritize both joy and well-being for our beloved companions.
Recipe
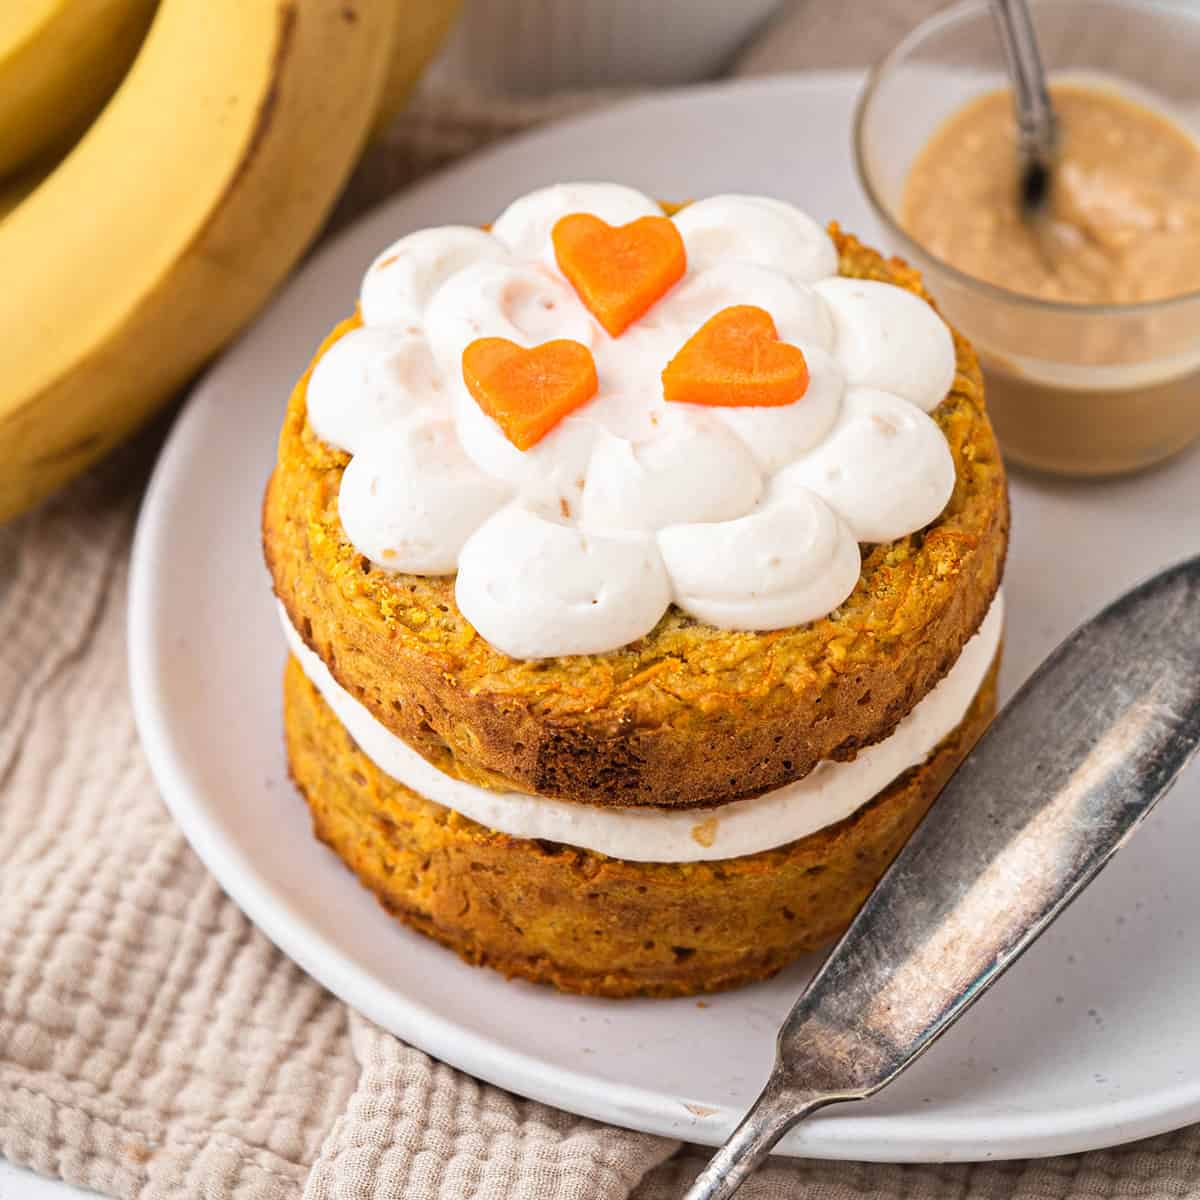
Making a cake for your furry friend can be a delightful experience that not only shows your love but also gives them a special treat to enjoy. This dog cake recipe is simple, nutritious, and sure to make your pup wag their tail in excitement! The ingredients are dog-friendly and can be easily found at your local grocery store. With a few simple steps, you can create a cake that is safe for your dog to eat and will have them begging for more.
This recipe features wholesome ingredients such as whole wheat flour, peanut butter, and applesauce, which are not only tasty for dogs but also provide some nutritional benefits. Ideal for birthdays, celebrations, or just because, this cake is a great way to treat your canine companion. Let’s get started on making a delicious dog cake that your pup will love!
Ingredients:
- 1 cup whole wheat flour
- 1/2 cup rolled oats
- 1/2 cup unsweetened applesauce
- 1/4 cup peanut butter (ensure it’s xylitol-free)
- 1/4 cup water
- 1 egg
- 1 teaspoon baking powder
Instructions:
Preheat your oven to 350°F (175°C) and grease a small cake pan. In a mixing bowl, combine the whole wheat flour, rolled oats, and baking powder. In another bowl, mix together the applesauce, peanut butter, water, and egg until well blended. Gradually add the dry ingredients to the wet mixture, stirring until everything is combined. Pour the batter into the prepared cake pan and bake for about 25-30 minutes or until a toothpick inserted in the center comes out clean. Allow the cake to cool completely before serving it to your dog.
Extra Tips:
When making the dog cake, it’s important to let it cool completely before giving it to your pet, as a warm cake might be too tempting and could lead to a quick gulp. You can also customize the cake by adding dog-friendly toppings like yogurt or a sprinkle of crushed dog treats for added flavor and texture. Always check that all ingredients are safe for dogs, especially when using any add-ins or decorations. Enjoy the celebration with your pup and remember to monitor their reaction to the cake for any potential allergies!
Cooking Steps
Now that we’ve gathered all our ingredients, it’s time to get cooking! First, I preheat the oven to 350°F, which sets the stage for a perfect bake. Then, I mix the dry ingredients thoroughly before adding the wet ingredients gradually, ensuring a smooth batter.
Step 1. Preheat Oven to 350°F
To kick off your dog cake baking adventure, preheating the oven to 350°F is vital. This temperature is perfect for achieving that delightful texture and moisture balance in your dog cake. When you set your oven settings, make sure it’s properly calibrated; an unreliable oven can ruin your masterpiece. I often recommend giving the oven a few extra minutes to reach the desired temperature, as this guarantees even baking. While waiting, take a moment to gather your ingredients and equipment, which keeps things organized and efficient. A hot oven is essential for the rising process, so don’t skip this step. Trust me, these baking tips will set you up for success, leading to a tail-wagging treat for your furry friend!
Step 2. Mix Dry Ingredients Thoroughly
Once you’ve gathered all your ingredients, it is essential to mix the dry components thoroughly before combining them with the wet ingredients. I recommend using a whisk or a sifter—these mixing techniques help guarantee that everything blends evenly and avoids any clumps. Pay close attention to the ingredient ratios; for example, the balance of flour to oats can greatly affect the cake’s texture. As you mix, envision how those ratios will work together to create a delightful cake for your pup. Don’t rush this step; taking the time to mix well can elevate your dog cake to a whole new level. Once you’re satisfied with the consistency, you’ll be ready to move on to the next exciting stage!
Step 3. Add Wet Ingredients Gradually
As you prepare to add the wet ingredients, keep in mind that doing this gradually is key to achieving a smooth batter. Start by measuring your wet ingredient ratios carefully; this guarantees your dog cake isn’t too runny or too thick. I recommend pouring in a small amount of liquid, then mixing it in thoroughly before adding more. This gradual mixing technique allows the dry ingredients to absorb the moisture evenly, preventing lumps. You’ll want to see a creamy consistency develop as you continue. Feel free to pause and scrape down the sides of your bowl to incorporate all ingredients effectively. By following this method, you’ll create a delightful batter that’s perfect for your furry friend’s special treat!
Step 4. Pour Batter Into Pans
With your batter now perfectly mixed and smooth, it’s time to pour it into the prepared pans. I recommend using a pair of 8-inch round cake pans for even baking and a delightful presentation. As I pour, I pay close attention to the batter consistency; it should flow easily but not be too runny. This guarantees that the cake rises beautifully and holds its shape. I like to use a spatula to scrape every last bit of that delicious mixture from the bowl, making sure it’s evenly distributed between the pans. Remember, the goal is to fill each pan to about two-thirds full, allowing room for the batter to rise. Your dog will adore this cake!
Step 5. Bake for 30 Minutes
Now that your batter is in the pans, it’s time to bake for 30 minutes. Preheat your oven to the right temperature before placing the pans inside; this guarantees even baking. Keep an eye on your dog cake as it bakes—every oven is a bit different. A great baking tip is to use a toothpick to check for doneness; if it comes out clean, your cake is ready. You can also explore cake variations by adding dog-friendly ingredients like pumpkin or peanut butter to the batter for extra flavor. Once the timer goes off, let the cakes cool in the pans for a few minutes before transferring them to a wire rack. Happy baking!
Nutritional Guide
While creating a delicious dog cake is exciting, it’s important to evaluate the nutritional needs of our furry friends. Understanding dog nutrition helps guarantee the ingredients we choose offer real benefits. Here’s a quick guide to some common ingredients and their benefits:
| Ingredient | Benefits |
|---|---|
| Peanut Butter | High in protein and healthy fats |
| Pumpkin | Great for digestion |
| Carrots | Rich in vitamins A and K |
| Oats | Good source of fiber |
| Eggs | Provides protein and essential amino acids |
Final Thoughts
As I reflect on the joy of baking a dog cake, I realize how rewarding it is to create something special for our furry companions. Not only does it bring them happiness, but it also promotes dog health when made with wholesome ingredients. Experimenting with different cake toppings can elevate the experience for both you and your pet.
Here are a few ideas to contemplate:
- Greek yogurt for a creamy, nutritious layer
- Carob chips as a chocolate alternative
- Fresh fruit for added flavor and vitamins
- Peanut butter for a rich, tasty finish
Baking a dog cake is an innovative way to celebrate your pet’s special moments, showing them just how much they mean to you.
Frequently Asked Questions
Can I Use Human Ingredients in a Dog Cake?
I often use human ingredients, but I make certain they’re dog safe. You can get creative with cake decoration tips like using yogurt or peanut butter. Always double-check for any harmful ingredients before baking!
How Long Can Dog Cake Be Stored?
Wondering how long your dog cake stays fresh? I’ve discovered dog cake storage can last up to five days in the fridge, but freezing it extends the freshness for months. Keep those tails wagging!
Are There Any Toxic Ingredients for Dogs?
I always check ingredients for my dog’s safety. Chocolate toxicity and harmful sweeteners like xylitol can seriously harm dogs. It’s essential to avoid these in any treats to keep our furry friends safe and healthy.
Can I Freeze the Dog Cake?
I’ve frozen dog cakes, transforming them into glorious frozen dog treats! For ideal dog cake storage, just wrap it tightly. Your pup will enjoy a delightful, icy surprise, perfect for warm days.
How Often Can I Give My Dog Cake?
I usually give my dog cake as an occasional treat, not too often. The benefits are great, but I mix in dog treat alternatives to keep it balanced and exciting for my furry friend.
Conclusion
To sum up, making a dog cake is like creating a special memory shared with your furry friend—it’s a delightful experience that strengthens your bond. As you whip up this tasty treat, remember that your dog’s happiness is worth every moment spent in the kitchen. With a little love and creativity, you can treat your pup to something truly special. So, grab your ingredients and start baking; your four-legged companion will thank you with wagging tails and joyful barks!
Dog Cake Recipe
Ingredients
Equipment
Method
- Preheat Oven – Preheat to 350°F (175°C). Lightly grease a small cake pan.
- Mix Dry Ingredients – In a bowl, whisk flour and baking powder.
- Combine Wet Ingredients – In another bowl, mix applesauce, peanut butter, coconut oil, egg, and water.
- Combine Mixtures – Gradually add dry ingredients to wet, stirring until smooth.
- Bake – Pour batter into the pan and bake for 20-25 minutes or until a toothpick comes out clean.
- Cool Completely – Let it cool before serving. Frost with dog-safe yogurt if desired.