

I’m excited to share my marble cake recipe, a delightful mix of rich chocolate and sweet vanilla that creates a stunning marbled design. To make it, you’ll need flour, sugar, butter, eggs, and cocoa powder, mixed with love and care. After swirling the batters together, bake until golden, and enjoy every bite. This cake is perfect for any occasion and appeals to all ages. Stick around, and you’ll discover more about flavor variations and presentation tips!
History
The history of marble cake is as rich and layered as the dessert itself. I find it fascinating how this delightful treat reflects the cultural significance of baking evolution. Originating in Europe, marble cake emerged during the 19th century when bakers sought innovative ways to combine flavors. The striking swirls of chocolate and vanilla not only look appealing but also symbolize the blending of different culinary traditions. As I dive deeper into its past, I can’t help but admire how this cake embodies creativity, inviting bakers to experiment with colors and tastes. From festive occasions to everyday celebrations, marble cake has stood the test of time, evolving while still holding onto its roots, making it a timeless favorite in kitchens around the world.
Recipe
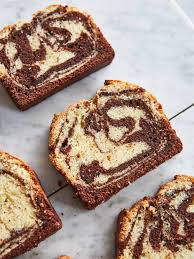
Marble cake is a delightful dessert that combines the rich flavors of chocolate and vanilla, creating a beautiful swirled pattern that is as pleasing to the eye as it is to the palate. This classic cake is perfect for any occasion, whether it’s a birthday party, a family gathering, or just a cozy afternoon treat with a cup of coffee or tea. The combination of textures and flavors makes it a favorite among both kids and adults alike.
To make a perfect marble cake, you’ll need to prepare a simple cake batter and then divide it into two halves—one for the chocolate flavor and one for the vanilla. By swirling the two batters together, you create a stunning effect that makes each slice a surprise. This recipe is straightforward and requires minimal ingredients, making it accessible for bakers of all skill levels. Let’s explore the ingredients and the cooking process to create this scrumptious marble cake.
Ingredients:
- 1 ¾ cups all-purpose flour
- 1 ½ teaspoons baking powder
- ½ teaspoon salt
- ½ cup unsalted butter, softened
- 1 cup granulated sugar
- 2 large eggs
- 1 teaspoon vanilla extract
- ¾ cup milk
- ¼ cup unsweetened cocoa powder
Instructions:
Preheat your oven to 350°F (175°C) and grease a 9-inch round cake pan. In a medium bowl, whisk together the flour, baking powder, and salt. In a separate large bowl, cream the softened butter and sugar until light and fluffy. Add the eggs one at a time, mixing well after each addition, followed by the vanilla extract. Gradually add the dry ingredients to the wet mixture, alternating with the milk, and mix until just combined. Divide the batter in half, adding cocoa powder to one half and mixing until fully incorporated. In the prepared cake pan, alternate spoonfuls of the vanilla and chocolate batters, then use a knife or skewer to swirl them together gently. Bake for 30-35 minutes, or until a toothpick inserted in the center comes out clean. Allow the cake to cool in the pan for 10 minutes before transferring it to a wire rack to cool completely.
Extra Tips:
For an even more decadent marble cake, consider adding chocolate chips to the chocolate batter or a sprinkle of powdered sugar on top once the cake has cooled. If you prefer a richer flavor, you can substitute buttermilk for milk in the recipe. Always make sure your ingredients are at room temperature for better incorporation, and don’t overmix the batter after adding the flour, as this can lead to a dense cake. For an added touch, serve your marble cake with a dollop of whipped cream or a scoop of vanilla ice cream!
Cooking Steps
Now that we have our ingredients ready, let’s get started with the cooking steps. First, I always preheat my oven to 350°F to guarantee even baking. Once that’s done, we’ll mix our chocolate and vanilla batters, creating a beautiful swirl that makes marble cake so irresistible.
Step 1. Preheat Oven to 350°F
To kick off this delightful marble cake, preheating your oven to 350°F is essential. The right oven temperature is vital for achieving that perfect rise and texture. As I prepare for baking, here are a few tips to make sure everything goes smoothly:
- Use an oven thermometer to verify accuracy.
- Avoid opening the oven door during baking for even heat distribution.
- Allow the oven to fully preheat before placing the batter inside.
- Position the oven rack in the center for ideal airflow.
Step 2. Mix Chocolate and Vanilla Batter
With the oven warmed up and ready, it’s time to whip up the chocolate and vanilla batters that will create the beautiful marbled effect in your cake. First, I combine the dry ingredients—flour, cocoa powder, baking powder, and salt—in one bowl. In another bowl, I mix the wet ingredients—sugar, eggs, and butter—until smooth. Next, I alternate adding the dry mixture and milk to achieve the perfect batter consistency for both flavors. The chocolate batter is rich and decadent, while the vanilla offers a light, airy touch, achieving a delightful flavor balance. Remember, the key is to keep both batters thick enough to hold their shape yet pourable for easy layering. Now, let’s get ready to swirl!
Step 3. Swirl Batters in Pan
As I prepare to swirl the batters in the pan, excitement builds knowing that this step will transform the simple layers into a stunning marble design. To achieve the perfect swirl, I focus on my batter distribution and employ a few creative swirl techniques:
- Alternate dollops: Drop alternating spoonfuls of chocolate and vanilla batter into the center of the pan.
- Use a skewer: With a skewer or knife, gently swirl the batters together, creating beautiful patterns.
- Don’t overmix: I make sure to keep some definition in the swirls for that eye-catching effect.
- Experiment: I often play with different swirling styles to make each cake unique.
This is where my cake starts to come alive!
Step 4. Bake for 30 Minutes
After swirling the batters to perfection, I place the pan in the preheated oven, setting the timer for 30 minutes. As the heat envelops the cake, I can already envision the beautiful marble pattern emerging. This is where the magic of baking techniques comes into play; the even heat distribution guarantees that both chocolate and vanilla flavors meld harmoniously. I often think about the cake variations I could explore next—perhaps adding a hint of espresso or a swirl of raspberry purée. While the cake bakes, I savor the rich aroma wafting through my kitchen, a tantalizing reminder of the delicious treat that awaits. It’s all about patience and creativity, and I can’t wait to see the final result!
Step 5. Cool Cake Before Serving
Once the timer dings, I carefully take the marble cake out of the oven, letting it rest in the pan for about ten minutes. This initial cooling is essential, as it allows the cake to firm up. After that, I gently flip it onto a wire rack to cool completely. Here are some cooling techniques I swear by:
- Use a wire rack: It promotes even cooling and prevents sogginess.
- Avoid drafts: A sudden temperature change can cause cracking.
- Cover loosely: If it’s warm, a light cover keeps moisture in without creating steam.
- Chill before serving: Pop it in the fridge for a firmer texture.
These serving tips guarantee my marble cake is delightful and ready for any gathering!
Nutritional Guide
When it comes to indulging in a delicious slice of marble cake, it’s important to reflect on the nutritional aspects. Understanding the caloric content can help you make informed choices while still enjoying this delightful treat. Plus, using ingredient alternatives can enhance the health benefits without sacrificing flavor. Here’s a quick nutritional guide to analyze:
| Ingredient | Standard (per slice) | Alternative (per slice) |
|---|---|---|
| Calories | 350 | 250 |
| Sugar (g) | 20 | 10 |
| Fat (g) | 15 | 7 |
| Protein (g) | 5 | 7 |
| Fiber (g) | 1 | 3 |
Final Thoughts
As I reflect on the delightful experience of enjoying a slice of marble cake, it’s clear that this beloved dessert holds a special place in our hearts and on our tables. Its marbled beauty captivates the eye, while the rich flavor combinations tantalize the taste buds.
Exploring cake variations can elevate your baking game, allowing for endless creativity. Here are a few ideas to inspire your next bake:
Elevate your baking with creative cake variations that inspire and delight every palate.
- Chocolate and Vanilla: The classic duo that never disappoints.
- Red Velvet and Cream Cheese: A bold, festive twist for special occasions.
- Lemon and Almond: A revitalizing combination for springtime gatherings.
- Spice and Pumpkin: Perfect for autumn celebrations.
Embrace your creativity, and let your marble cake journey begin!
Frequently Asked Questions
Can I Use Gluten-Free Flour for Marble Cake?
I’ve used gluten-free alternatives in my baking, and it works beautifully. Just remember to mix in a binding agent like xanthan gum. It enhances texture and keeps your cake moist and delicious. Happy baking!
How Should I Store Leftover Marble Cake?
Think of leftover cake as a treasure to preserve. I store mine in an airtight container, ensuring proper storage to maintain cake freshness. It keeps deliciously moist for days, ready to delight whenever I crave a slice.
Can I Freeze Marble Cake for Later?
Absolutely, I’ve frozen cake before! For texture preservation, wrap it tightly in plastic and foil. When you’re ready, let it thaw slowly in the fridge to maintain that delightful moisture. Trust me, it’s worth it!
What Are Some Popular Frosting Options for Marble Cake?
When I think of frosting options, chocolate ganache is a rich delight, while cream cheese adds a tangy twist. Both transform any cake into a decadent treat, making every bite an unforgettable experience.
How Can I Make a Dairy-Free Marble Cake?
If you want a dairy-free marble cake, I use almond milk as a dairy substitute and flaxseed or applesauce as egg alternatives. It creates a moist, flavorful cake that everyone can enjoy without compromise!
Conclusion
As I slice through the marbled layers of this cake, I’m reminded that life, like this recipe, is a beautiful blend of flavors and experiences. Each bite whispers stories of tradition and creativity, inviting us to savor the sweet and the bittersweet. Baking this marble cake isn’t just about the ingredients; it’s about crafting moments of joy and connection. So, let’s gather around the table, share our creations, and celebrate the delicious chaos of life together.
marble cake recipe
Ingredients
Equipment
Method
- Preheat oven to 350°F (175°C). Grease and line a loaf pan with parchment paper.
- In a bowl, whisk flour, baking powder, and salt. Set aside.
- Beat butter and sugar until light and fluffy (~3 mins). Add eggs (one at a time) and vanilla, mixing well.
- Alternately add dry ingredients and milk, starting and ending with flour. Mix until just combined.
- Take ⅓ of the batter in a separate bowl. Mix cocoa powder + hot water into it until smooth.
- Spoon vanilla and chocolate batters alternately into the pan. Swirl gently with a knife.
- Bake for 40-45 mins or until a toothpick comes out clean. Cool in pan for 10 mins, then transfer to a wire rack.
Notes
- Storage: Keep in an airtight container for up to 3 days or freeze for a month.
- Variations: Add orange zest or espresso powder for extra flavor.
- For cupcakes: Bake for 18-20 mins in a lined muffin tin.